Are you looking for expert small bathroom design tips that can genuinely transform a cramped, cluttered space into a stylish and highly functional retreat? It’s a universal challenge for homeowners, where the dream of a spa-like sanctuary often collides with the reality of a compact footprint.
A small bathroom can easily feel claustrophobic, making daily routines more stressful than serene. But what if the very limitations of your space could be the catalyst for exceptional creativity? The secret to unlocking a small bathroom’s potential lies not in wishing for more square footage, but in mastering the art of intelligent design.
By implementing proven visual tricks, space-saving fixtures, and strategic storage, you can craft a sanctuary that feels open, airy, and effortlessly luxurious.
As an interior designer, I’ve dedicated my career to helping clients turn their challenging powder rooms and tiny ensuites into showcases of efficiency and elegance. This guide will provide you with 21 actionable, expert-backed tips that go beyond simple decluttering.
We will delve into the psychology of color, the latest in space-saving technology, and the organic trends that connect our homes to nature, giving you a complete roadmap to create a visually expansive, clutter-free, and truly functional bathroom.
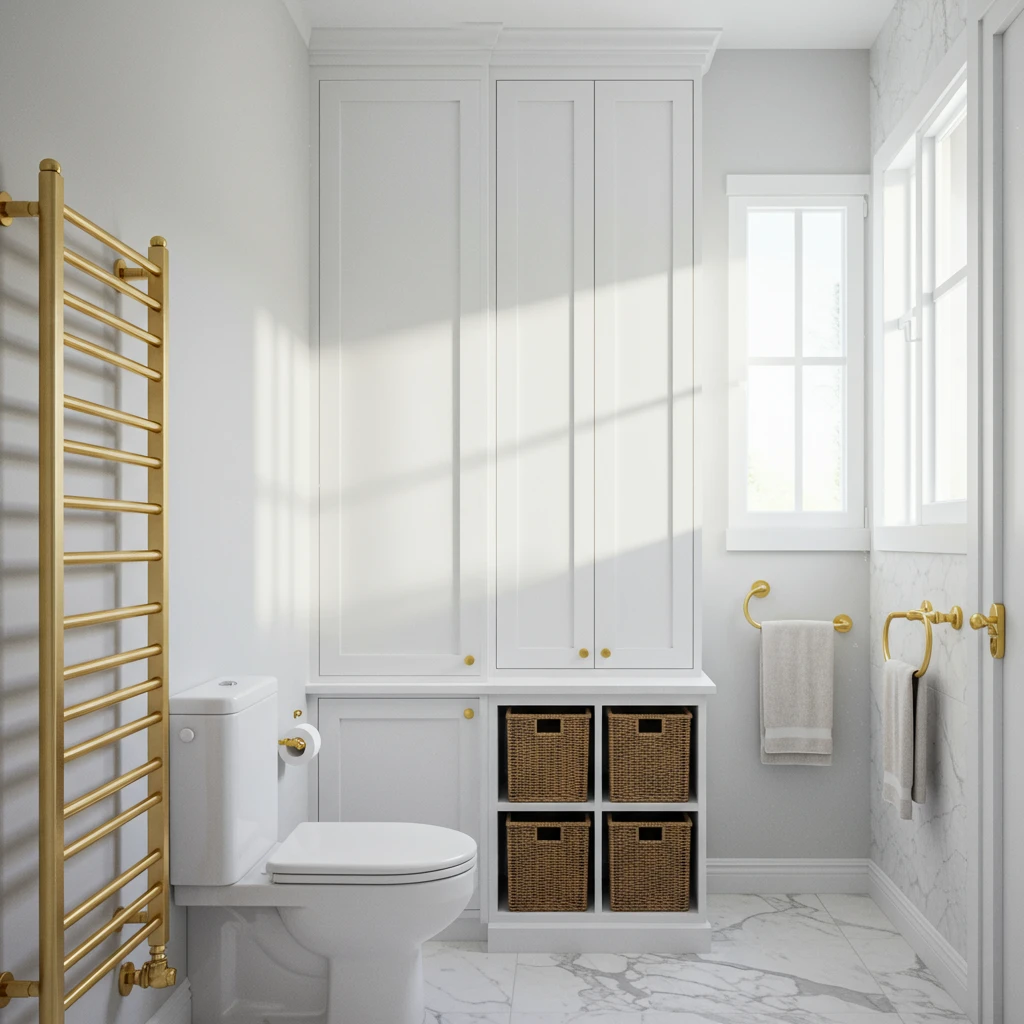
1. Maximize Verticality with Floor-to-Ceiling Solutions
In any room with a limited footprint, the most valuable and often underutilized real estate is the vertical space between your eye level and the ceiling. My first piece of advice is always to draw the eye upward. This powerful design principle creates an immediate illusion of height and volume, making a small bathroom feel far grander than its dimensions suggest.
Instead of opting for standard-height, bulky vanities that consume the floor, think vertically. Floor-to-ceiling cabinetry, tall and slender linen towers, or custom built-in shelving that ascends the wall can introduce immense storage capacity without encroaching on your precious walking area. This strategy is foundational because it allows you to keep the floor clear, a critical factor in enhancing the perception of space and creating a streamlined look.
I recently consulted on a project in a modern apartment complex where the ensuite bathroom was particularly narrow. We designed a custom built-in unit that elegantly wrapped around the toilet, featuring fluted glass doors on the upper cabinets a nod to 2025’s texture trend and concealed drawers below. We painted the entire unit in Sherwin-Williams’ “Urbane Bronze,” the same deep, warm neutral as the walls.
This tone-on-tone approach, a technique often highlighted by designers on HGTV, allowed the substantial unit to blend seamlessly, appearing as a sophisticated architectural feature rather than a heavy piece of furniture.
The open shelving at the center was perfect for displaying amber glass bottles and a small, trailing pothos plant, adding a touch of organic warmth and creating a beautiful focal point.
To implement this yourself, consider these options:
- Ladder Shelves: A leaning ladder-style shelf offers a light, airy aesthetic that doesn’t feel bulky. It’s perfect for holding woven baskets, folded towels, and small decorative objects.
- Tall Linen Towers: Look for freestanding, slender cabinets designed for compact spaces. A width of 12-15 inches can be surprisingly spacious.
- Custom Built-Ins: For a truly integrated and high-end look, a custom cabinet can be designed to fit your bathroom’s exact dimensions, turning awkward nooks into functional storage.
For an added touch of sophistication, integrate subtle LED strip lighting on the underside of your open shelves. This not only highlights your curated decor but also adds a layer of soft, ambient light, making the entire unit feel intentional and luxurious.
2. Embrace a Light and Monochromatic Color Palette
The psychological impact of color on our perception of space is immense, and in a small bathroom, it’s arguably your most powerful and cost-effective tool. Light colors such as soft whites, pale grays, warm beiges, and muted pastels are masters of illusion.
Their high light-reflective value (LRV) means they bounce light around the room rather than absorbing it. This simple act of reflection creates a bright, airy, and expansive atmosphere that can make even the most confined space feel significantly larger and more inviting.
A dark, heavily saturated color, in contrast, can absorb light and make the walls feel as if they are closing in, a sensation you want to avoid in a compact area.
When I kick off a small bathroom project, my primary goal is to establish a cohesive, light color foundation. This doesn’t mean the room has to be a sterile, all-white laboratory. The key is to create a seamless visual flow through a monochromatic scheme.
I often suggest using the same light color, or very similar tones, on the walls, ceiling, and even for the main tiles. This approach, frequently lauded by editors at House Beautiful, effectively erases the hard lines and corners of a room.
This visual trickery fools the eye into perceiving one continuous, unbroken surface, which reads as more spacious. You can introduce depth and prevent monotony by layering different textures within that same color family. For example, pair matte-finish walls with glossy subway tiles, a textured linen shower curtain, and a fluffy bath mat, all in complementary shades of off-white.
Your tile choice plays a crucial role in this strategy.
- Choose a High LRV Color: Opt for paint shades like Benjamin Moore’s “Chantilly Lace” for a pure, bright white, or Farrow & Ball’s “Elephant’s Breath” for a sophisticated warm gray.
- Select the Right Finish: Use an eggshell or satin finish for the walls. The subtle sheen will help reflect light far more effectively than a flat or matte finish.
- Layer Textures: Combine smooth, rough, glossy, and matte textures in similar light tones to add visual interest without introducing jarring contrast.
For a sophisticated enhancement, use a grout color that closely matches your tile. Contrasting grout creates a grid-like pattern that visually chops up the surfaces, while matched grout reinforces the seamless, expansive effect you’re aiming for.
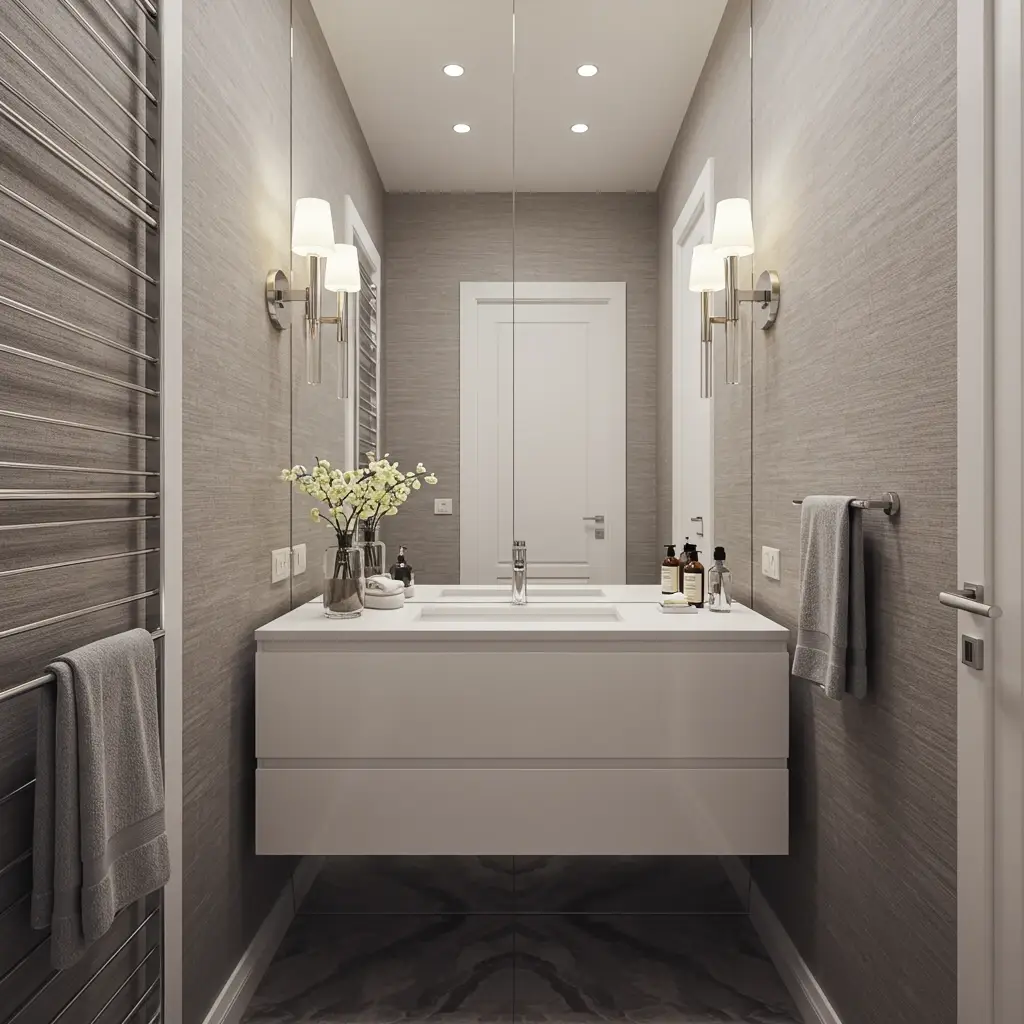
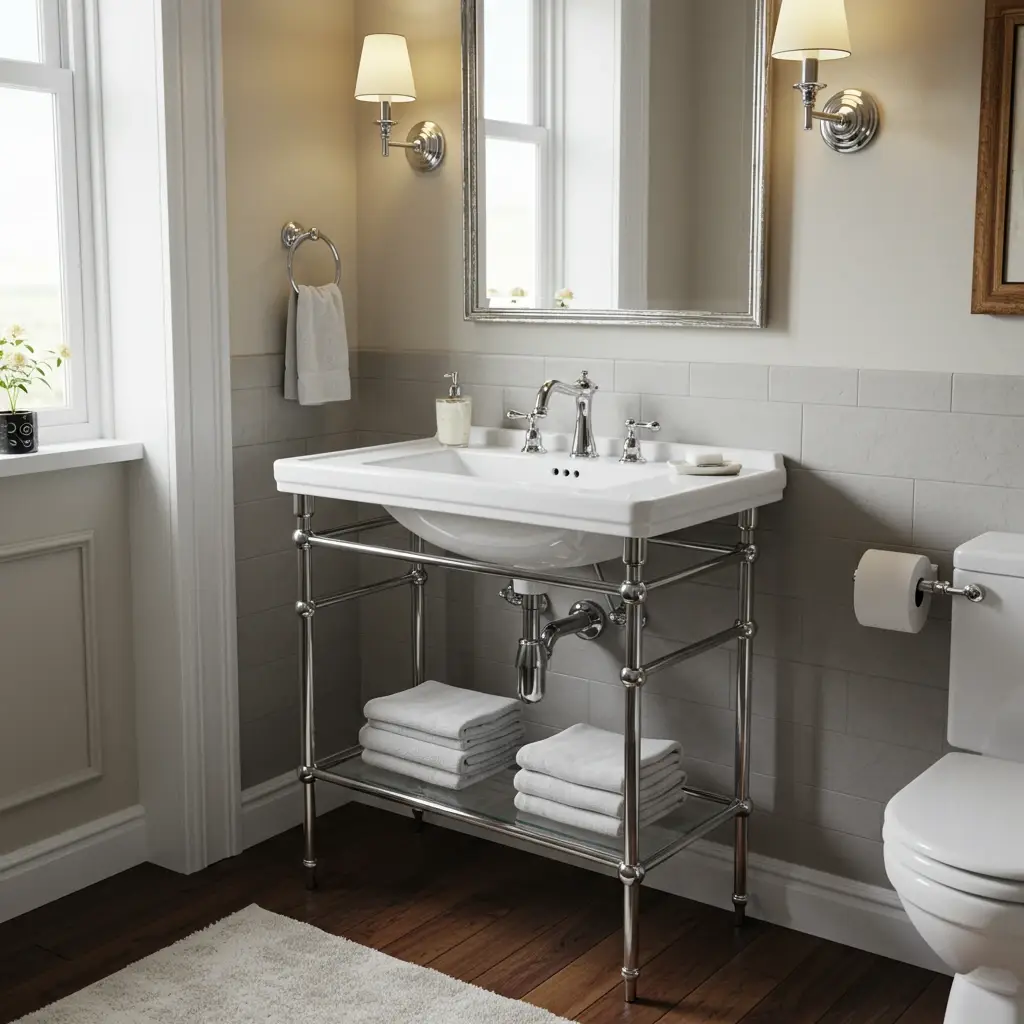
3. Install a Floating Vanity to Free Up Floor Space
A floating, or wall-mounted, vanity is one of my signature recommendations for a small bathroom. By lifting the cabinet off the floor, you create an unbroken sightline across the entire floor surface.
This simple visual trick immediately makes the room feel wider and more spacious. It works by reducing the “visual weight” of the furniture; instead of a heavy, solid block occupying the room, you have an elegant fixture that appears to hover effortlessly.
This not only enhances the sense of space but also contributes to a clean, modern, and minimalist aesthetic, a timeless trend that continues to dominate in 2025.
The benefits extend beyond just aesthetics. From a practical standpoint, a floating vanity makes cleaning the bathroom floor infinitely easier. There are no awkward corners or legs to navigate around, allowing you to sweep or mop the entire area with ease. In a recent project for a client who valued both style and low maintenance, we installed a sleek, single-drawer floating vanity with an integrated sink.
We then installed motion-activated LED lighting underneath it. This not only looked stunning but also served as a perfect, soft nightlight. Entities like Dwell and Dezeen frequently feature floating vanities in high-end, compact architectural projects for this very reason they are the epitome of form meeting function.
When selecting a floating vanity, consider the following:
- Size and Proportion: Choose a vanity that is proportional to your space. A model that is too deep can impede traffic flow. Look for “slim-depth” models that are under 18 inches deep.
- Storage Needs: Many floating vanities come with deep, spacious drawers that are surprisingly effective for organizing toiletries.
- Sink Style: An integrated sink (where the countertop and sink are one seamless piece) enhances the minimalist look. A vessel sink on top can add a sculptural element.
To further elevate this design, pair the floating vanity with a wall-mounted faucet. This frees up the entire countertop surface around the sink, reinforcing that clean, uncluttered, and spacious feeling.
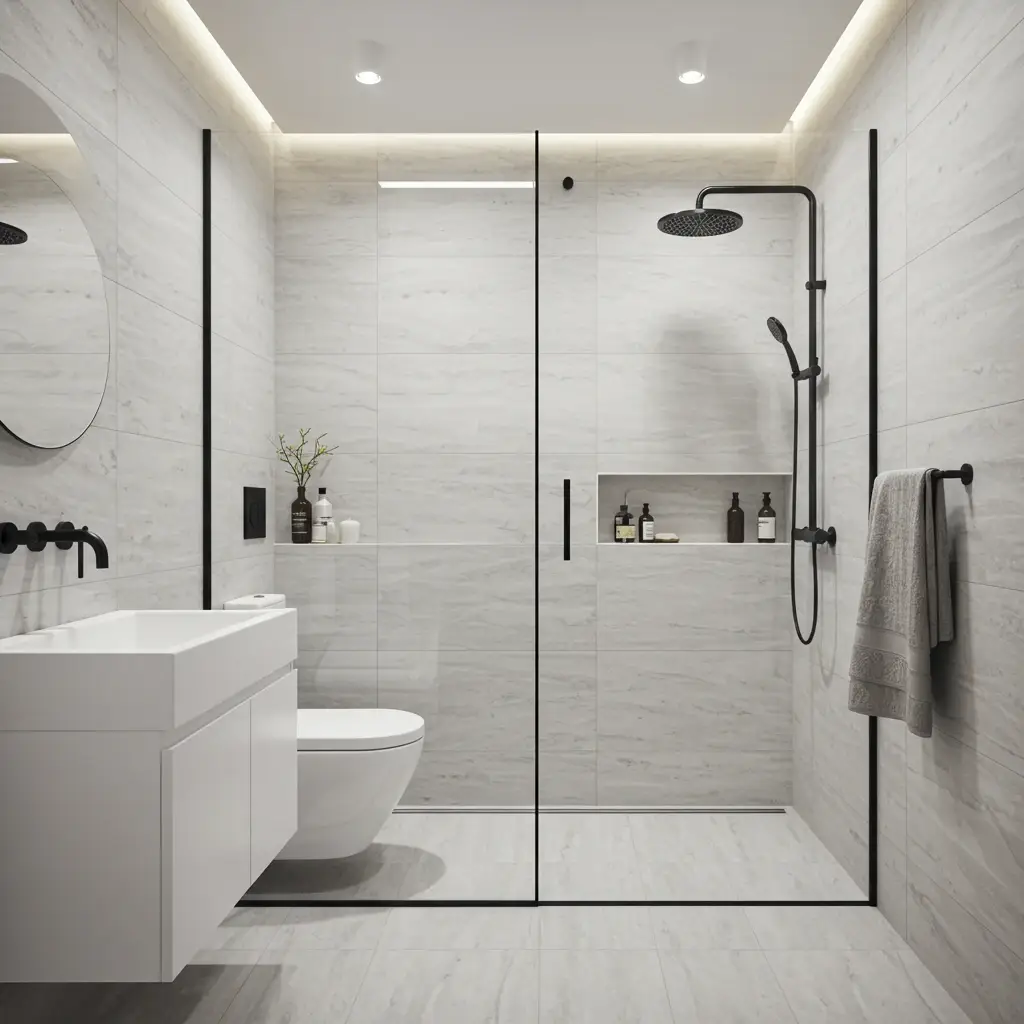
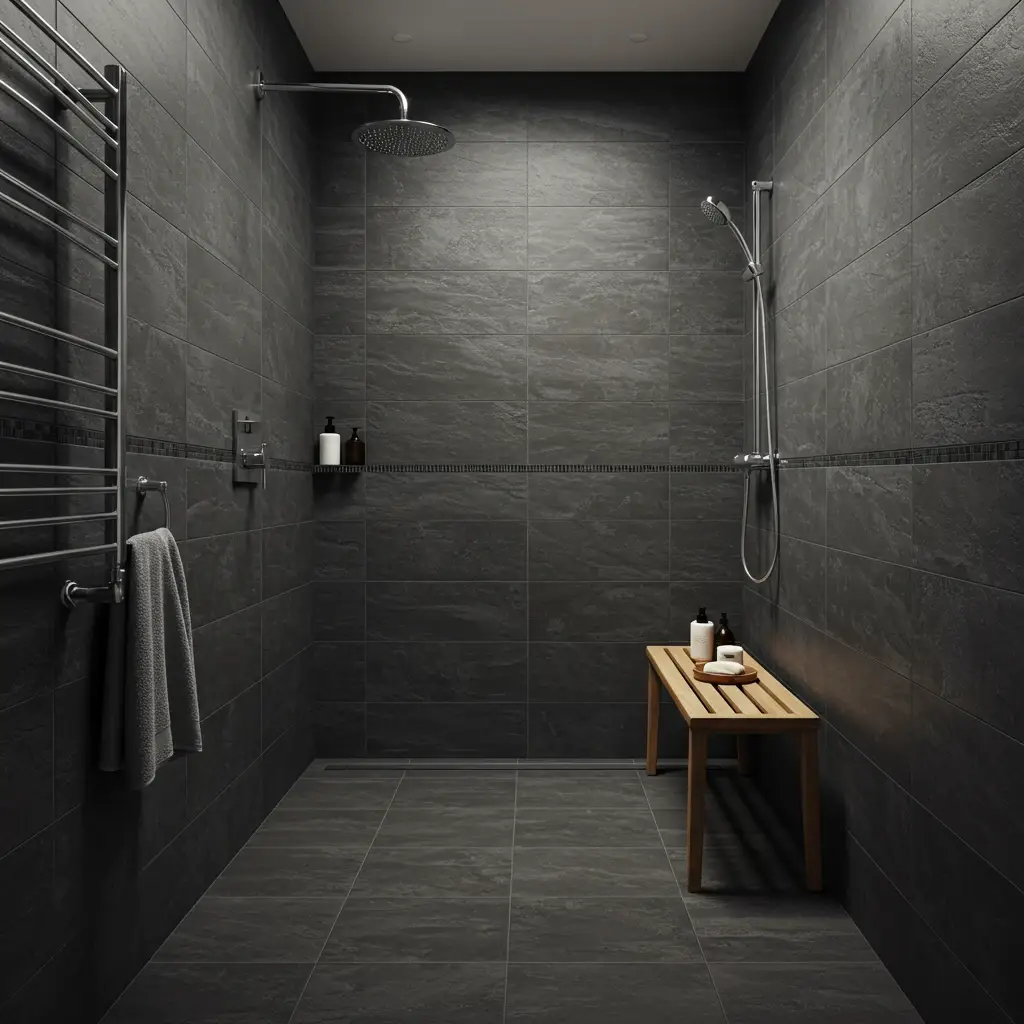
4. Opt for a Frameless Glass Shower Enclosure
One of the bulkiest elements in any bathroom is the shower or tub enclosure. A traditional framed shower door or an opaque shower curtain acts as a visual barrier, effectively cutting your bathroom in half and making it feel significantly smaller.
The solution is to remove that barrier with a frameless glass shower door. This simple change can be one of the most transformative decisions you make in a small bathroom renovation.
The transparent glass allows your eye to travel all the way to the back wall of the shower, incorporating that square footage into the rest of the room and creating a seamless, open-plan feel.
I consistently recommend frameless or semi-frameless designs because they allow light—both natural and artificial to flow freely throughout the entire space. This enhanced light distribution is critical for making a room feel bright and airy.
For a recent project in a bathroom with no natural light, installing a frameless glass door and tiling the shower with the same light-colored tile as the rest of the bathroom floor made a world of difference. It created a unified, cohesive look that instantly made the room feel double its actual size.
This is a strategy widely endorsed by leading design authorities, who recognize its power to add a sense of luxury and openness simultaneously.
For maximum effect, consider these options:
- Swinging vs. Sliding Door: A swinging door can offer a wider opening, but ensure you have enough clearance in the room. A sliding glass door is an excellent space-saver if clearance is an issue.
- Curbless Entry: If your budget and plumbing allow, a curbless shower (where the bathroom floor flows directly into the shower) is the ultimate solution. It creates a completely unbroken floor plane for a truly high-end, accessible, and spacious look.
- Minimal Hardware: Choose hardware (hinges and handles) in a finish that matches your other fixtures to maintain a cohesive design.
To enhance the clean look, incorporate a built-in shower niche into the tiled wall. This provides a sleek, recessed spot for your shampoo and soap, eliminating the need for bulky shower caddies and keeping the space clutter-free.
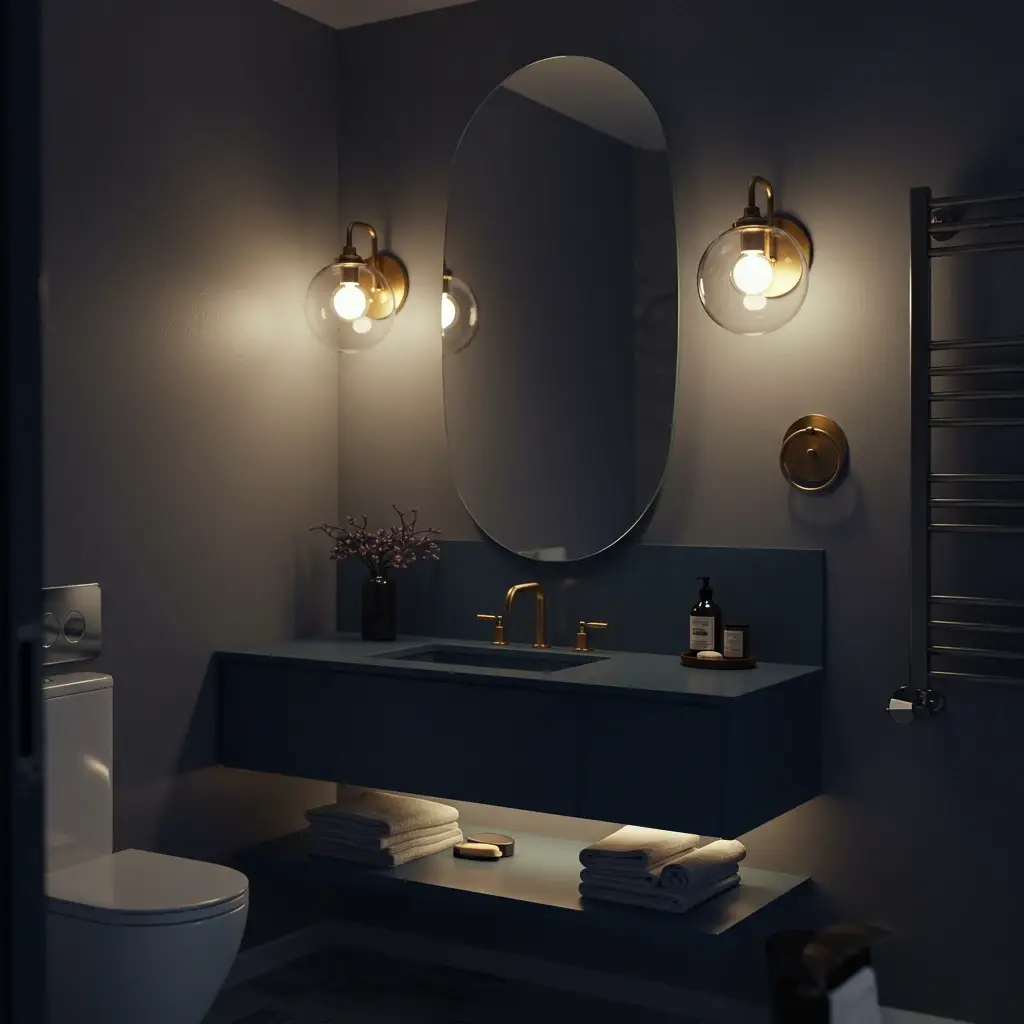
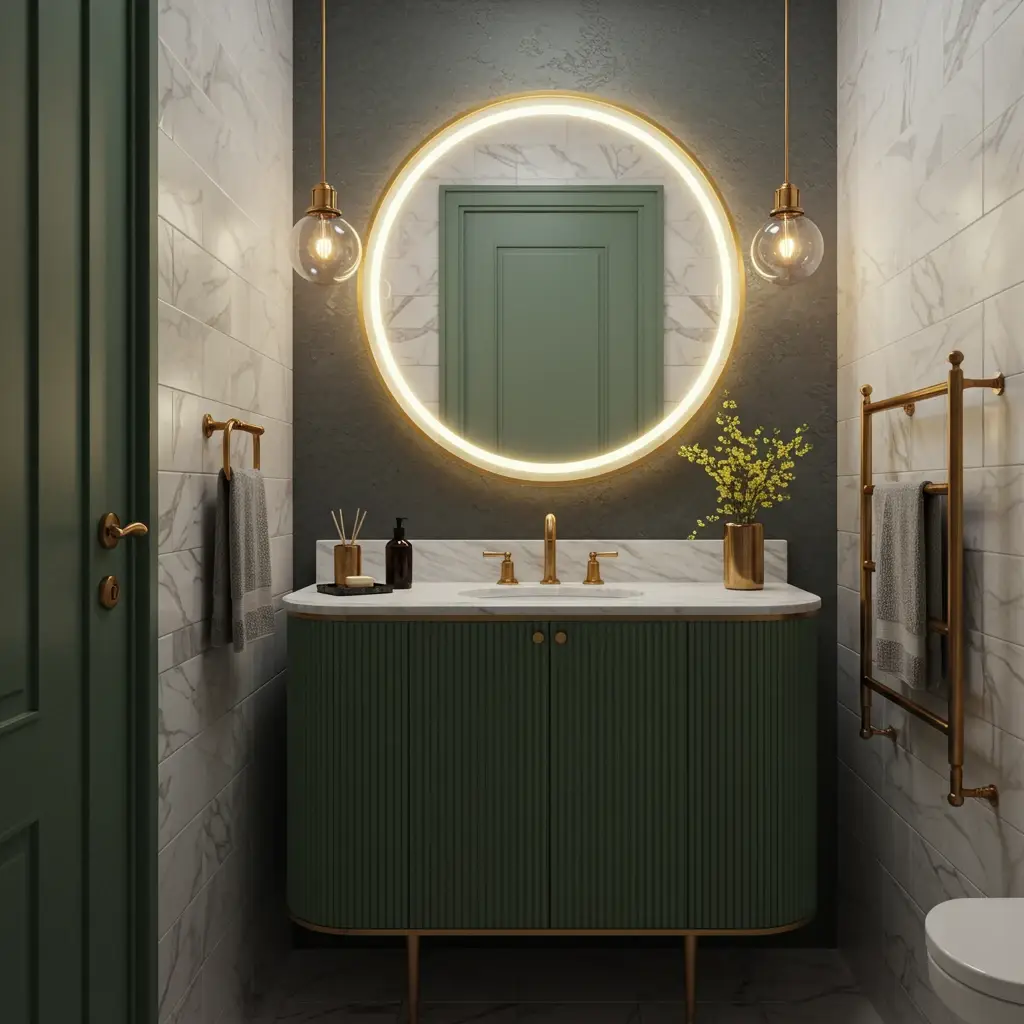
5. Add a Large, Statement Mirror
If there is one universally agreed-upon trick in the interior designer’s handbook for small spaces, it’s the strategic use of mirrors. A large mirror can dramatically alter the perception of a room’s size and brightness.
It works in two ways: first, it reflects light, effectively doubling the illumination from your windows and light fixtures. Second, it reflects the room itself, creating an illusion of depth and making the space feel less confined. In a small bathroom, I often suggest going as big as you possibly can with your mirror.
Instead of a small, standard-sized mirror that just hangs over the sink, consider a custom-cut mirror that spans the entire width of the wall above your vanity, from the backsplash right up to the ceiling.
This creates a powerful, high-impact feature wall that instantly makes the room feel grander. In one particularly narrow powder room project, we installed a floor-to-ceiling mirror on the entire wall behind the toilet.
The effect was astonishing, as it visually erased the wall and created an almost infinite sense of depth. This is a bold move, but as lifestyle gurus like Martha Stewart have long advised, placing a mirror to reflect the most open part of the room or a light source yields the best results.
Consider different styles to match your bathroom’s aesthetic:
- Frameless: A simple, polished-edge mirror offers a clean, modern look that blends seamlessly.
- Framed: A mirror with a beautiful frame can act as a piece of art. A slim, metallic frame (in brass or black) can add a touch of elegance, while a rustic wood frame can add warmth.
- Backlit: An LED-backlit mirror provides soft, flattering, and even illumination for grooming tasks while also adding a layer of ambient light that makes the mirror appear to float off the wall.
For an even greater impact, consider using mirrored cabinet doors on your vanity or a tall storage unit. This not only provides hidden storage but also multiplies the light-reflecting benefits throughout the room.
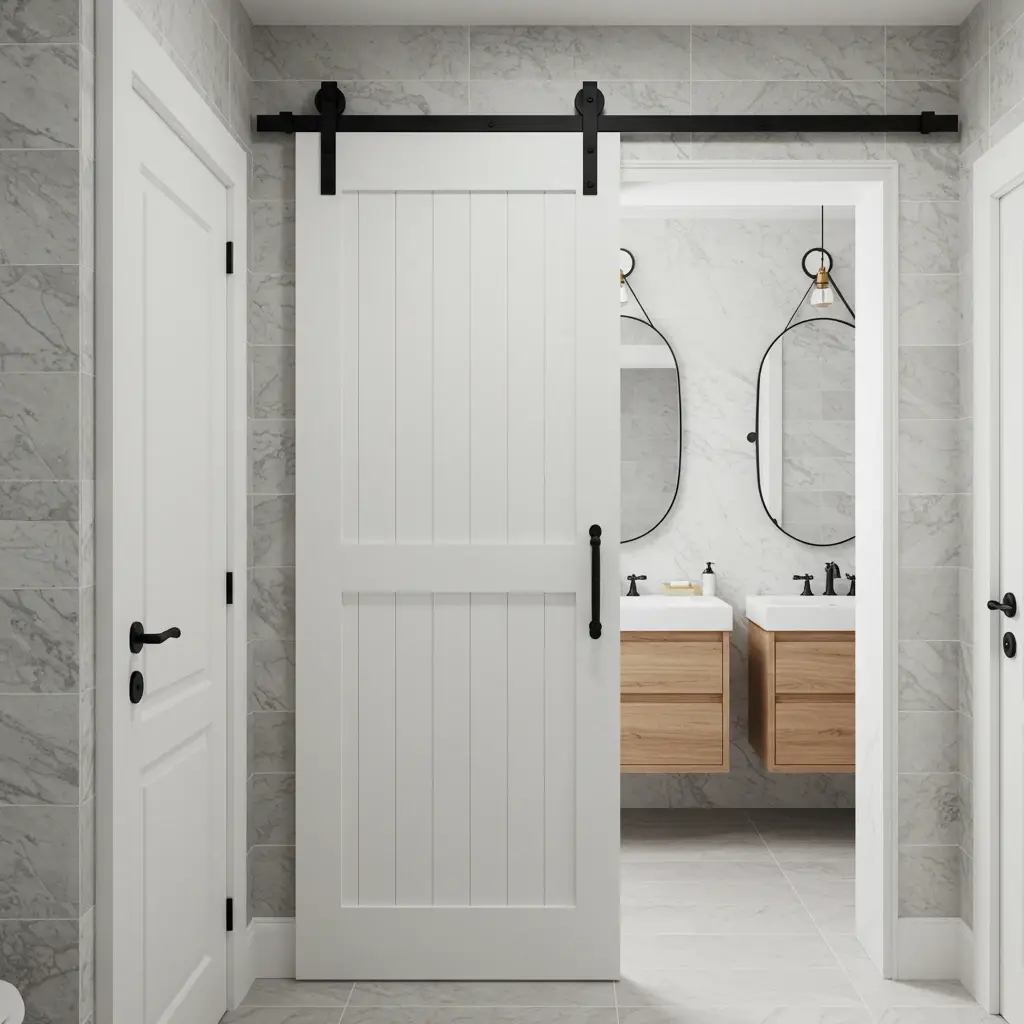
6. Select Pocket Doors or Sliding Barn Doors
The traditional hinged door is a notorious space-waster. The arc of a swinging door can consume up to 10 square feet of valuable floor and wall space, dictating where you can place fixtures, furniture, or even a simple towel hook. In a small bathroom, where every inch is precious, this is an unacceptable loss.
The solution is to replace the conventional door with a space-saving alternative like a pocket door or a sliding barn door.
A pocket door is the ultimate stealth operator. It slides neatly into a cavity built within the adjacent wall, completely disappearing when open and freeing up all the surrounding floor and wall space. This is my go-to recommendation for new constructions or major renovations where wall framing can be adjusted.
For existing spaces where opening up a wall isn’t feasible, a surface-mounted sliding barn door provides a similar space-saving benefit. It adds a strong decorative element and can become a focal point, with hardware available in styles ranging from rustic farmhouse to sleek industrial modern.
I once transformed a tiny, awkward ensuite by replacing the inward-swinging door with a frosted glass barn door; it not only saved space but also allowed light to be shared between the bedroom and bathroom, enhancing the brightness of both. This switch is a key recommendation from space-saving experts at sources like Apartment Therapy.
Key considerations include:
- Pocket Doors: Require professional installation and modification of the wall structure. Best for renovations.
- Barn Doors: Easier to install on an existing wall but require a clear stretch of wall for the door to slide over when open.
- Material: A door with frosted glass panels can provide privacy while still allowing light to filter through, a major plus for dark, windowless bathrooms.
To enhance the design, choose hardware for your sliding door that complements the metal finishes of your faucets and fixtures. This creates a cohesive, intentional look that ties the entire design together.
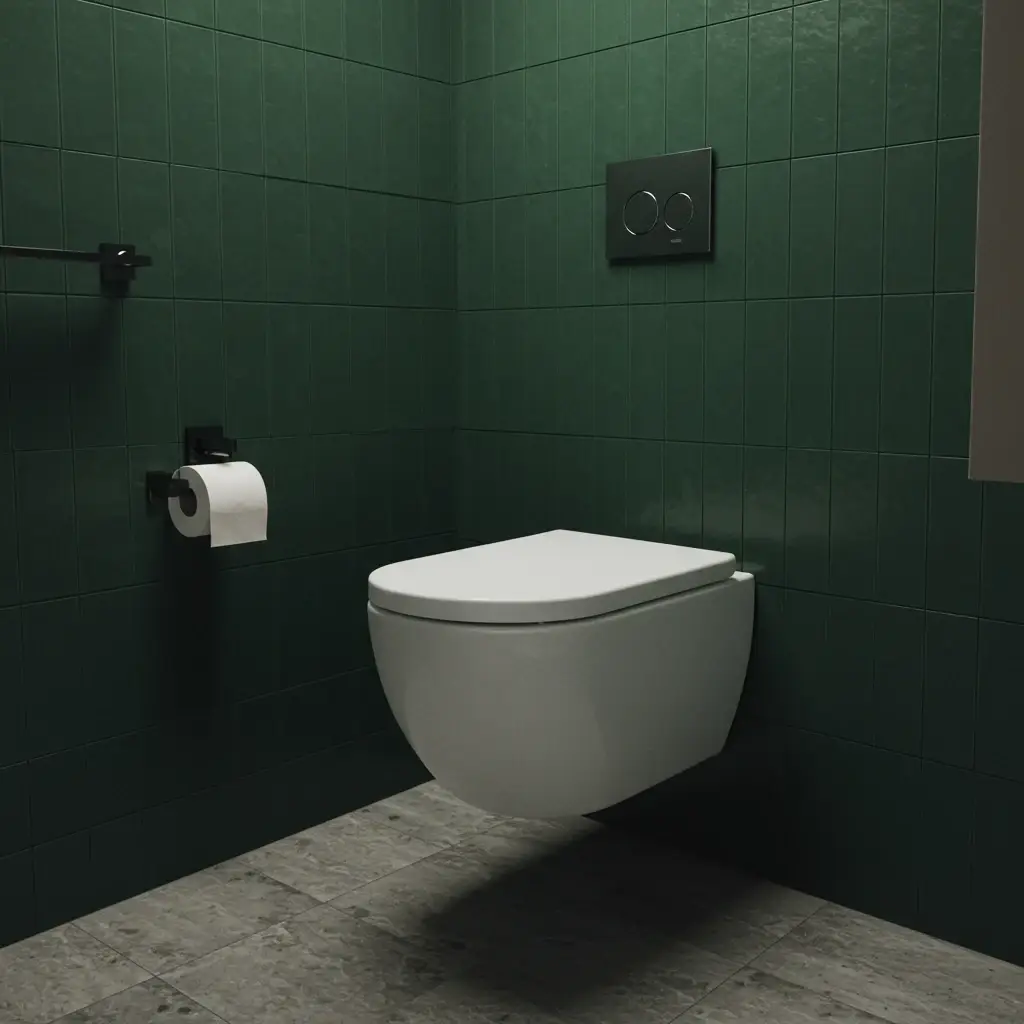
7. Opt for Wall-Mounted Fixtures
Just as a floating vanity opens up floor space, so too can wall-mounted fixtures like toilets and faucets. This is a design strategy borrowed from high-end European hotels and minimalist architecture, and it’s incredibly effective in small bathrooms.
A wall-mounted toilet, also known as a wall-hung toilet, has its tank (cistern) concealed inside the wall. All you see is the bowl, which “floats” above the floor. This instantly makes the bathroom feel less cluttered and significantly larger because, once again, the flooring extends uninterrupted beneath it.
The functional benefits are just as compelling. Cleaning under and around a wall-mounted toilet is a breeze, contributing to better hygiene. Similarly, wall-mounted faucets, which are installed directly onto the wall behind the sink, free up precious counter space on the vanity.
This creates a clean, uncluttered surface that is both aesthetically pleasing and easier to wipe down. I often pair a wall-mounted faucet with a simple vessel sink on a floating shelf for the ultimate minimalist and space-saving combination in a powder room. This approach showcases a commitment to clean lines and is a hallmark of sophisticated, modern design.
When planning for wall-mounted fixtures, remember:
- Installation: Both wall-mounted toilets and faucets require the wall to be opened up for plumbing and support installation. They are best incorporated during a renovation rather than as a simple fixture swap.
- Concealed Tank: The toilet’s tank and carrier system are hidden within a 2×6 inch wall stud frame, so you need to ensure your wall has adequate depth.
- Faucet Placement: The height and position of a wall-mounted faucet need to be carefully planned in relation to the sink basin to avoid splashing.
To complete the off-the-floor look, consider other wall-mounted accessories. A wall-mounted soap dispenser, toothbrush holder, and even a wall-mounted trash can can further eliminate clutter from your surfaces and floors.
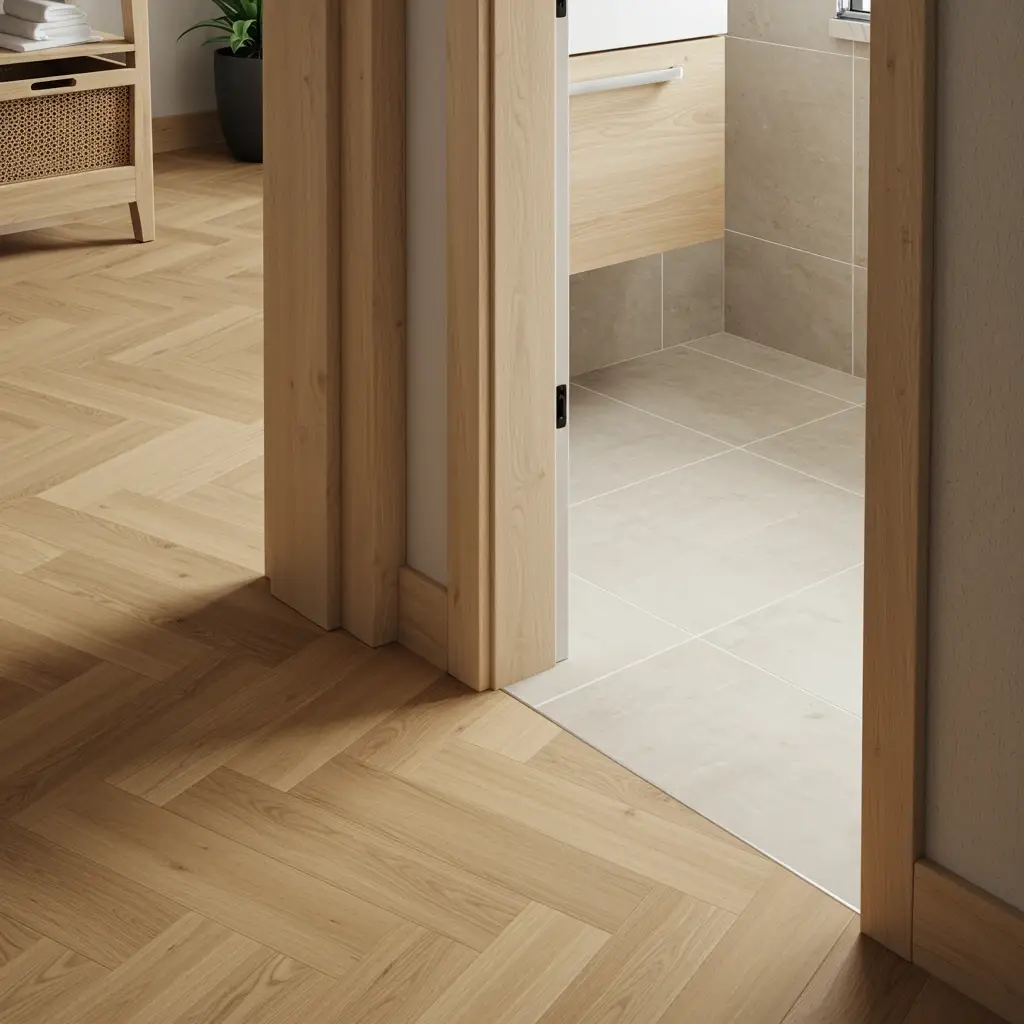
8. Create a Cohesive Look with Continuous Flooring
One of the most effective ways to make a small space feel larger is to create a sense of uninterrupted flow. You can achieve this by using the same flooring material from the room outside the bathroom (like the hallway or bedroom) and carrying it directly inside.
When the floor is one continuous surface without a threshold or a change in material, it tricks the eye into seeing the two separate areas as one larger, unified space. This is particularly effective for ensuites or powder rooms that open off a main living area.
If continuing the main flooring isn’t practical (for example, if you have hardwood outside and need waterproof tile inside), then the next best strategy is to choose a bathroom tile that is very similar in color and tone to the adjacent floor.
The goal is to minimize the visual contrast at the doorway. In a recent project, we matched a light wood-look porcelain tile inside the bathroom to the natural oak floors in the hallway. The transition was so seamless that it dramatically enhanced the perceived size of the bathroom entrance.
Additionally, within the bathroom itself, using large-format tiles is a pro tip.
- Larger Tiles, Fewer Grout Lines: A 12×24 inch or even 24×24 inch tile will have significantly fewer grout lines than traditional small tiles. Grout lines create a grid pattern that can visually chop up the floor and make it feel smaller. Fewer lines mean a more serene and expansive surface.
- Match Grout to Tile: I always specify a grout color that closely matches the tile color. Contrasting grout lines will highlight the grid effect you want to avoid.
- Diagonal Placement: Laying square tiles on a diagonal can also create an illusion of a wider space.
To take this concept one step further, use the same large-format tile on the floor and up the walls of the shower. This continuous surface creates a “wet room” effect that is incredibly chic and makes the entire room feel like one cohesive, expansive unit.
9. Implement a Layered Lighting Scheme
Lighting is everything in a small bathroom. A single, harsh overhead light can cast unflattering shadows and make a space feel like a cave. A successful design relies on a layered lighting scheme, combining different types of light to create a space that is both functional and atmospheric. This involves three main layers: ambient, task, and accent lighting.
Ambient light is the room’s primary light source, like recessed ceiling lights or a central flush-mount fixture. Task lighting is focused light for specific activities, and in a bathroom, this is most critical around the mirror. Instead of a “Hollywood” light bar above the mirror, which casts shadows down your face, I always recommend placing two vertical sconces on either side of the mirror.
This provides even, cross-illumination for grooming. A backlit mirror is another excellent source of flattering task light. Finally, accent lighting is used to highlight architectural features or decor. This could be a small spotlight aimed at a piece of art or the LED strip under a floating vanity we discussed earlier.
For a recent client who wanted a spa-like feel, we installed recessed ceiling lights on a dimmer switch for overall ambient control. We then added two beautiful, slim sconces with a warm brass finish next to the mirror.
The ability to dim the main lights and rely on the soft glow of the sconces completely transformed the evening ambiance of the room.
- Ambient: Dimmable recessed lights or a stylish flush-mount ceiling fixture.
- Task: Vertical sconces on either side of the mirror or a backlit mirror.
- Accent: LED strips under vanities or shelves, or a small spotlight.
As an enhancement, choose bulbs with a warm temperature (around 2700K-3000K) for a relaxing, spa-like feel. Ensure your task lighting around the mirror has a high Color Rendering Index (CRI) of 90+ for accurate color representation.
10. Incorporate Curved Silhouettes
The prevailing bathroom design for decades has been defined by hard lines and sharp angles. However, a major trend for 2025 that is particularly effective in small spaces is the introduction of curves. Curved silhouettes found in mirrors, vanities, sinks, and even arched doorways soften the overall look of a room and create a more organic, gentle flow.
In a compact space, sharp corners can feel harsh and can physically jut into your path. By contrast, a rounded vanity corner or a circular mirror can make navigating the space feel easier and more natural. This “soft geometry” is a key element in creating a space that feels nurturing and calm.
I recently implemented this in a small powder room by replacing a standard rectangular vanity with a custom-made, half-moon shaped floating unit. The gentle curve of the cabinet front made the tight space feel instantly more gracious and less boxy.
We paired it with a large, circular backlit mirror. Elle Decor has highlighted this trend, noting that arched and rounded forms evoke a sense of classic architecture and modern sculpture, adding a layer of sophistication.
It’s a move away from pure, stark minimalism towards a more expressive and human-centric design language. This concept can be applied in various ways:
- Round or Oval Mirrors: An easy swap that instantly softens the space above the sink.
- Vessel Sinks: Choose a round or oval vessel sink to add a sculptural, curved element.
- Curved Faucets: A faucet with a high, gooseneck arc introduces a graceful curve.
- Archways: If renovating, consider a small arched niche for storage or even an arched shower entrance.
As an enhancement, if you opt for a curved mirror, choose one with a slim, metallic frame in a warm finish like brushed brass or bronze. This adds a touch of glamour and definition to the soft shape.
11. Use Large-Format Tiles
The size of your tiles can have a significant impact on how large your small bathroom feels. While it may seem counterintuitive, using large-format tiles is one of the most effective strategies for creating an illusion of space.
Tiles that are 12×24 inches, 24×24 inches, or even larger, result in fewer grout lines on your floors and walls. Grout lines create a grid, and the more lines there are, the more chopped-up and busy the surface appears. A surface with fewer interruptions reads as a more cohesive and expansive plane, tricking the eye into seeing the room as bigger than it is.
In a recent renovation of a very narrow galley-style bathroom, we used 24×48 inch porcelain tiles on the floor. The effect was dramatic. With only a handful of tiles needed to cover the entire floor, the space felt significantly wider and more streamlined.
The client was initially hesitant, fearing the large tiles would overwhelm the room, but was thrilled with the final result. This principle is a cornerstone of modern minimalist design and is consistently recommended by tile experts and designers.
To maximize the effect of large-format tiles:
- Minimize Grout Lines: Use the thinnest grout lines your tile and substrate will allow (typically 1/16 or 1/8 inch).
- Match Grout Color: Select a grout color that is as close as possible to the tile color. This helps the grout lines visually disappear, enhancing the seamless look.
- Continue Tiles Up the Wall: Using the same large-format tile on the floor and at least one wall (like the wall behind the vanity or inside the shower) further enhances the sense of continuity and space.
As an enhancement, consider running rectangular tiles in a stacked (or “grid”) pattern rather than a traditional running bond (or “brick”) pattern. The clean, linear lines of a stacked pattern feel more modern and can contribute to a greater sense of order and calm in a small space.
12. Choose Multi-Functional Furniture
In a small bathroom, every single item must earn its place. The best way to ensure this is by choosing pieces that serve more than one purpose. Multi-functional furniture and fixtures are the heroes of compact spaces, allowing you to combine storage, seating, and surfaces without adding clutter.
This approach is all about efficiency and smart design, ensuring that you get the maximum utility out of every square inch.
Think beyond the standard fixtures. For instance, a medicine cabinet is a classic multi-functional item, combining a mirror with hidden storage. Modern versions have elevated this concept with integrated lighting, electrical outlets, and even USB ports for charging devices.
Another one of my favorite recommendations is a small, waterproof stool or bench. It can be placed inside a walk-in shower to serve as a seat or a surface for toiletries, or it can be used next to the tub to hold a towel, a book, or a cup of tea. It adds a spa-like element while being incredibly practical.
Some ideas for multi-functional pieces:
- Storage Ladders: A decorative ladder can be used to hang towels and can also support baskets for extra storage.
- Vanity with Integrated Towel Bar: Some smaller vanities come with a towel bar built into the front or side, saving precious wall space.
- Over-the-Toilet Storage Units (Étagères): These units provide open shelving and sometimes a small cabinet without taking up any additional floor space.
To enhance this, look for a vanity mirror that has a small, integrated shelf at the bottom. It’s the perfect spot for a soap dispenser or a toothbrush holder, keeping your main countertop surface completely clear.
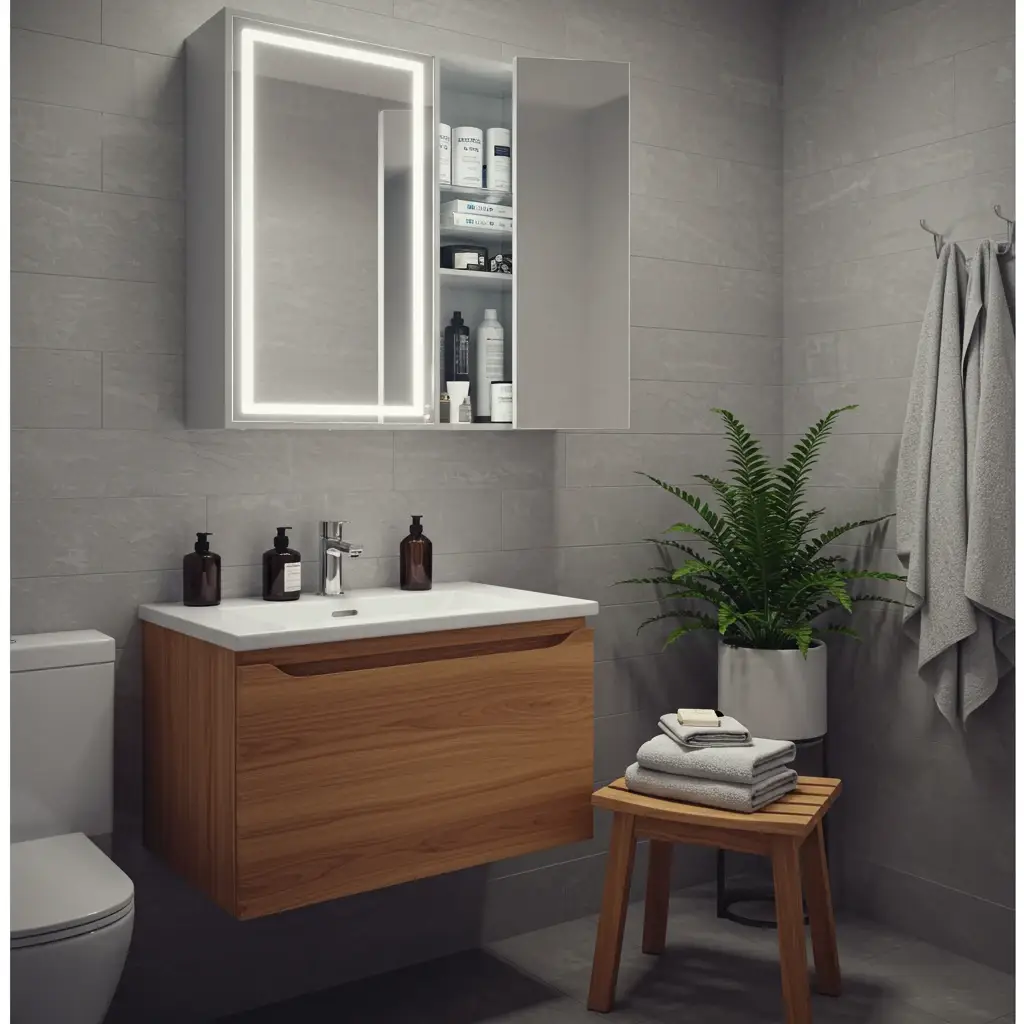
alt text: A functional small bathroom featuring a mirrored medicine cabinet and a multi-purpose teak stool.
13. Keep Countertops Clear and Curated
This tip is less about renovation and more about daily discipline, but its impact on the feel of a small bathroom is enormous. Nothing makes a compact space feel more chaotic and cramped than cluttered countertops.
Every bottle, tube, and container left out on the surface contributes to visual noise, which our brains interpret as a lack of space. By making a conscious effort to keep your countertops clear, you instantly create a sense of calm, order, and spaciousness.
I advise my clients to adopt the “a home for everything” philosophy. Before you even begin styling, ensure you have adequate hidden storage (like in a deep vanity drawer or a medicine cabinet) for all your daily necessities. Once everything is put away, you can then be intentional about what you choose to display.
Think like a stylist for a high-end hotel. Select only a few items that are both beautiful and functional. A beautiful tray is a fantastic tool for this; it can corral a stylish soap dispenser, a small vase with a single stem, and a scented candle, making these items feel like a deliberate, curated collection rather than random clutter.
To achieve a curated countertop:
- Decant Products: Transfer hand soap, lotion, and mouthwash into uniform, attractive dispenser bottles.
- Use Trays: Group the few items you leave out on a small tray made of marble, wood, or metal.
- Embrace Negative Space: Don’t feel the need to fill every inch of the surface. Empty space is a luxury in a small room.
As an enhancement, add a small, living element. A tiny potted succulent or a small air plant requires very little space but adds a touch of life and organic texture that can elevate the entire vignette.
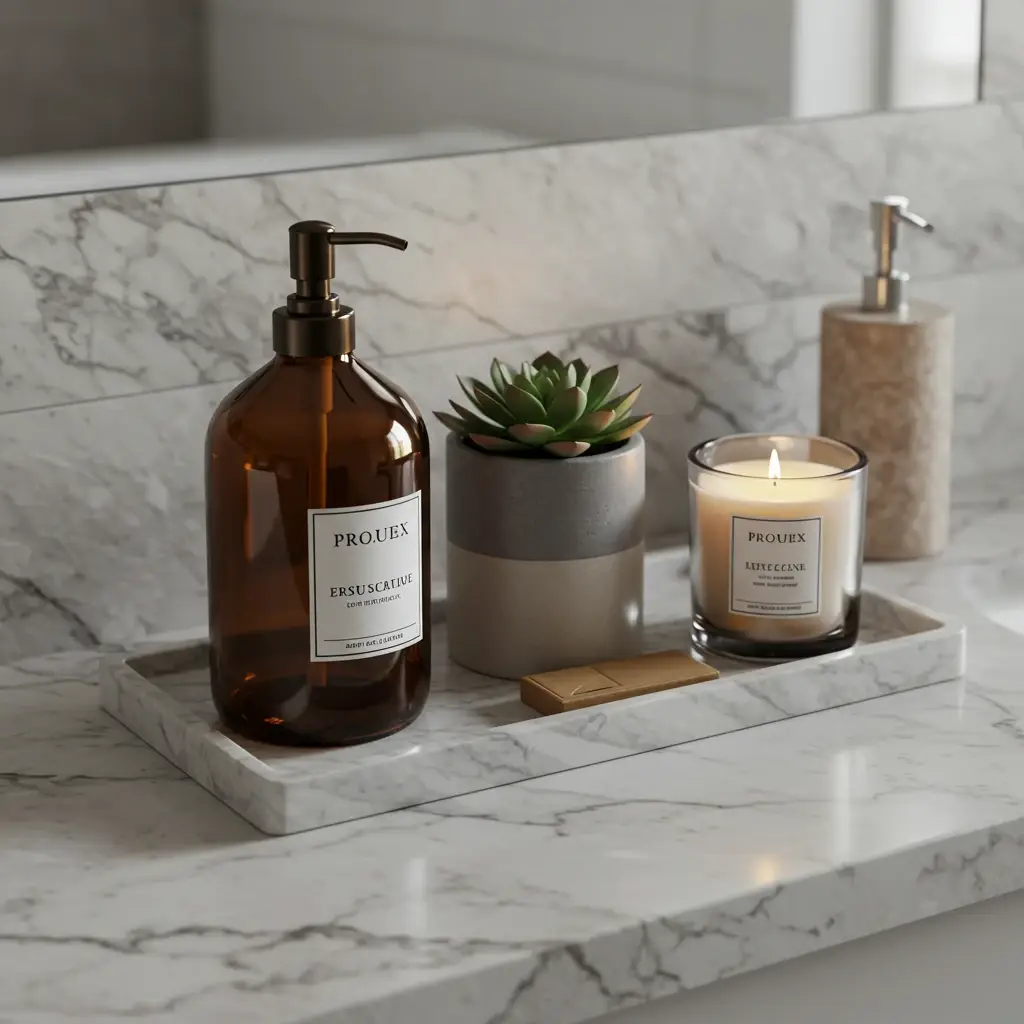
alt text: A minimalist and curated small bathroom countertop with a marble tray and amber glass dispenser.
14. Use Wall Niches for Streamlined Storage
Wall niches are a brilliant way to add storage without taking up any physical space in the room. A niche is essentially a recessed shelf that is built into the wall cavity between the studs. They are most commonly used in showers to hold shampoo and soap, but their potential extends throughout the entire bathroom.
A niche can be a sleek, minimalist alternative to a bulky medicine cabinet or protruding shelves.
By carving storage out of the wall itself, you maintain the clean, flat plane of the wall surface, which contributes to a more open and uncluttered feeling. In a recent project, we built a tall, narrow vertical niche next to the vanity. We lined it with the same tile as the floor and installed several glass shelves.
It became the perfect, stylish spot for storing perfumes and decorative items. As seen in many architectural publications, a well-placed and well-lit niche can be a stunning design feature in its own right.
Ideas for implementing wall niches:
- Shower Niche: A must-have in any modern shower. Consider a wide horizontal niche for a more contemporary look.
- Vanity Niche: A niche beside or above the vanity can hold everyday items like toothbrushes and skincare.
- Toilet Niche: A niche above the toilet is a great spot for storing extra toilet paper rolls or a small piece of art.
To enhance your niche, install waterproof LED lighting inside it. A backlit niche creates a beautiful, soft glow and turns a simple storage spot into a high-end architectural feature, especially effective inside a shower.
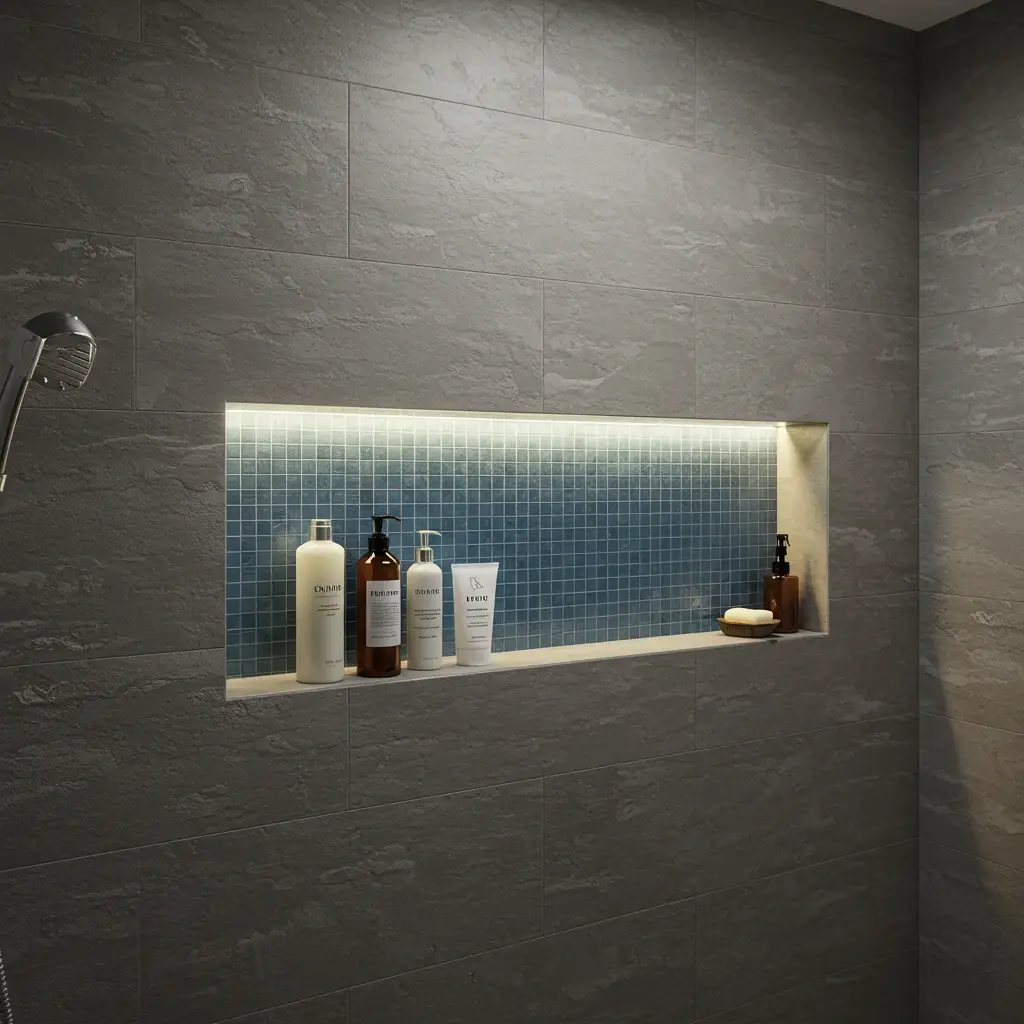
alt text: A contemporary shower with a large, backlit wall niche featuring a blue mosaic tile accent.
15. Hang a Statement Shower Curtain High and Wide
If a glass shower door isn’t in your budget or plan, a shower curtain can still be used to create an illusion of space, provided you hang it correctly. The standard practice of hanging a shower curtain on a tension rod just inside the tub’s edge can make a bathroom feel shorter and smaller.
The trick is to treat the shower curtain like you would treat drapes in a living room, by hanging it as high and as wide as possible.
Mount the shower curtain rod on the wall several inches below the ceiling or even directly on the ceiling if possible. This draws the eye upward, immediately making the ceiling feel higher.
Also, use a rod that is wider than the tub, so that when the curtain is open, it can be pushed completely clear of the tub opening, stacking against the wall. This makes the bathroom feel wider and allows more light into the shower. You will likely need an extra-long and extra-wide shower curtain for this, but the dramatic effect is well worth it.
For a successful application:
- Go High: Mount the curtain rod at least 6-8 inches above the top of the tub or shower opening, as close to the ceiling as you can.
- Go Wide: Use a rod that extends 6-12 inches beyond the tub on both sides.
- Choose a Light Curtain: A light-colored, solid or subtly patterned curtain in a quality fabric (like waffle-weave cotton or linen) will feel more luxurious and less visually heavy than a busy plastic liner.
For a clean, hotel-like enhancement, use a fabric liner along with your decorative shower curtain. This adds a layer of quality and helps the curtain hang more beautifully.
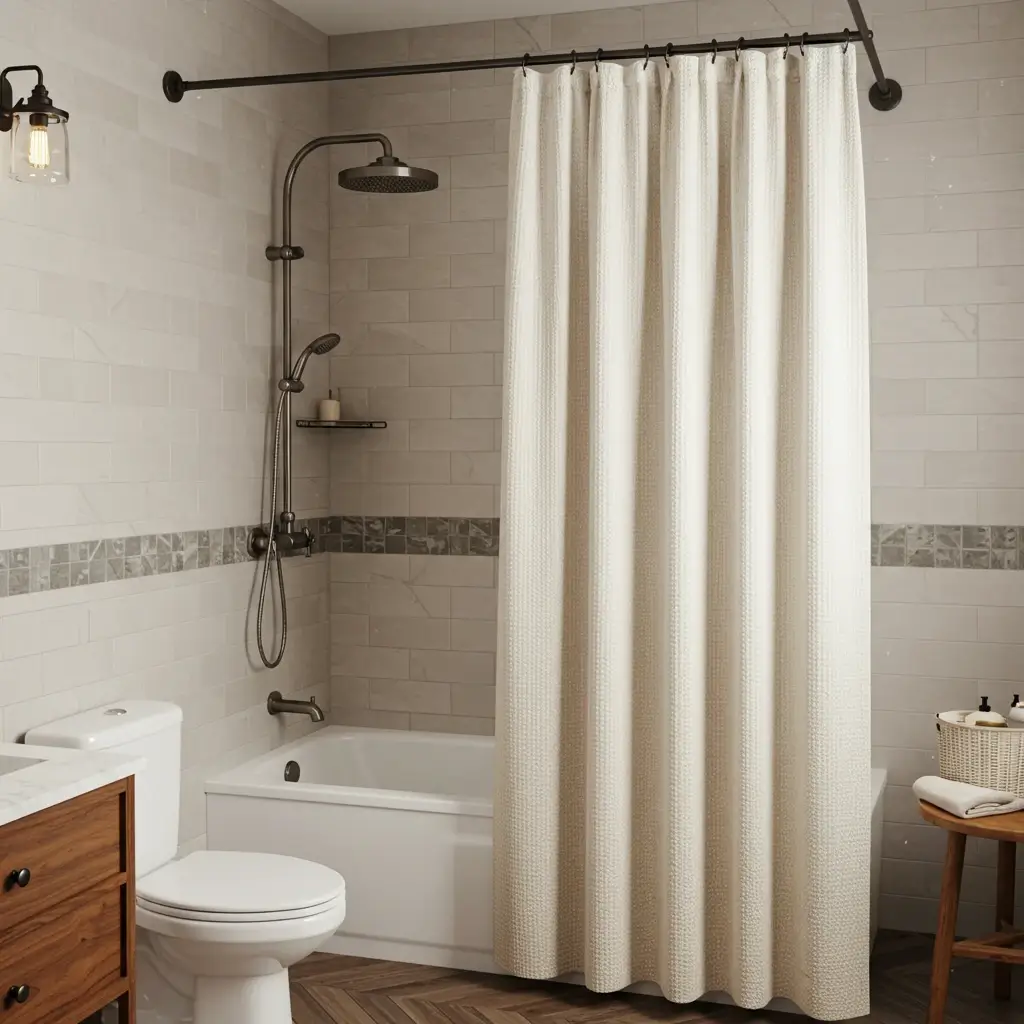
alt text: A small bathroom showing a shower curtain hung high and wide to create an illusion of height and space.
16. Incorporate Reflective Surfaces and Finishes
Mirrors aren’t the only surface that can work magic in a small space. Incorporating a variety of reflective surfaces throughout the bathroom will help to bounce light around, making the room feel brighter, larger, and more dynamic.
Any surface with a bit of sheen will capture and reflect light, so think beyond just the main mirror.
Glossy tiles are a classic choice for this reason. Whether on the floor or as a wall feature, their polished surface will reflect your light sources beautifully. Metallic finishes on your fixtures—like polished chrome, polished nickel, or even a warm, polished brass—add little points of light that sparkle and draw the eye.
You can even consider furniture with reflective qualities. A small vanity with a lacquered finish or a medicine cabinet with a mirrored frame can contribute to the overall brightness of the room.
Some ways to incorporate reflective surfaces:
- Glossy Tiles: A backsplash or an entire feature wall of glossy subway tiles or Zellige tiles.
- Polished Fixtures: Taps, showerheads, and hardware in a polished chrome or brass finish.
- High-Gloss Vanity: A vanity cabinet with a high-gloss, lacquered finish.
- Reflective Accessories: A polished metal trash can, soap dispenser, or decorative tray.
As an enhancement, consider a back-painted glass backsplash behind the vanity. It provides a sleek, seamless, and highly reflective surface that is also incredibly easy to clean. You can choose any color to be painted on the back of the glass to perfectly match your design scheme.
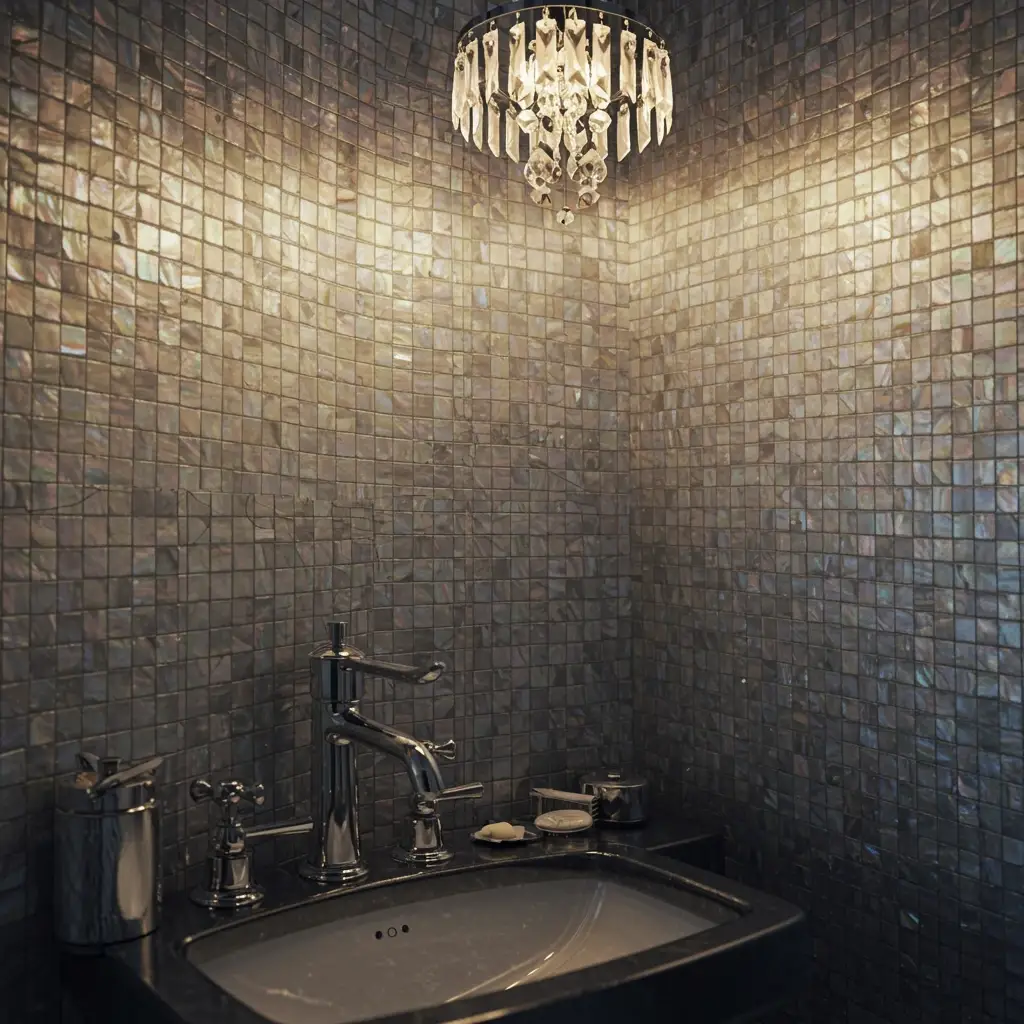
alt text: A glamorous small bathroom featuring reflective mother-of-pearl tiles and polished chrome fixtures.
17. Choose Leggy, Open-Base Furniture
Just as a floating vanity works by showing the floor underneath, any other furniture or fixture with an open base will have a similar space-enhancing effect. Solid, blocky pieces that sit flat on the floor can feel heavy and make a room seem crowded. In contrast, furniture with legs allows you to see more of the floor, creating a sense of openness and airiness.
This principle is especially important if you are adding a freestanding piece of storage, like a small cabinet or étagère. Look for one with visible legs that lift the main body of the piece off the ground.
Even a toilet brush holder or a trash can with a slightly raised base can contribute to this lighter-than-air feeling. If you have a freestanding sink, a console sink with slim metal legs is a fantastic option for a small bathroom. It provides a surface for the sink and a small amount of counter space without the visual bulk of a traditional vanity cabinet.
To apply this principle:
- Console Sinks: Choose a sink with slim legs in a finish that matches your other fixtures.
- Freestanding Storage: If you need an extra cabinet, select one with tall, tapered legs.
- Benches or Stools: A small stool or bench with slim legs can add function without bulk.
For a chic enhancement, place a beautiful, shallow woven basket on the floor underneath a console sink. It provides soft, textured storage for extra towels or toilet paper while still maintaining the open, airy look.
alt text: A classic small bathroom with a leggy console sink that keeps the floor visible and the space feeling open.
18. Unify Your Metal Finishes
In a small space, visual cohesion is key to creating a sense of calm and order. While mixing metals can be a sophisticated design choice in larger rooms, it can often feel chaotic and unintentional in a compact bathroom. I generally recommend that clients stick to one primary metal finish for all the main fixtures to create a unified and streamlined look.
This means your faucet, showerhead, drain, toilet lever, cabinet hardware, and light fixture finish should all match. This creates a common thread that ties the entire room together, resulting in a look that feels more deliberate and less cluttered. Popular finishes for 2025 include matte black for a modern, high-contrast look; brushed brass for a touch of warmth and luxury; and brushed nickel for a timeless, versatile appeal. Polished chrome remains a classic choice for its durability and reflective quality.
To execute this effectively:
- Choose Your Primary Finish: Decide on one metal that will be the star of the show.
- Make a List: Write down every single item in the bathroom that has a metal component.
- Source Carefully: When purchasing items, ensure they are all available in your chosen finish. Pay attention to the exact name of the finish, as “brass” can vary significantly between brands.
If you absolutely love the mixed-metal look, you can enhance this by following a simple rule: use one dominant metal for about 70% of the fixtures, and then add a second, contrasting metal as a small accent. For example, use matte black for all the main fixtures, but then choose light sconces with a small touch of brass.
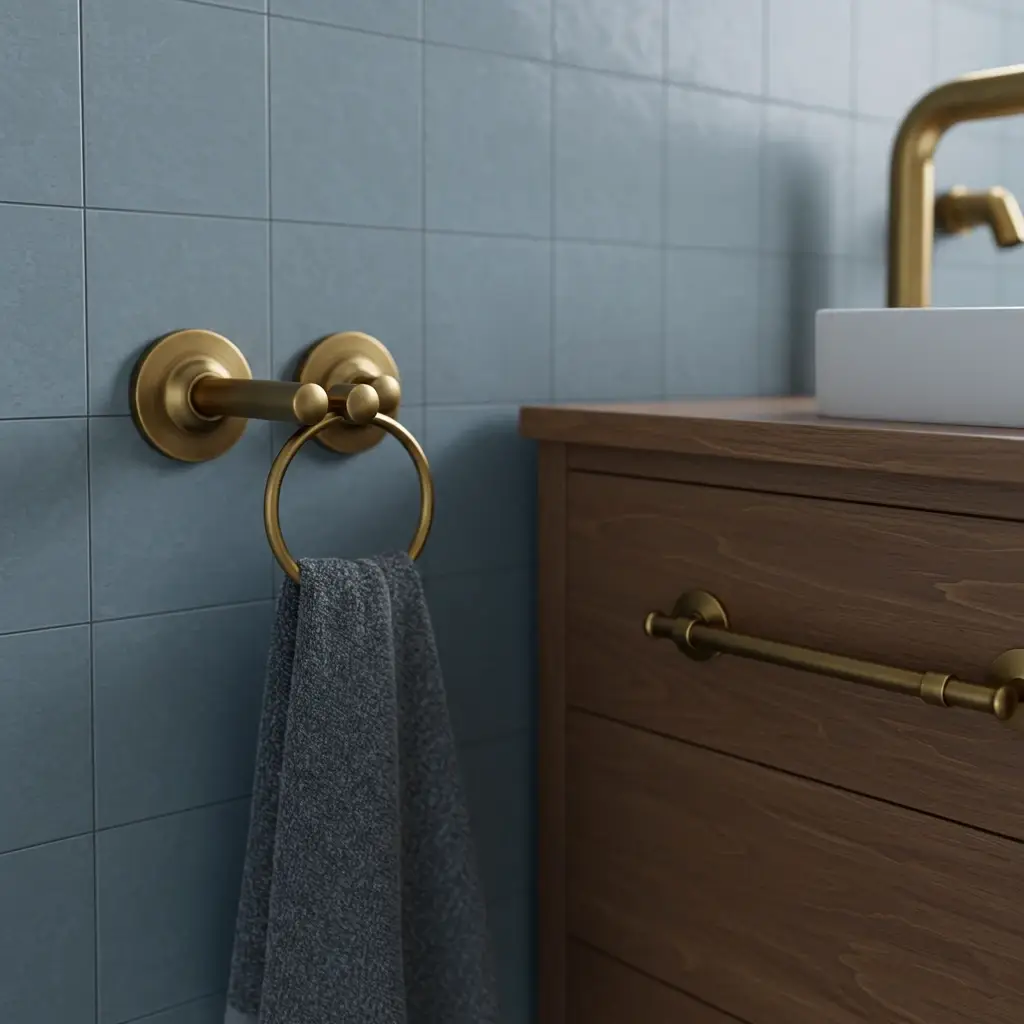
alt text: A cohesive small bathroom design showing unified brushed brass finish on the faucet, hook, and handle.
19. Add Plants for Life and Color
Never underestimate the power of biophilic design, even in the smallest of spaces. Adding living plants to a bathroom is one of the easiest and most effective ways to make it feel more vibrant, fresh, and welcoming.
Plants add a touch of natural color and organic texture that can soften the hard surfaces of a bathroom. They also improve air quality and have been shown to reduce stress, contributing to that spa-like atmosphere you want to create.
Many plants thrive in the high humidity and lower light conditions typical of a bathroom. In my own home, I have a snake plant in the corner of my small bathroom and a string of pearls trailing from a high shelf. They require minimal care and add a huge amount of personality. When choosing plants, consider the amount of natural light your bathroom receives.
Great plant choices for bathrooms:
- Low Light: Snake Plant, ZZ Plant, Pothos.
- Medium to Bright Light: Orchid, Ferns, Spider Plant.
- No Space on Surfaces: Use a hanging planter for a trailing plant like a Pothos or String of Pearls, or a wall-mounted planter.
As an enhancement, instead of a standard plastic pot, re-pot your plant into a beautiful ceramic or terracotta planter that complements your bathroom’s design scheme. It’s a small detail that makes a big difference.
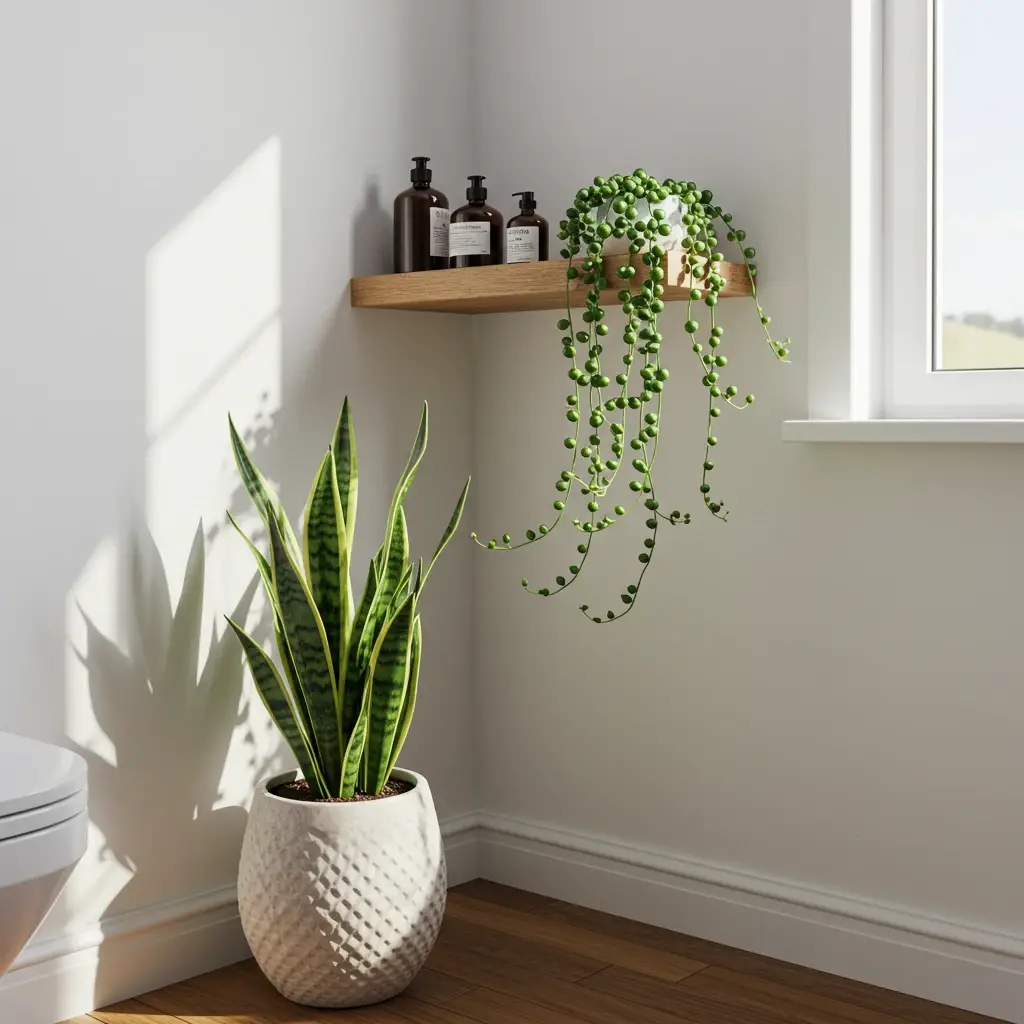
alt text: A modern bohemian small bathroom corner decorated with a snake plant and a trailing string of pearls plant.
20. Don’t Forget the Details: Upgrade Your Hardware
The hardware in your bathroom the cabinet knobs or pulls, the drawer handles, the toilet paper holder, and the towel hooks—are like the jewelry of the room. They may be small, but they have a disproportionately large impact on the overall style and perceived quality of the space.
Upgrading basic, builder-grade hardware to something more unique and stylish is a relatively inexpensive and easy change that can instantly make your bathroom feel more custom and luxurious.
This is a place where you can inject a lot of personality. Are you going for a modern look? Choose sleek, minimalist bar pulls in a matte black finish. Is your style more traditional? Opt for elegant glass or ceramic knobs.
Do you want a touch of glamour? Brushed brass or even leather-wrapped handles can provide a high-end, bespoke feel. When I’m working with a tight budget, this is one of the first things I suggest changing, as it provides a huge “bang for your buck.”
To make a cohesive choice:
- Match Your Finishes: As discussed in tip #18, ensure your hardware finish matches the rest of your fixtures for a unified look.
- Consider Ergonomics: Make sure the knobs or pulls are comfortable to use.
- Think About Scale: The size of the hardware should be proportional to the size of the vanity drawers and doors.
For a unique enhancement, look for hardware from artisan makers on platforms like Etsy. You can often find beautiful, handcrafted pieces that will make your bathroom feel truly one-of-a-kind.
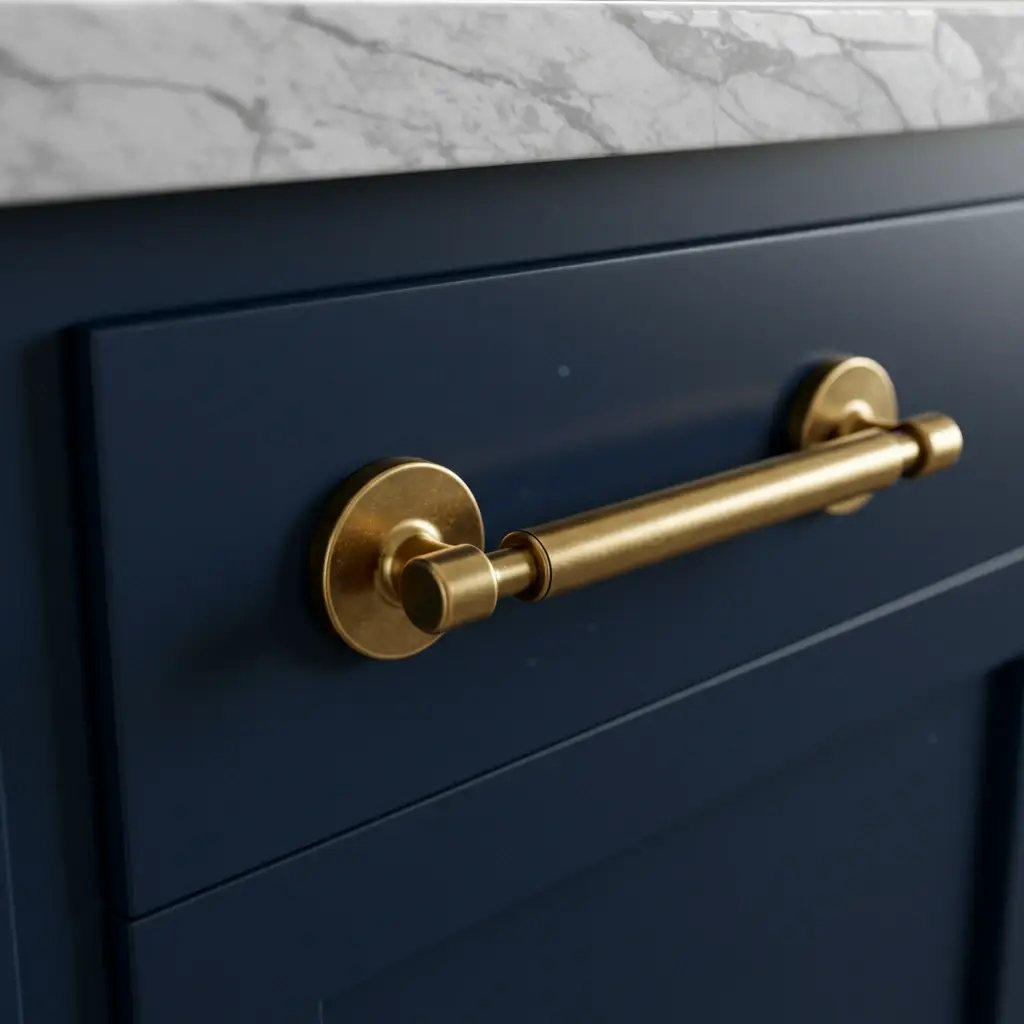
alt text: A close-up of a navy blue bathroom vanity with stylish, hexagonal brushed brass hardware.
21. Invest in High-Quality, Luxurious Textiles
The final layer of any successful bathroom design is the textiles. This includes your towels, bath mat, and shower curtain. Investing in high-quality, beautiful textiles can elevate the entire sensory experience of your bathroom, making it feel like a five-star hotel spa. Scratchy, thin towels and a cheap plastic bath mat can undermine even the most well-designed space.
When it comes to towels, look for ones made from 100% long-staple cotton, like Egyptian or Pima cotton. They are incredibly soft, absorbent, and durable.
For a bath mat, choose one that is plush and feels wonderful underfoot. A thick cotton or even a memory foam mat can add a significant touch of daily luxury.
If you have a shower curtain, select one made from a quality fabric like a heavy waffle-weave cotton or a linen blend. The weight and texture of the fabric will make it hang more beautifully and feel more substantial.
My personal preference is for a set of classic, fluffy white towels. They evoke a sense of cleanliness and luxury, and they are easy to bleach to keep them looking fresh. However, choosing towels in a color that complements your design scheme can also be a great way to add a pop of color or texture.
- Towels: 100% Egyptian or Pima cotton.
- Bath Mat: Plush, absorbent cotton or memory foam.
- Shower Curtain: Heavy, high-quality fabric like waffle-weave cotton or linen.
For a final, luxurious touch, have your towels monogrammed. A simple, elegant monogram adds a personalized, bespoke feel that is the hallmark of a truly well-considered space.
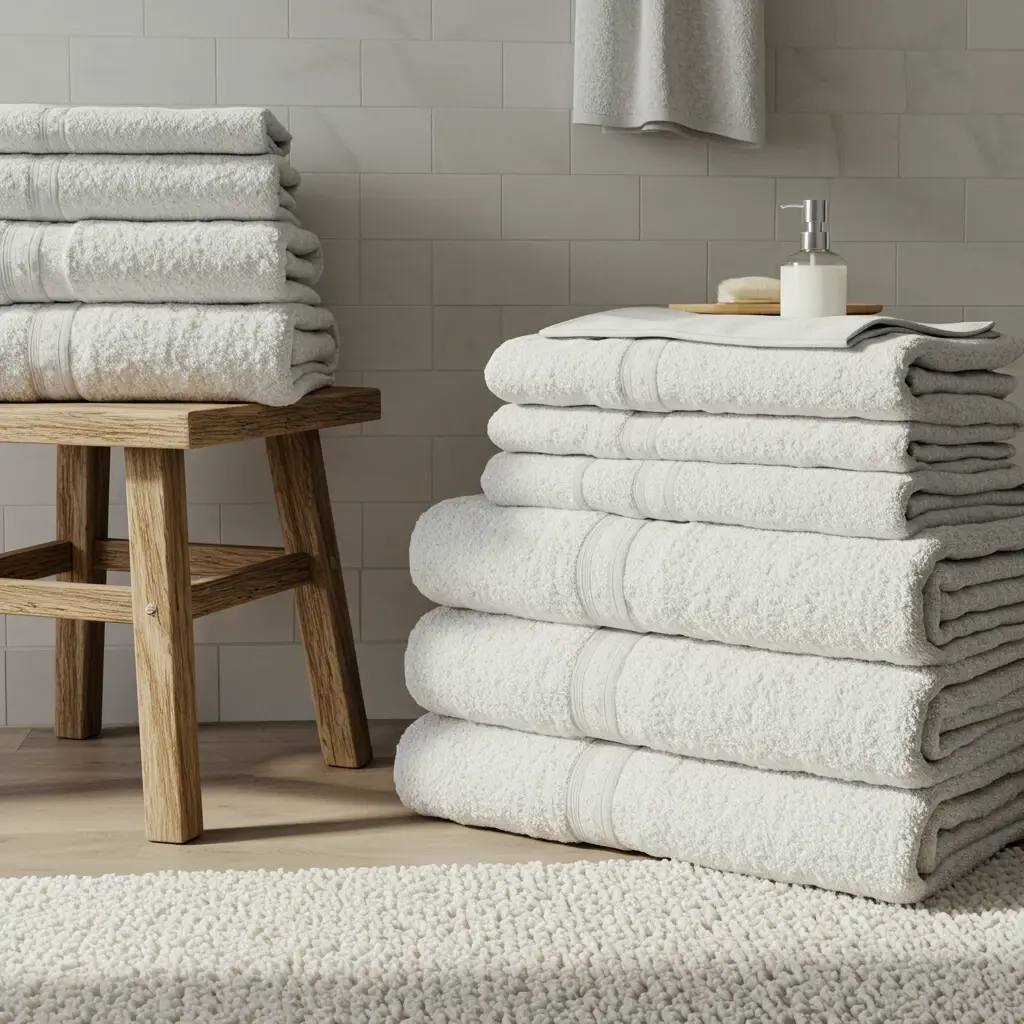
alt text: A spa-like bathroom scene with a stack of luxurious, fluffy white towels and a plush bath mat.
Conclusion
Designing a small bathroom doesn’t mean you have to compromise on style or function. As we’ve explored through these 21 tips, a smaller space is simply an invitation for smarter, more creative design solutions.
By embracing vertical storage, leveraging the psychology of light and color, and choosing intelligent, space-saving fixtures, you can completely transform a cramped room into a functional and serene retreat.
The key takeaways are to prioritize a clutter-free environment, create long, unbroken visual lines, and make every design element work hard for you. As we see in 2025, the future of design lies in creating spaces that are not only beautiful but also enhance our well-being, a principle that is perfectly achievable in even the most compact bathroom.
I encourage you to look at your small bathroom not as a limitation, but as a design opportunity waiting to be realized. Choose a few of these ideas that resonate with you and start planning.
You’ll be amazed at how a few strategic changes can make your space feel larger, brighter, and infinitely more luxurious. For more personalized tips and design inspiration, consider subscribing to our newsletter for the latest trends in home renovation and decor.
Frequently Asked Questions (FAQs)
What is the best color to paint a small bathroom to make it look bigger in 2025?
While light colors remain supreme, the trend for 2025 leans towards warm, earthy neutrals. Think soft, warm whites, creamy beiges, and very pale sage greens or terracotta tones. These colors provide the space-enhancing brightness of traditional whites but with added warmth and character, creating a more inviting and spa-like atmosphere.
Is a wet room a good idea for a very small bathroom?
A wet room can be an excellent solution for a very small bathroom. By waterproofing the entire room and eliminating the shower curb and enclosure, you create one continuous, open space. This maximizes every square inch and is fantastic for accessibility. However, it requires professional installation to ensure proper drainage and waterproofing, which can be more costly than a standard shower setup.


