Introduction
Are you looking for truly transformative pantry ideas to turn the most cluttered closet in your home into a stunning model of organization? The pantry is the hardworking heart of the kitchen, but it all too often becomes a “danger zone”—a chaotic jumble of half-used bags, hidden boxes, and duplicate purchases. A pantry makeover is about more than just tidying up; it’s a complete transformation that can streamline your daily routines, save you money on groceries, and bring a profound sense of calm and order to your entire home.
This guide will provide you with 15 transformative ideas, from foundational editing and strategic zoning to the magic of custom-feeling storage and stylish finishes, that will help you create the pantry of your dreams, no matter its size.
1. Begin with a Ruthless Edit: The Foundation of Transformation
Before you can implement any new system, you must start with a complete and ruthless “edit.” This is the non-negotiable first step of any true transformation. It means taking every single item out of your pantry and placing it on a large surface like your kitchen island or dining table. This process is crucial because it forces you to confront exactly what you have, and it allows you to assess your pantry space as a completely blank canvas.
I always tell my clients this is the most important and empowering step. It’s your opportunity to be honest about what you actually use and need.
- Empty Everything: Take every last can, box, and bag out of the pantry.
- Categorize as You Go: Create piles of like items as you pull them out (all pasta together, all cans together, etc.).
- Check Expiration Dates: Immediately discard anything that is expired.
- Be Honest: Get rid of any specialty ingredients you bought for a single recipe years ago and will never use again.
For an enhancement, create a donation box as you edit. For any non-expired, non-perishable food items that you know your family won’t eat, set them aside to donate to a local food bank.
Image Gen 1

alt text: The first step in a transformative pantry makeover: all items removed from the pantry and sorted into categories.
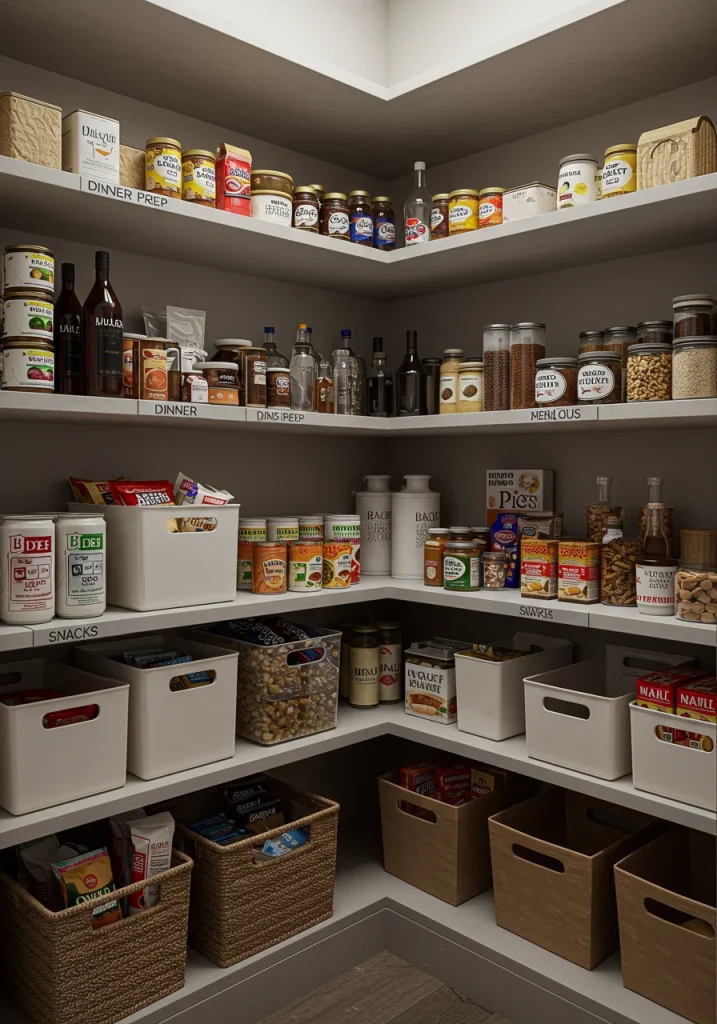
2. Implement Strategic Zoning
Once your pantry is empty and your items are edited, the next transformative step is to create a strategic “zone” plan. This means assigning a specific purpose and category to each shelf or section of your pantry. Instead of randomly placing items back on the shelves, you are creating a logical map that you and your family can easily understand and maintain. This is the core principle behind any sustainable organization system.
Think about how you use your kitchen and create zones that make sense for your lifestyle.
- Common Zones: A “Breakfast Zone” with cereals and coffee, a “Dinner Prep Zone” with pastas and sauces, a “Baking Zone,” a “Snack Zone,” and a “Back Stock Zone” for surplus items.
- Placement: Place your most frequently used zones on the prime real estate—the shelves that are at eye level and easiest to reach.
- Consistency: Once you’ve set your zones, be disciplined about always putting items back in their designated home.
For an enhancement, create a small, framed “map” of your pantry zones and hang it on the inside of the pantry door. This is especially helpful for other family members and will help everyone learn and maintain the new system.
Image Gen 2
alt text: A transformative pantry idea showing a well-organized pantry with specific, labeled zones for different food categories.
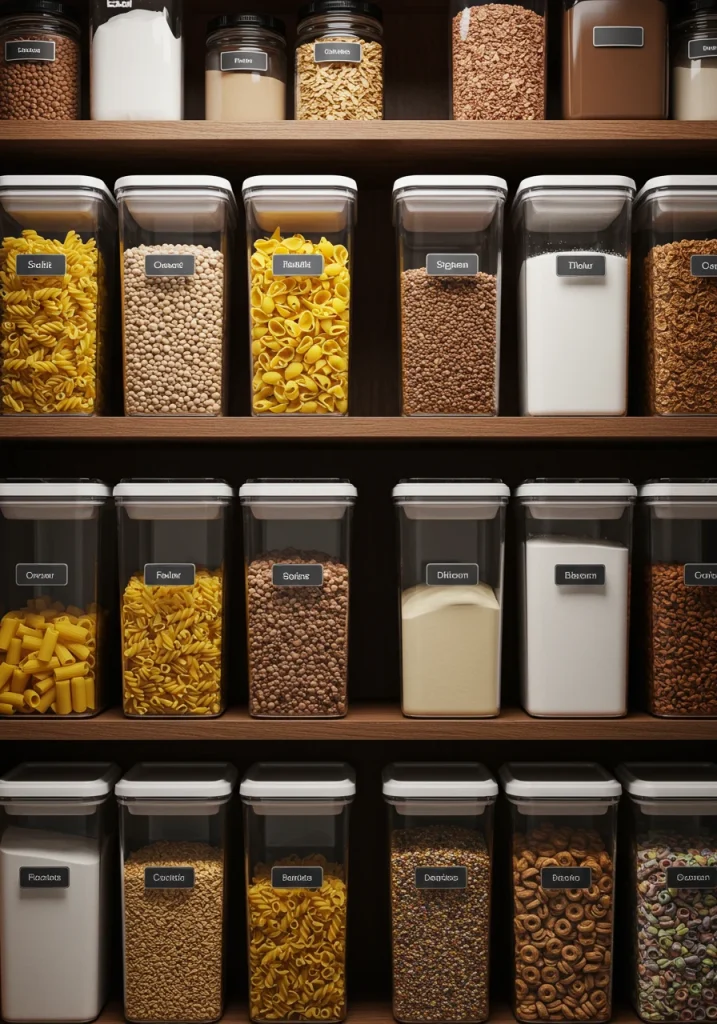
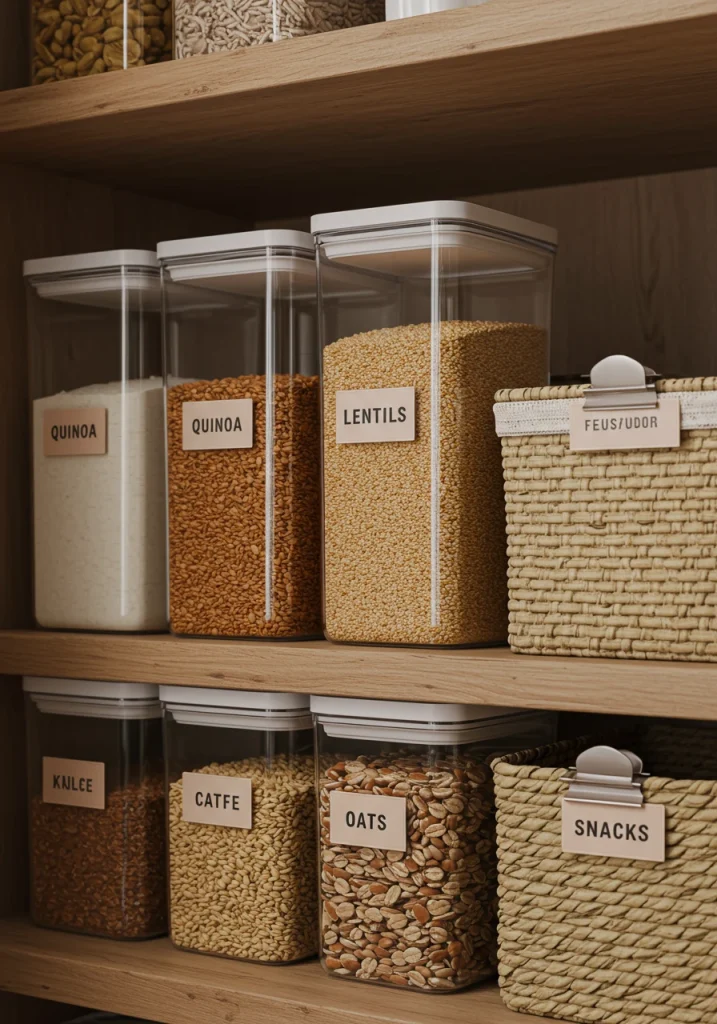
3. The Power of Decanting into Uniform Containers
This is perhaps the most visually transformative idea on the list. Decanting your dry goods—like flour, sugar, pasta, cereal, rice, and snacks—from their messy, half-empty, and bulky original packaging into a set of clear, airtight, uniform containers is a complete game-changer. This single step will instantly make your pantry look more organized, cohesive, and incredibly high-end.
This is the signature technique of professional organizers everywhere. It has huge functional benefits as well.
- Keeps Food Fresher: Airtight containers protect your food from air, moisture, and pests, keeping it fresh for much longer.
- See What You Have: The clear containers allow you to see exactly how much of an item you have left at a glance, preventing you from buying duplicates or running out unexpectedly.
- Maximizes Space: Uniform, stackable, square, or rectangular containers are far more space-efficient than bulky, mismatched boxes and bags.
For an enhancement, create a cohesive set by choosing one style of container (like the popular OXO Pop containers or a simple, glass jar with a bamboo lid) and using it for all of your decanted goods. The uniformity is what creates the stunning visual impact.
Image Gen 3
alt text: A transformative pantry idea showing dry goods decanted into uniform, clear, airtight containers.
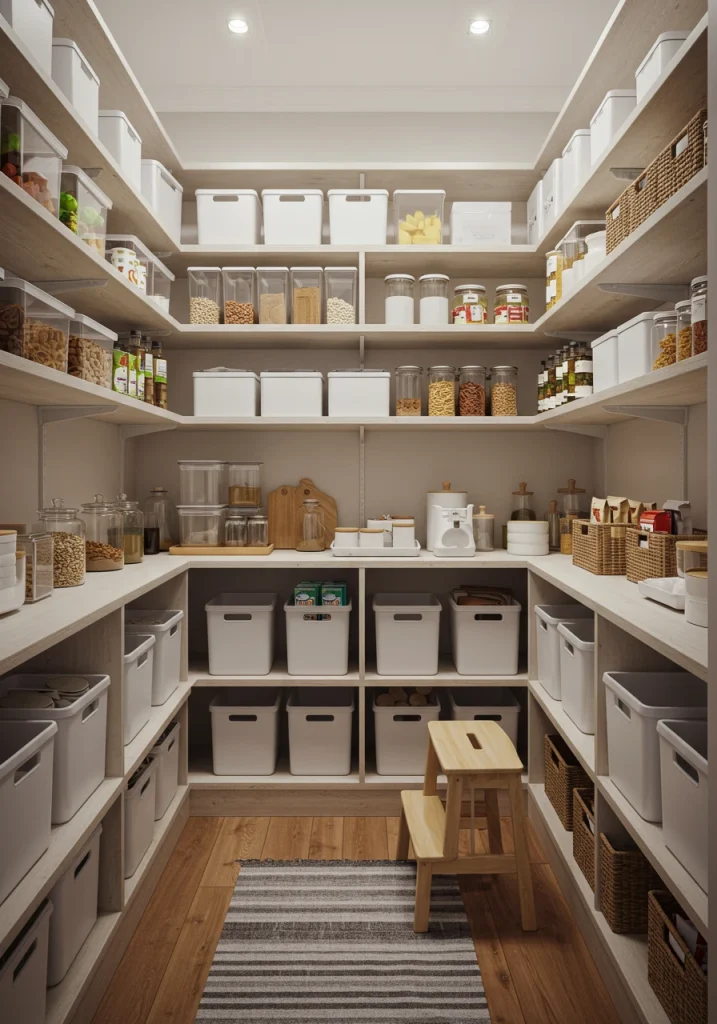
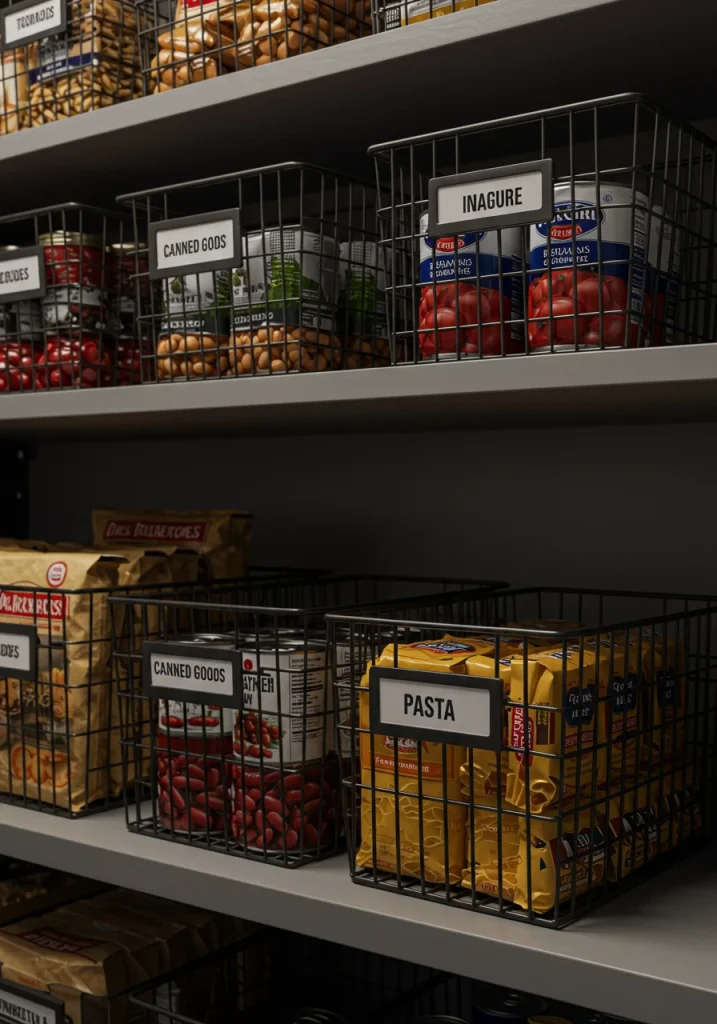
4. Utilize Clear Bins for Categorical Storage
For items that can’t be decanted, like packets, pouches, cans, and jars, clear bins are the perfect solution for creating order. By grouping “like with like” items into a clear, open-topped bin, you are creating a “removable drawer.” Instead of rummaging around on the shelf, you can simply pull out the entire bin to easily see and access everything inside.
This is a core principle from The Home Edit that I use in every pantry I organize. It turns a deep, cluttered shelf into a series of organized, accessible compartments.
- Group Items: Create bins for “Baking Supplies,” “Seasoning Packets,” “Kids’ Snacks,” “Breakfast Bars,” etc.
- Clear is Key: The clear plastic allows you to see the contents of the bin from a distance without having to pull it down.
- Create a System: Line the bins up neatly on your shelves to create a clean, uniform look.
For an enhancement, add a beautiful, custom label to the front of each clear bin. Even though you can see inside, the label clearly defines the category and adds a polished, professional finishing touch.
Image Gen 4
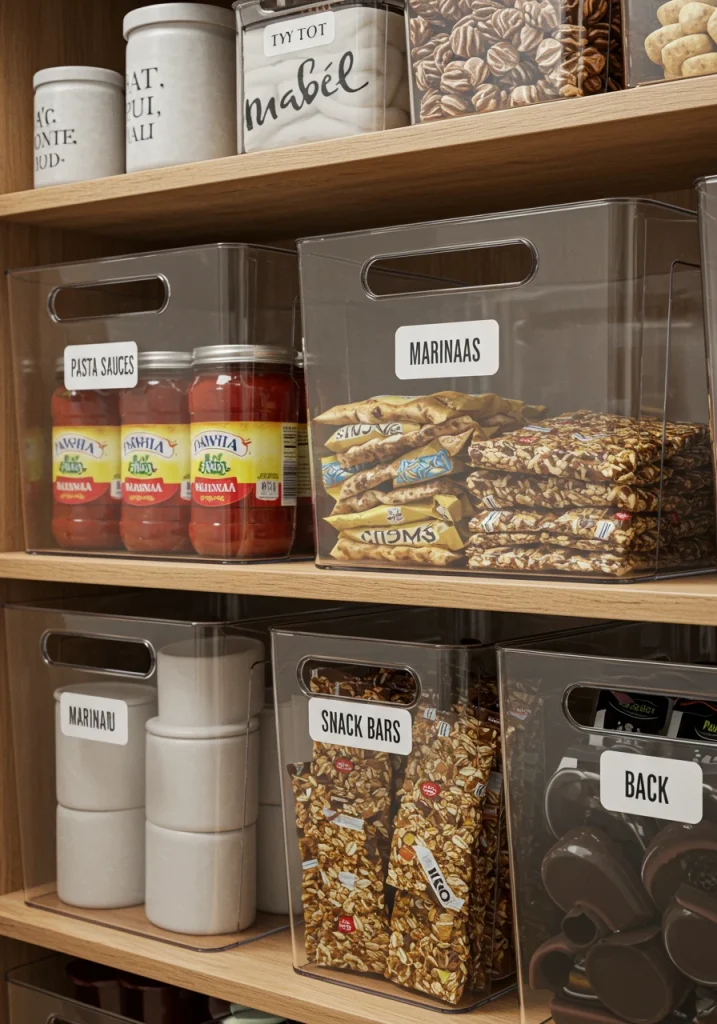
[Generate Image: A high-resolution, realistic 3D render of a pantry shelf organized with clear bins. Several, clear, plastic, open-topped bins are lined up neatly. Each has a stylish, white label. One bin labeled “PASTA SAUCES” holds jars of marinara. Another labeled “SNACK BARS” holds a collection of granola bars. You can see the contents of each bin clearly. The style is modern and inspired by professional organization, size 1000×1500 pixels]
alt text: A transformative pantry idea showing clear plastic bins used to group and organize categories like sauces and snack bars.
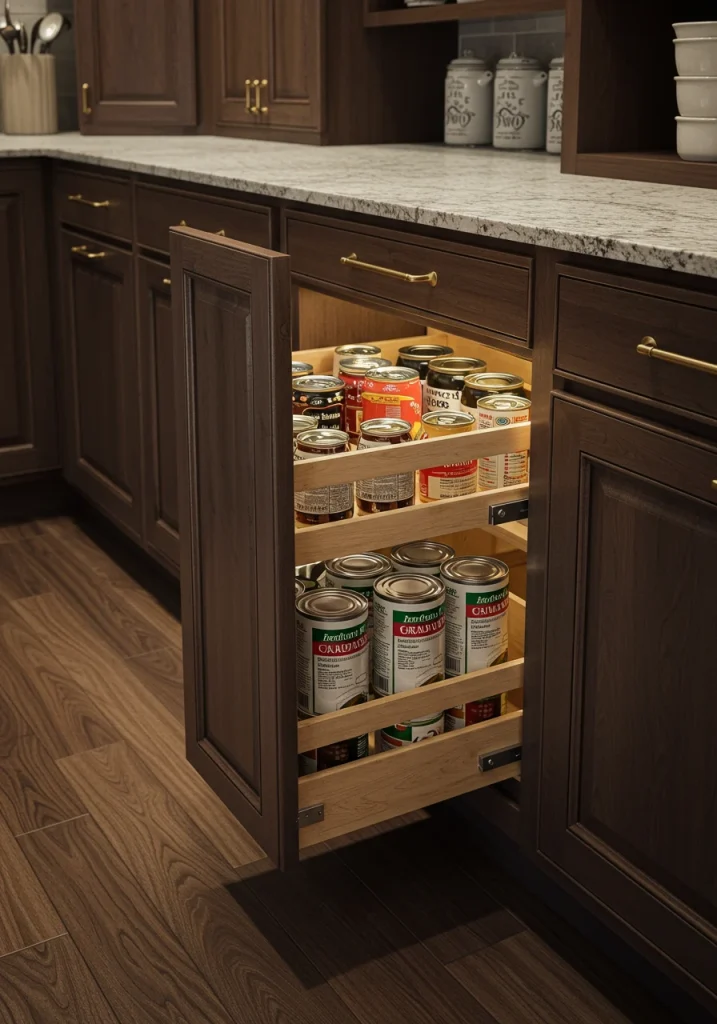
5. Install Pull-Out Drawers and Shelves
Deep pantry shelves can be a major source of frustration, as items in the back get lost, forgotten, and expire. A truly transformative remodel idea is to install pull-out, or sliding, drawers and shelves. This allows you to bring the entire contents of a deep shelf out to you, making every single item perfectly visible and accessible.
This is an investment that my clients always say is worth every penny. It completely eliminates the problem of “dead space” at the back of your pantry.
- Full Accessibility: Allows you to easily reach items at the very back of a deep shelf.
- Options: You can install full, custom pull-out drawers, or for a more budget-friendly and DIY option, you can add retro-fit, slide-out wire baskets to your existing shelves.
- Best for: Lower shelves, where it can be difficult to bend down and see what’s in the back.
For an enhancement, use dividers within your pull-out drawers to keep items like cans, jars, and boxes from tipping over when you slide the drawer in and out.
Image Gen 5
alt text: A transformative pantry with custom, pull-out drawers that make accessing items on deep shelves easy.
6. Maximize Corners with Turntables
Pantry corners are another notorious “dead zone” where items get lost in the dark abyss. The perfect, transformative solution for a corner shelf is a turntable, also known as a Lazy Susan. This simple, rotating tray is a classic organizational tool for a reason: it allows you to easily access everything on the shelf with a simple spin, making a deep or awkward corner completely functional.
This is an inexpensive item that has a huge impact on functionality. I always recommend using turntables for collections of round items like jars of condiments, oils, vinegars, and spices.
- Makes Corners Accessible: Brings items from the back of a corner to the front with a simple spin.
- Great for Round Items: Perfect for jars, bottles, and cans.
- Variety: Available in simple, plastic versions, or more stylish options in wood or metal.
For an enhancement, use a turntable with a high outer lip or a non-slip surface. This will help to prevent items from flying off when you spin it.
Image Gen 6

alt text: A transformative pantry idea: using a turntable or Lazy Susan to make a corner shelf fully accessible.
7. Go Vertical with Floor-to-Ceiling Shelving
To truly maximize the storage capacity of your pantry, you must utilize every inch of vertical space. If your current pantry only has a few shelves with large, empty gaps of air between them, a transformative idea is to install floor-to-ceiling shelving. This allows you to take your storage all the way up, creating a huge amount of extra space for back stock and less frequently used items.
I often suggest an adjustable shelving system for maximum flexibility. This allows you to change the height of your shelves as your needs change.
- Maximizes Space: Uses the often-wasted vertical space near the ceiling.
- More Storage: Can nearly double the amount of storage space in your pantry.
- Adjustable Systems: Offer the most flexibility for storing items of different heights.
For a necessary enhancement, keep a small, stylish, and sturdy step stool inside your pantry. This will allow you to safely and easily access the items on your new, high shelves.
Image Gen 7
alt text: A pantry transformed with floor-to-ceiling shelving to maximize vertical storage space.
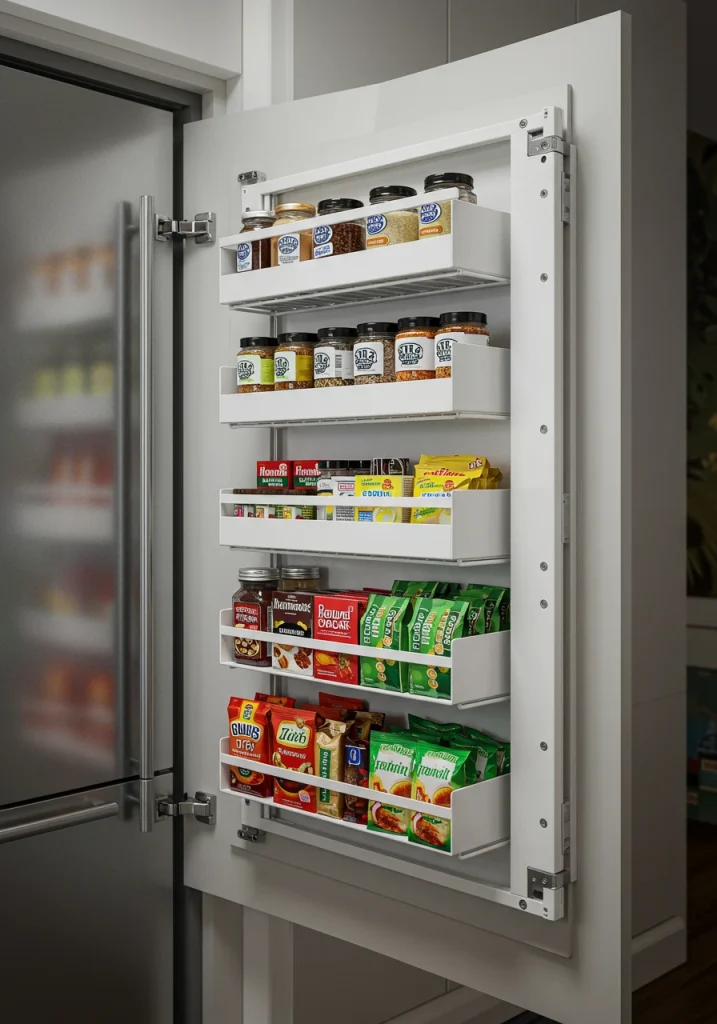
8. Utilize the Back of the Door
The back of your pantry door is one of the most underutilized storage spaces in the entire kitchen. An over-the-door or a wall-mounted rack can instantly add a huge amount of shallow storage, perfect for items that can get lost on deep shelves. This is a transformative idea, especially for a small, closet-style pantry.
I love using door storage for spices, small jars, packets, and kids’ snacks. It keeps these small items visible and incredibly easy to access. As the experts at The Container Store show, there is a huge variety of door storage solutions available.
- Shallow Storage: Perfect for small items that would get lost on a deep shelf.
- Easy Access: Keeps your most frequently used spices or snacks right at your fingertips.
- Options: Adjustable, wire rack systems are the most versatile. Individual clear pockets or baskets also work well.
For an enhancement, choose a sturdy, high-quality, wall-mounted rack system that screws directly into the door, rather than a flimsy, over-the-door hook system. The screwed-in version will be much more stable and can hold more weight.
Image Gen 8
alt text: A transformative pantry idea using a back-of-the-door rack to add a huge amount of shallow storage.
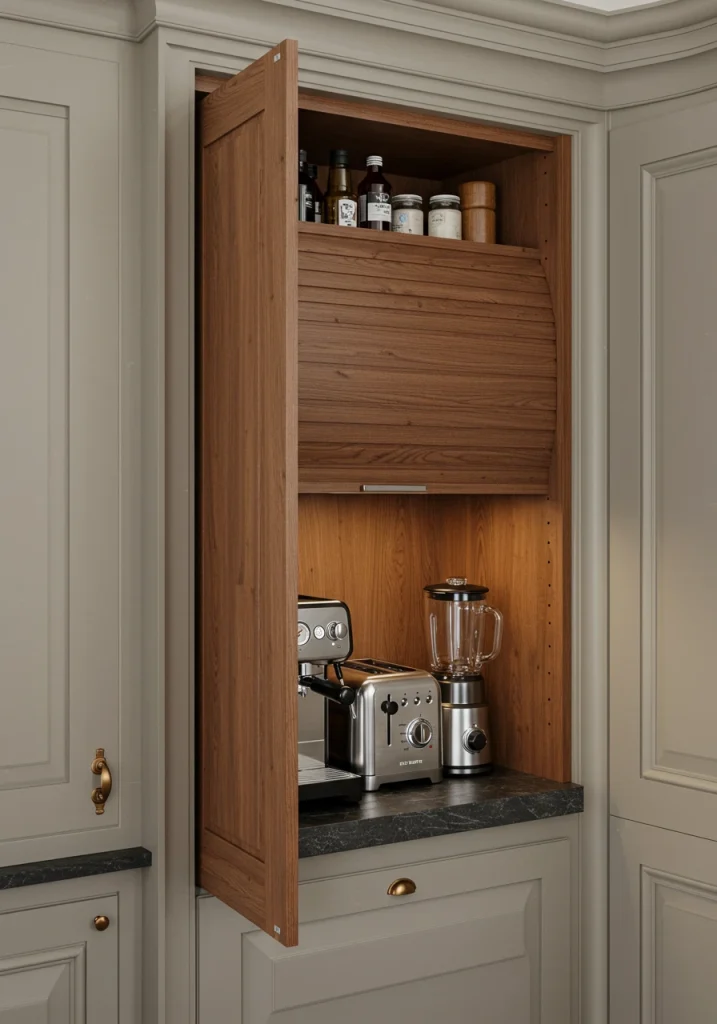
9. Create a Hidden Appliance Garage or Coffee Station
A pantry with a bit of counter space can be transformed into a highly functional workspace, but you don’t want it to become cluttered with small appliances. A brilliantly creative and luxurious idea is to create a hidden “appliance garage.” This is a section of your counter with an outlet that is concealed behind a cabinet door (like a tambour door that rolls up, or a lift-up door).
This allows you to keep your frequently used appliances, like your toaster, your blender, or your coffee maker, plugged in and ready to use, but completely hidden from view when not in use. I love designing these for clients as it keeps their main kitchen counters completely clear and uncluttered.
- Hides Clutter: Keeps your small appliances out of sight.
- Convenient: Appliances are plugged in and ready to use at a moment’s notice.
- Custom Look: A very high-end and custom-feeling feature.
For an enhancement, transform your appliance garage into a complete, hidden, morning coffee station. Include shelves above for your mugs, and small, airtight containers for your coffee beans, sugar, and tea bags.
Image Gen 9
alt text: A transformative pantry idea: a hidden appliance garage with a roll-up door to conceal small appliances.
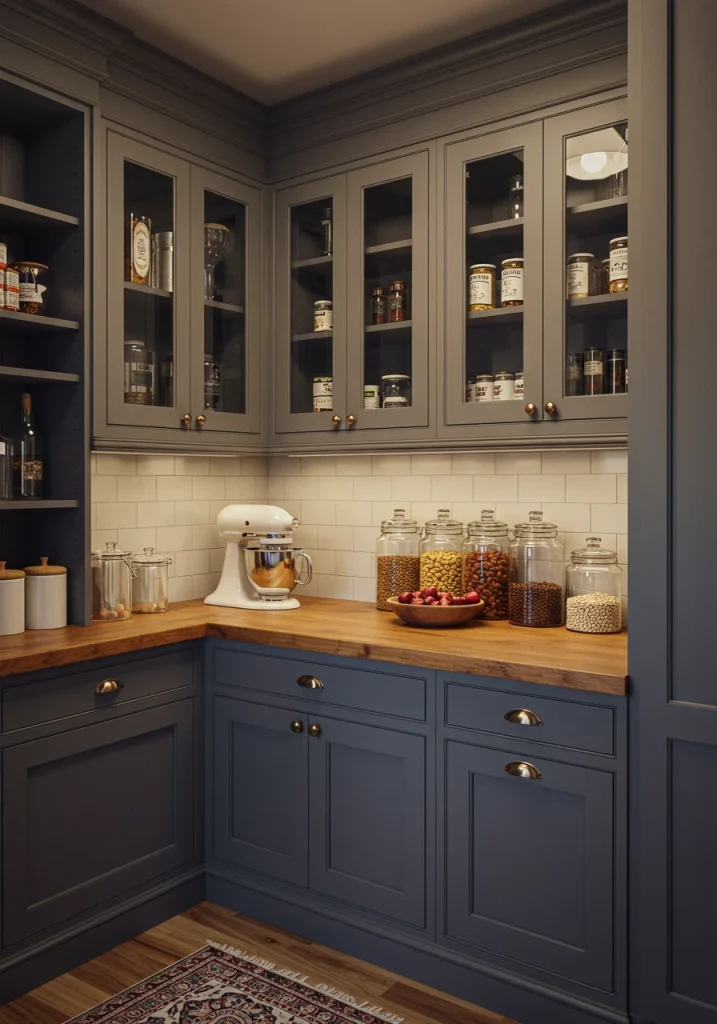
10. Add a Countertop Workspace
If you have a walk-in pantry, adding a dedicated section of countertop can be a truly transformative feature. It turns your pantry from just a storage closet into a true, functional, secondary workspace. This is a feature that is a hallmark of a high-end, luxury pantry design.
A pantry countertop is the perfect spot for a number of tasks that you might not want to do in your main kitchen.
- Appliance Zone: A place to keep your less frequently used appliances, like a stand mixer or a bread machine, out on the counter without cluttering your main kitchen.
- Food Prep: Can be used as an extra surface for meal prep or for unloading groceries.
- Coffee or Snack Bar: The perfect spot to set up a dedicated coffee station or a snack bar for the kids.
For an enhancement, use a beautiful, high-end material for your pantry countertop, like a piece of remnant marble or a thick, butcher block. Since it’s a smaller area, you can often afford to splurge on a more luxurious material than you would for your entire kitchen.
Image Gen 10
alt text: A transformative idea for a walk-in pantry: adding a countertop to create a functional workspace.
11. Install Good, Layered Lighting
A pantry, especially a walk-in or a closet-style one, can often be a dark and gloomy space where it’s hard to see what you have. A transformative and very important upgrade is to install good, layered lighting. A single, bare, overhead bulb is not enough. A well-lit pantry is more functional, more beautiful, and safer to use.
I always specify a layered lighting plan for my pantry projects.
- Ambient Light: Start with a bright, central, flush-mount ceiling light to illuminate the entire space.
- Task Lighting: This is the key. Install under-shelf LED strip lighting. This will illuminate the contents of each shelf, eliminating the dark shadows that are cast by the shelf above.
- Motion-Activated: A motion sensor that automatically turns the lights on when you open the door is a fantastic, convenient, and energy-saving feature.
For a high-end enhancement, use a lighting system that allows you to adjust the brightness. This will allow you to have bright, functional light when you’re looking for something, and a softer, ambient glow if you use your pantry as a bar or a serving station during a party.
Image Gen 11

alt text: A transformed pantry with a layered lighting scheme, including essential under-shelf LED lighting.
12. Use Baskets for a Softer, Textural Look
While clear, plastic bins are fantastic for pure, functional visibility, incorporating a collection of beautiful, woven baskets is a transformative way to add a layer of warmth, texture, and a softer, more decorative feel to your pantry. Baskets are perfect for hiding away visually cluttered items, like bags of snacks or a jumble of small packets, in a beautiful and stylish way.
I love to use a mix of both clear bins and natural baskets for a look that is both functional and beautiful. This approach, often seen in the designs of studios like Amber Interiors, adds a warm, organic, and slightly rustic touch.
- Materials: Baskets made of natural materials like seagrass, water hyacinth, or rattan are perfect.
- Use for “Ugly” Items: Use opaque baskets to hide the things you don’t want to see.
- Great for Produce: Wire or woven baskets that allow for good air circulation are perfect for storing potatoes and onions.
For a cohesive and polished enhancement, choose baskets that are all the same style or material and add a beautiful, matching label to each one. A simple, clip-on, metal bin label or a tied-on, leather tag can look incredibly chic.
Image Gen 12

alt text: A transformative pantry idea using beautiful, woven baskets for a soft, textural, and organized look.
13. Label Everything for a Polished System
A truly transformed and sustainable pantry organization system is not complete until every single container, bin, and basket is labeled. Labeling is the crucial final step that turns a tidy pantry into a true, easy-to-use system. It ensures that everyone in the family knows exactly where everything belongs, which is the key to maintaining your beautiful, new, organized space.
This is a step that I insist on with all my clients. It’s the difference between a one-time tidying project and a long-term organizational solution.
- Be Specific: The more specific your labels are, the better.
- Consistency is Key: Choose one style of label and use it throughout the entire pantry for a cohesive, high-end look.
- Options: You can use a simple, modern label maker, beautiful, pre-printed vinyl labels from a site like Etsy, or charming, handwritten, chalkboard labels.
For an enhancement that is a signature of professional organizers, choose a single, beautiful “font” for your pantry. Whether it’s an all-caps, minimalist font on your label maker or your own, beautiful handwriting, using a consistent script throughout will make your entire pantry look incredibly polished and custom-designed.
Image Gen 13
alt text: The transformative final step of pantry organization: labeling every container with a stylish, consistent label.
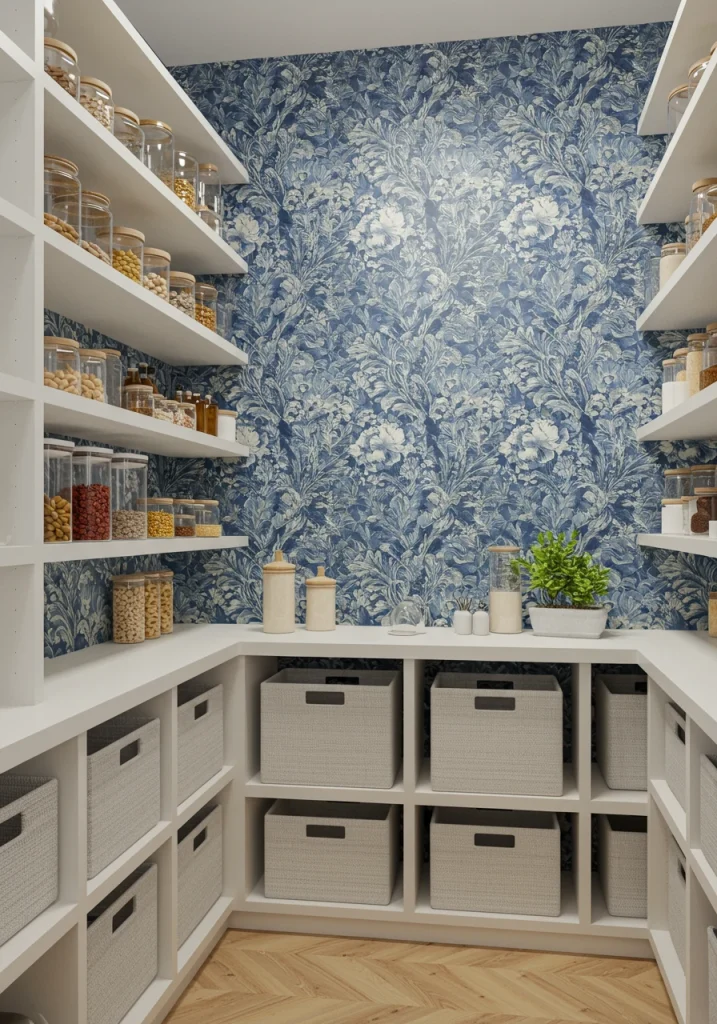
14. Add a Touch of Style with Wallpaper
A pantry, especially a walk-in pantry, is the perfect, small, contained space to have a bit of fun with your design and add a touch of unexpected style. A transformative and very on-trend idea is to add a beautiful, patterned wallpaper to the back wall of your pantry. This can turn a purely utilitarian space into a delightful, jewel-box-like surprise every time you open the door.
Since it’s a very small space, you can often afford to splurge on a roll of a higher-end, designer wallpaper that you might not use in a larger room. I love this trick for adding a huge amount of personality for a relatively small cost.
- Bold Patterns: A large-scale floral or a bold, geometric pattern can be a stunning backdrop for your organized shelves.
- Removable Wallpaper: For a less permanent and more renter-friendly option, a peel-and-stick wallpaper is a fantastic choice.
- Subtle Texture: Even a simple, textural wallpaper, like a grasscloth or a linen-effect paper, can add a layer of sophisticated, high-end warmth.
For an enhancement, if you have open shelves, paint the shelves a color that you have pulled from a detail in your wallpaper pattern. This will create a very custom and cohesive, high-design look.
Image Gen 14
alt text: A transformative pantry idea: adding a bold, patterned wallpaper to the back wall for a touch of style.
15. Create a “Back Stock” System
To keep your main, everyday pantry shelves from becoming cluttered with unopened duplicates, a transformative organizational strategy is to create a dedicated “back stock” system. This means designating a separate area—either a high, hard-to-reach shelf in your main pantry, a shelf in the garage, or a cabinet in your laundry room—for all your surplus, unopened items.
This is a system used by grocery stores and professional organizers for a reason: it’s incredibly efficient. I always help my clients set up this system.
- The System: When you use up the last of an item (like olive oil) from your main pantry, you “shop” from your back stock area to get the new one. You then immediately add “olive oil” to your running grocery list.
- Prevents Overbuying: You will always know exactly what surplus you have, so you won’t buy a third jar of mustard when you already have two, unopened ones in your back stock.
- Keeps Main Pantry Tidy: Your prime, easy-to-access shelves are reserved only for the items that are currently open and in use.
For an enhancement, use a simple, wall-mounted clipboard or a whiteboard in your back stock area to keep your running grocery list. This will make it incredibly easy to add an item to the list the moment you take your last one.
Image Gen 15
alt text: A transformative pantry organization system: a dedicated “back stock” area for storing surplus items.
Conclusion
A well-organized pantry is a true joy, and as we’ve explored through these 15 transformative pantry ideas, creating a beautiful, functional, and efficient space is an achievable goal for every home. The key to a true transformation lies in a systematic approach: start with a thorough edit to know what you have, create clear zones for your categories, use the right containers to maximize space and maintain freshness, and finally, label everything to create a polished and sustainable system that your whole family can follow.
I encourage you to look at your pantry not as a source of stress, but as a fun and rewarding project. You don’t have to tackle everything at once. Start with the foundational first step of editing and cleaning, and then gradually incorporate the containers and systems that work best for you. The satisfaction of opening your pantry door to a scene of beautiful, calm, and accessible order is one of the simple pleasures that makes a house truly feel like a well-run and peaceful home. For more inspiration, you might enjoy our guide on kitchen organization. [Link to related article on how to organize your entire kitchen].
Frequently Asked questions (FAQs)
- What is the very first step to organizing a pantry?The first and most important step is to take every single item out of the pantry. You cannot effectively organize a space until you can see everything you have and can start with a clean, blank slate.
- What is “decanting” and should I really do it?Decanting is the process of removing food from its original packaging and putting it into uniform containers. Yes, you should absolutely do it! It saves a huge amount of space, keeps your food fresher for longer, and allows you to see at a glance how much you have, which saves you money.
- How do I organize a very deep pantry?Deep pantries are best organized with solutions that can be pulled out. Installing pull-out drawers or shelves is the best option. A more budget-friendly solution is to use long, narrow, clear bins that can act as removable “drawers.” Turntables (Lazy Susans) are also essential for making deep corners accessible.
- What are the best containers for a pantry?The best containers are clear, airtight, and space-efficient. Choose clear containers so you can see the contents. Airtight lids are essential for keeping food fresh. And, most importantly, choose square or rectangular containers over round ones, as they fit together with no wasted space, maximizing your shelf space.
- How do I keep my pantry organized long-term?The key to long-term success is creating a sustainable system and being disciplined. Label everything, so every family member knows where things go. Implement a “back stock” system to keep your main shelves from getting cluttered with duplicates. And, schedule a quick, 15-minute “pantry reset” once a month to tidy things up before they get out of hand.
- What are “pantry zones”?Zoning is the process of assigning a specific category of items to a specific area of your pantry. For example, you would have a “Breakfast Zone” where you keep all your cereals, oats, and coffee, and a separate “Baking Zone” for all your flours, sugars, and sprinkles. This creates a logical map of your pantry.
- What is a “back stock” system?A “back stock” system involves having a designated, separate area (like a high shelf or a spot in the garage) for your unopened, surplus items. When you finish an item in your main pantry, you “shop” from your back stock to get a new one, and then immediately add that item to your grocery list. It’s a very efficient inventory management system.


