Are you looking for creative and cheap backyard ideas that will transform your outdoor space without draining your wallet? It’s a common misconception that creating a beautiful and functional backyard requires a massive budget.
In reality, some of the most charming, stylish, and personal outdoor spaces are born from resourcefulness, a bit of DIY spirit, and a whole lot of creativity. A stunning backyard oasis is less about how much you spend and more about how cleverly you use the space and materials you have. It’s about “sweat equity” and the satisfaction of building something beautiful with your own hands.
This guide is packed with over 15 creative, high-impact, low-cost ideas that you can actually do yourself. From building furniture out of unexpected materials to creating magical ambiance with solar lights, these projects, often celebrated by DIY communities on Pinterest and in publications like The Spruce, will help you create a backyard you love without the hefty price tag.
1. Create a Chic Pea Gravel Patio
One of the most affordable and stylish ways to create a functional patio area is by using pea gravel. This is a fantastic alternative to expensive concrete, pavers, or decking. Pea gravel consists of small, smooth, rounded stones that create a soft, textural surface with a relaxed, European-courtyard feel. It’s perfect for a casual seating area, a fire pit zone, or a space for your bistro set, and the installation is a very manageable DIY project for a beginner.
The most critical part of this project is the preparation. To ensure your patio looks neat and stays weed-free, you must properly install a sturdy landscape edging to contain the gravel and lay a high-quality weed barrier fabric underneath. I’ve seen clients transform a muddy, unused corner of their yard into a chic and functional patio in a single weekend with this method.
- Outline and Excavate: Mark your patio area and dig out about 4-5 inches of soil and grass.
- Install Edging: Use inexpensive metal, plastic, or even reclaimed brick edging around the perimeter.
- Add a Base and Weed Barrier: Put down and compact a 2-inch layer of crushed rock, then lay your weed barrier fabric on top.
- Add the Pea Gravel: Pour in your pea gravel and rake it smooth to a depth of about 2 inches.
For an enhancement, place a few large, inexpensive concrete pavers or flat flagstones within the pea gravel area. This provides a solid, stable surface for the legs of your chairs and tables, preventing them from sinking.

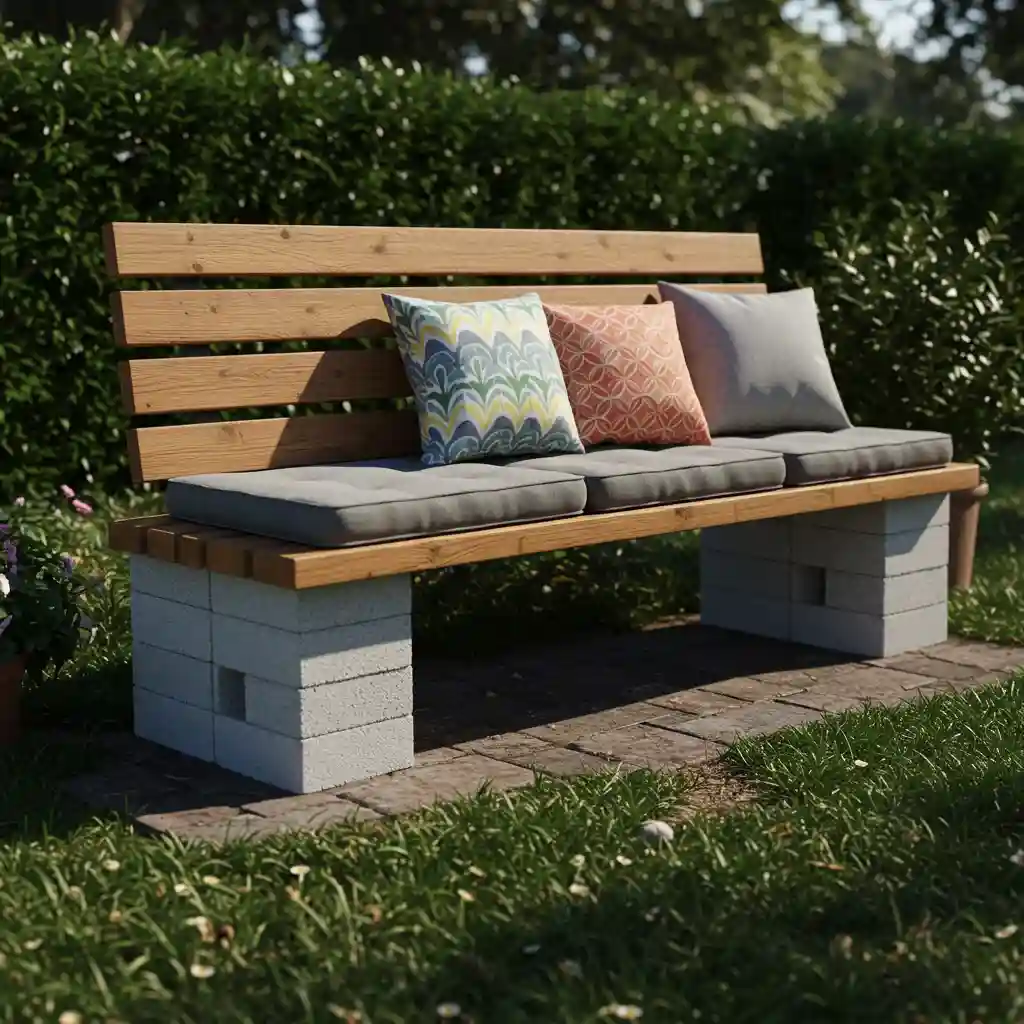
2. Build Furniture from Cinder Blocks and Wood
For truly budget-friendly, modern, and surprisingly stylish outdoor furniture, look no further than your local hardware store. A simple bench or a low sofa can be constructed in minutes using concrete cinder blocks and standard lumber posts (like 4x4s). This is a no-screws, no-nails required project that has a cool, industrial-chic vibe. The raw, utilitarian materials create a fantastic contrast with soft, cozy cushions.
I love this DIY project for its simplicity and modularity. You can create a simple bench, an L-shaped sofa, or even side tables just by stacking and arranging the blocks in different ways. This is a high-impact project that delivers a huge amount of seating for a very small investment, and it’s a favorite in modern and minimalist design circles.
- Gather Materials: Concrete cinder blocks (the kind with two holes) and 4×4 or 2×6 lumber posts cut to your desired length.
- Stack the Blocks: Create the two “legs” of your bench by stacking two or three cinder blocks on each end.
- Insert the Beams: Slide your wooden posts through the holes in the cinder blocks to create the seat.
- Add Comfort: Finish with comfortable, outdoor-friendly cushions and pillows.
To enhance this project, paint the cinder blocks a bold color—like a matte black, a crisp white, or a fun, vibrant hue—using masonry paint. This gives the bench a more custom, graphic look and helps it tie into your overall color scheme.
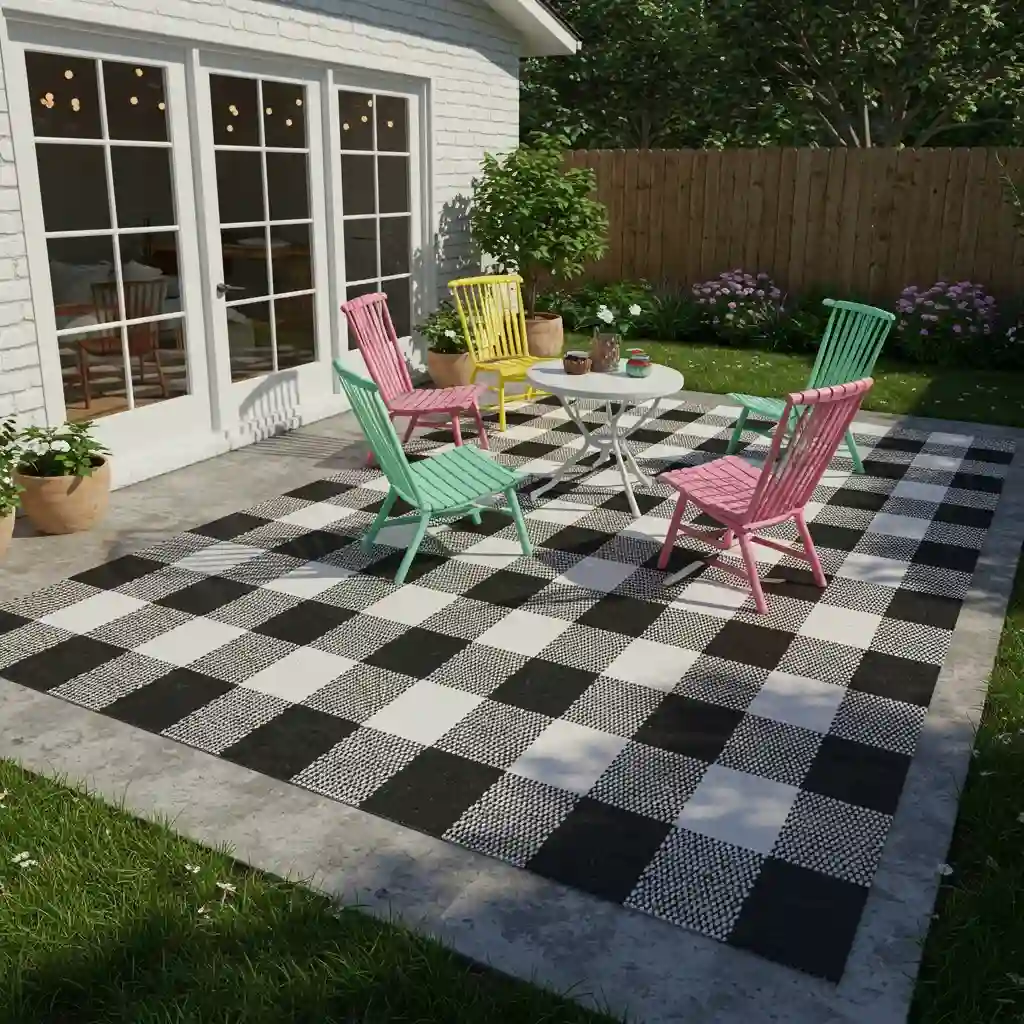
3. Paint a Faux Outdoor Rug on Concrete
A beautiful outdoor rug can instantly define a space, but a large, high-quality one can be expensive. A brilliantly creative and cheap alternative is to paint a “rug” directly onto your concrete patio or wooden deck. This project allows you to create a custom-sized rug with any pattern you can imagine, and it’s an incredibly durable, all-weather solution.
This is a fantastic way to add a major pop of color and personality to a boring concrete slab. For a client with a plain concrete patio, we used painter’s tape to create a bold, geometric pattern and used durable porch and floor paint in two contrasting colors. The result was a stunning, graphic “rug” that completely transformed the look of her space.
- Clean the Surface: Thoroughly clean your concrete or wood surface and let it dry completely.
- Tape Your Pattern: Use high-quality painter’s tape to create the outline of your rug and any interior pattern (stripes, chevrons, and geometric shapes are easiest).
- Paint Your Design: Use a durable porch and floor paint, which is designed to withstand foot traffic and the elements. Apply two coats for best results.
- Seal It (Optional): For extra durability, you can apply a clear, concrete or wood sealant over your finished design.
For an enhancement, use a stencil to create a more intricate, tile-like pattern. You can find large, reusable floor stencils online that can help you create a beautiful, Mediterranean-inspired design.
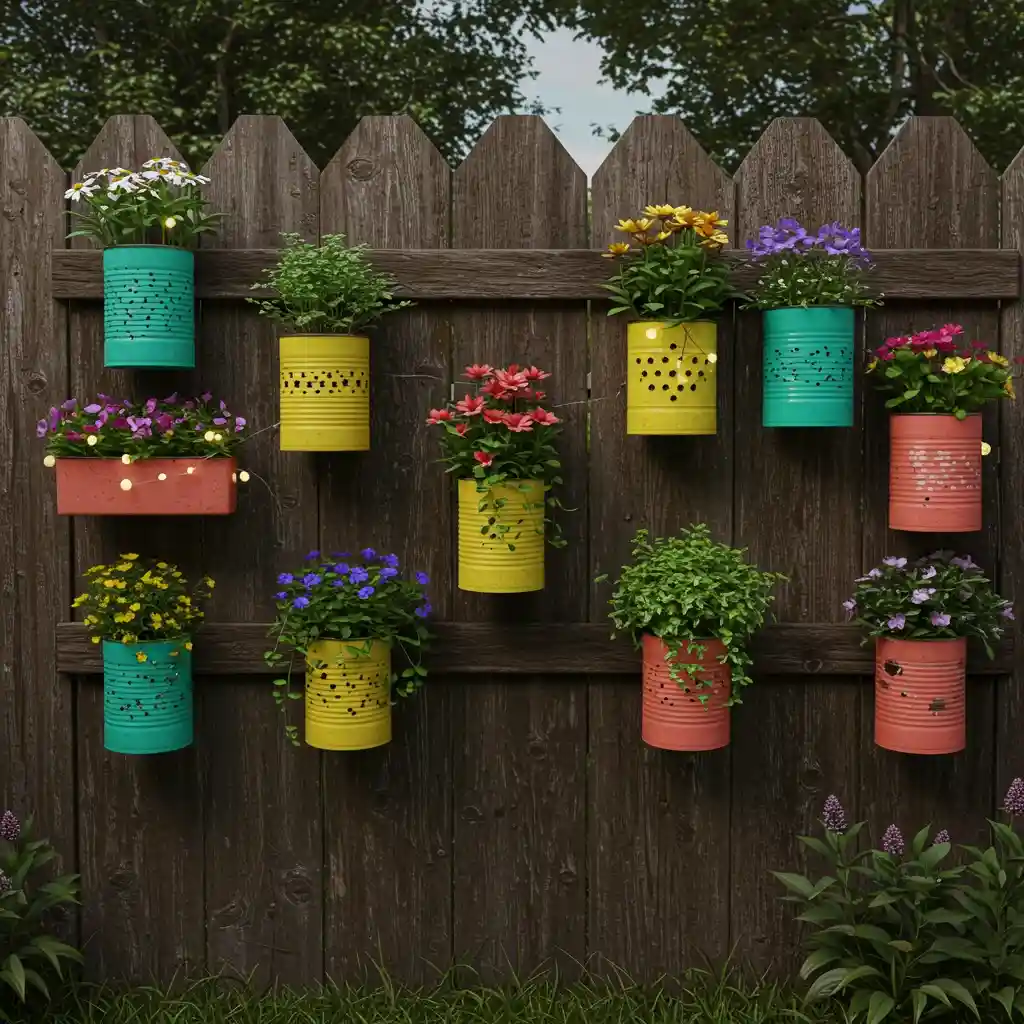
4. Upcycle Tin Cans into Planters and Lanterns
Don’t throw away those empty tin cans from your kitchen! With a little creativity, they can be upcycled into charming and virtually free decorative items for your backyard. This is a fun, eco-friendly project that is perfect for adding small pops of color and personality to your outdoor space.
I love to show my clients how to turn trash into treasure. For planters, simply wash the can, drill a few drainage holes in the bottom with a nail and a hammer, and then paint it a fun, vibrant color with spray paint.
They are the perfect size for growing herbs or small annual flowers. For lanterns, wash the can, fill it with water, and freeze it. The ice will provide support while you use a hammer and nail to punch a beautiful, decorative pattern of holes into the sides.
Once the ice melts, you can paint the can and place a small tea light or a battery-operated candle inside to cast a beautiful, patterned glow.
- For Planters: Clean can, drill drainage holes, and paint.
- For Lanterns: Clean can, freeze with water inside, punch a pattern of holes with a nail, and paint.
As an enhancement for the lanterns, use different sizes of nails or even a drill bit to create holes of varying sizes in your pattern. This will create a more complex and interesting light effect.
5. Edge Garden Beds with Repurposed Materials
Creating a clean, defined edge for your garden beds is one of the quickest ways to make your entire backyard look neater and more intentional. You don’t need to buy expensive, commercial edging. A fantastic and cheap idea is to use repurposed or found materials to create a unique and character-filled border.
Look around for free materials you can use. A collection of similar-sized rocks or river stones gathered from a walk can create a beautiful, naturalistic border.
I once had a client who collected colorful glass bottles from friends and family; we buried them neck-down in a row to create a stunning, luminous, and completely unique garden edge.
- Found Rocks: A classic, free, and natural-looking option.
- Wine/Glass Bottles: Bury them neck-down for a colorful, light-catching border.
- Old Bricks or Broken Concrete: “Urbanite,” or broken pieces of concrete, can be arranged to create a rustic, mosaic-like edge.
- Scalloped Terracotta Tiles: These can often be found cheaply and add a touch of classic, cottage charm.
For an enhancement, make sure to dig a small trench for your edging material to sit in. Burying the first inch or two of your rocks, bricks, or bottles will make the border much more stable and secure.
6. Use Solar Lights for Magical, Free Ambiance
Good lighting can completely transform a backyard at night, turning it into a magical and usable space. But hiring an electrician to install outdoor lighting is expensive. Solar-powered lights are the perfect cheap and creative solution.
They require no wiring, cost nothing to run, and modern solar lights are incredibly stylish and effective.
You can create a stunning, layered lighting scheme for just a few dollars. Use simple solar-powered path lights to illuminate a walkway. Use solar spotlights to uplight a beautiful tree or a textured fence.
But for the biggest “wow” factor, as recommended by countless designers, hang solar-powered string lights overhead. This is the single most impactful thing you can do to create a cozy, bistro-like ambiance.
- String Lights: Hang them overhead for a magical canopy effect.
- Path Lights: For safety and to define walkways.
- Spotlights: To highlight a feature plant or a tree.
- Fairy Lights: Weave tiny, solar-powered fairy lights through a bush or a trellis for a delicate sparkle.
For a creative enhancement, take a few empty glass mason jars, place a strand of solar-powered fairy lights inside each one, and hang them from tree branches or place them on your table. They look like you’ve captured a jar of magical fireflies.
7. DIY a Stock Tank Pool
The stock tank pool is the ultimate cheap and creative backyard idea for those who dream of a place to cool off. As we’ve seen on Pinterest and in magazines, these galvanized metal livestock troughs can be transformed into incredibly chic and functional mini-pools for a fraction of the cost of a traditional pool. This is a project that combines rustic charm with a trendy, industrial vibe.
The basic process involves buying a stock tank (available at farm supply stores), leveling a spot in your yard, and hooking up a simple, above-ground pool filter pump to keep the water clean. The real creativity comes in how you style the area around it.
I always suggest building a simple, low-profile wooden deck surround or creating a pea gravel patio to make it feel like a true oasis.
- Budget: The total cost can be a few hundred dollars, versus many thousands for a traditional pool.
- DIY: A manageable project for someone with basic DIY skills.
- Style: A unique, rustic, and very on-trend look.
To enhance your stock tank pool, build a simple, semi-circular bench around one side of the pool. It’s the perfect spot for sitting and dipping your feet in, and it helps to visually integrate the tank into your landscape.
8. Build a Simple Fire Pit with Concrete Pavers
A fire pit is a natural gathering spot that can make your backyard usable well into the cool evenings. You don’t need to spend a lot of money on a fancy, pre-made fire pit. A simple, rustic, and incredibly durable fire pit can be built yourself in an afternoon using concrete wall blocks or pavers from a hardware store.
This is a classic and very popular DIY project. The process involves creating a level ring of sand or gravel as a base and then simply stacking the concrete blocks in a circle, typically three or four layers high. You can use a bit of construction adhesive between the layers for extra stability. This creates a safe, contained pit for a wood-burning fire.
- Materials: Concrete retaining wall blocks (the kind with a lip on the back work well), sand or gravel for the base.
- Safety: Ensure your DIY fire pit is built on a level, non-flammable surface and is a safe distance from your house, trees, and fences.
- Cost-Effective: Significantly cheaper than buying a pre-made fire pit of a similar size.
For an enhancement, buy the optional metal fire pit ring insert. This steel ring sits inside your block structure and protects the concrete from the direct, intense heat of the fire, which will make your DIY fire pit last much longer.
9. Create a Vertical Garden from a Pallet
Wooden pallets are often available for free from local businesses and are a fantastic resource for a huge variety of DIY projects. One of the best uses for a pallet in a small backyard is to turn it into a vertical garden. This is a wonderfully rustic and space-saving way to grow a collection of herbs, succulents, or small flowers.
This is a very simple upcycling project. I love how it can turn a piece of industrial “trash” into a beautiful, living wall art piece.
- Find a Pallet: Look for a pallet that is heat-treated (marked with “HT”), not chemically treated (avoid ones marked “MB”).
- Prep the Pallet: Clean the pallet well and sand down any rough spots.
- Create Pockets: Staple landscape fabric to the inside of the pallet slats to create pockets to hold the soil.
- Plant: Stand the pallet upright, fill the pockets with potting mix, and plant your chosen herbs or flowers.
To enhance your pallet garden, paint it a fun, bright color or a chic, dark charcoal before you add the fabric and soil. This can help it to stand out as a stylish feature in your yard.

10. Plant Perennials from Cuttings or Seeds
The biggest cost in a new landscape is often the plants themselves. A fantastic way to create a lush garden on a very tight budget is to grow your plants from seeds or from cuttings shared by friends and neighbors.
This requires a bit more patience, but it is incredibly rewarding and virtually free. Many popular perennials are very easy to propagate from cuttings.
Many gardeners are more than happy to share a cutting or a division from an overgrown plant in their yard. Don’t be afraid to ask! This is a wonderful, time-honored way to build a garden and a community.
- Easy to Grow from Seed: Sunflowers, Zinnias, Marigolds, and Cosmos.
- Easy to Propagate from Cuttings: Sedum, Coleus, Hydrangeas, and many herbs.
- Plant Swaps: Look for local community plant swaps where you can trade your extra seedlings for something new.
For an easy enhancement, start your seeds indoors in late winter using recycled containers like yogurt cups or egg cartons. This will give your plants a huge head start, and you’ll have healthy, established seedlings ready to plant outside as soon as the weather warms up.
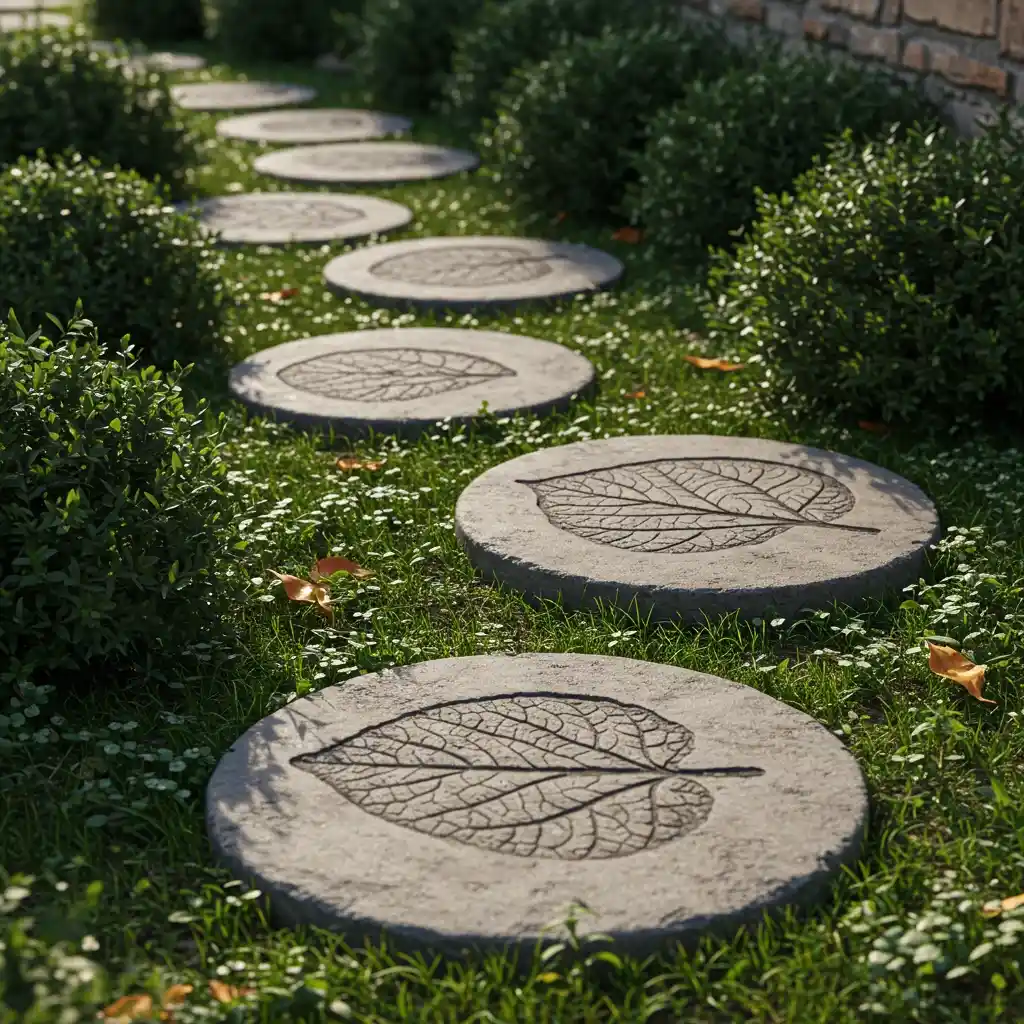
11. DIY a Simple Stepping Stone Path
Creating a path is a great beginner project that adds functionality and charm to your backyard. A simple stepping stone path is the easiest type to install and can look wonderfully rustic and informal. A path guides you through the space, protects your lawn or groundcover, and can lead the eye to a focal point.
This is a project that can easily be completed in an afternoon. I love the look of large, irregular flagstones for a naturalistic feel, but you can also make your own! You can buy inexpensive concrete mix and a simple mold (or even use a cake pan or a bucket) to create your own custom, DIY stepping stones.
- Plan Your Path: Lay your stepping stones out first to perfect the placement and spacing.
- Cut the Outline: For each stone, use a spade or a knife to cut its outline into the grass.
- Remove the Sod: Set the stone aside and dig out the sod and a bit of soil, so the stone will sit flush with the ground.
- Level and Set: Add a thin layer of sand to the hole to create a level base, then place the stone in and press it down firmly.
For a creative and personal enhancement, before your DIY concrete stepping stones fully cure, press a large, interesting leaf (like one from a hosta or a fern) into the wet surface to create a beautiful, fossil-like imprint.
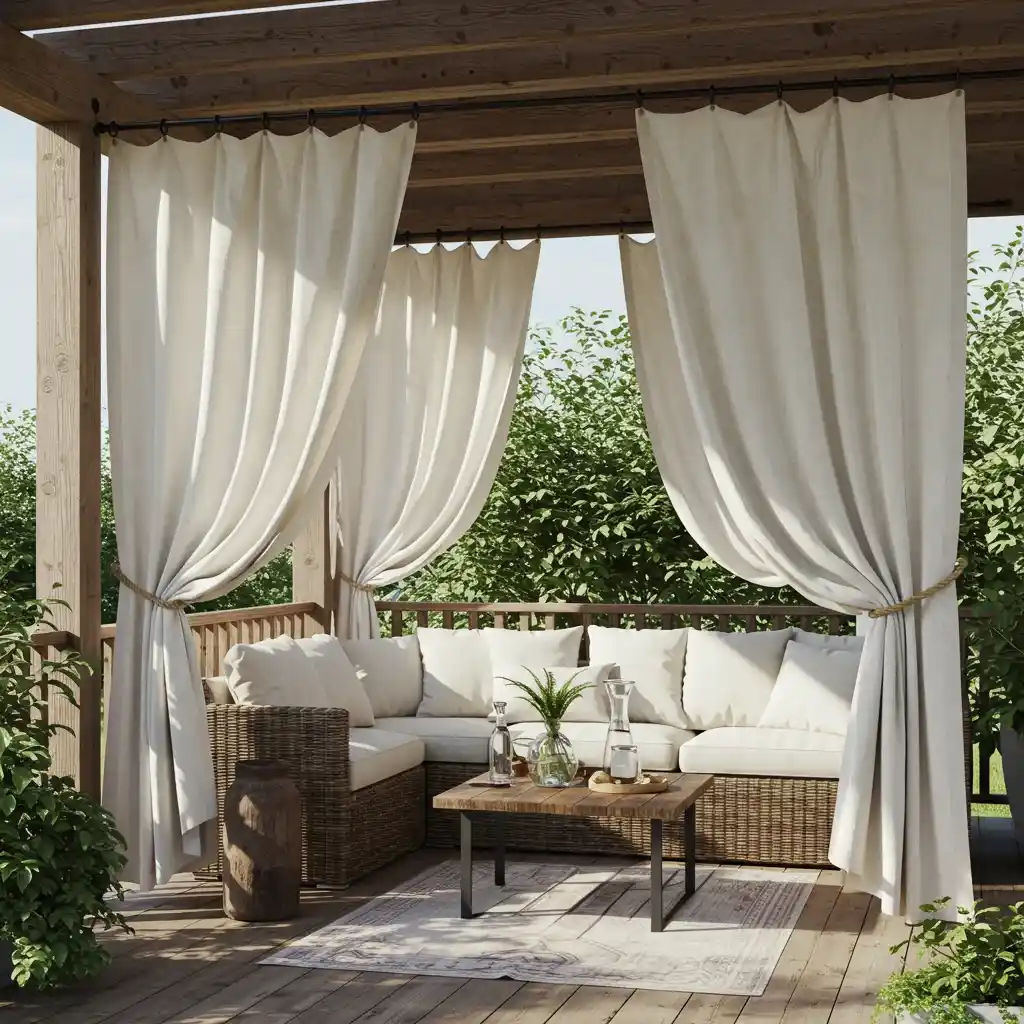
12. Hang DIY Outdoor Curtains
To create a sense of privacy and a soft, resort-like feel in your backyard, you don’t need to spend a lot of money on custom outdoor curtains. A fantastic and very cheap DIY idea is to make your own outdoor curtains from inexpensive canvas drop cloths from the hardware store.
Drop cloths are made of a heavy, durable cotton canvas that stands up well to the elements, and their neutral, off-white color is very chic.
This is a simple sewing or even no-sew project. You can use clip-on curtain rings to hang the drop cloths from a simple metal conduit pipe or a tension rod. I love how this simple project can instantly soften a space, provide shade, and create the feeling of a luxurious, private cabana.
- Get Your Materials: Canvas drop cloths, clip-on curtain rings, and an outdoor-rated curtain rod or a metal pipe.
- Wash First: Wash and dry the drop cloths to soften them up.
- Hang Them Up: Simply clip the rings onto the top edge of the drop cloth and slide it onto your rod.
For an enhancement, you can easily add your own custom, painted pattern to the drop cloths. Use painter’s tape to create a simple, bold stripe or a geometric pattern and use an outdoor-friendly fabric paint.
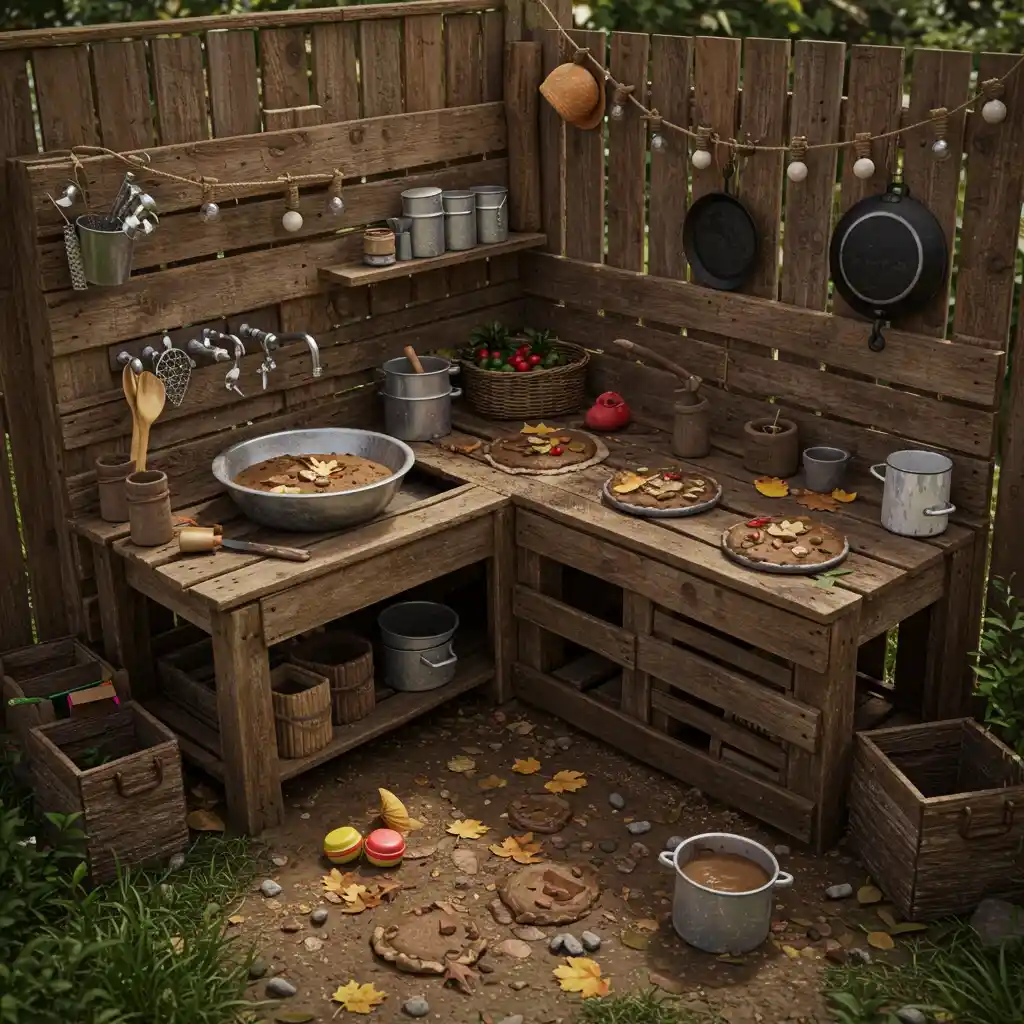
13. Create a Kids’ Mud Kitchen from Scraps
If you have children, creating a dedicated play space for them is a great way to keep them entertained outdoors. A “mud kitchen” is a classic and wonderfully creative play feature that you can build for almost no cost using scrap wood, old pallets, and thrift store finds. A mud kitchen is simply an outdoor play kitchen where kids are encouraged to get messy with dirt, water, leaves, and rocks.
This is the ultimate upcycling project. I have helped clients build these using a couple of old wooden pallets for the structure, a free, discarded sink from a renovation site, and a collection of old pots, pans, and utensils from a thrift store. It provides hours of creative, imaginative play.
- The Structure: Use old pallets, scrap lumber, or even a couple of old tires stacked up.
- The Sink: An old metal bowl or a discarded sink basin.
- The “Appliances”: Paint circles on a piece of wood for a “stovetop.”
- The Accessories: Stock it with old pots, pans, spoons, and containers.
For an enhancement, add a simple, working water source. You can attach a simple spigot to a large, refillable water jug placed on a shelf above the sink to create a functional, gravity-fed “faucet.”

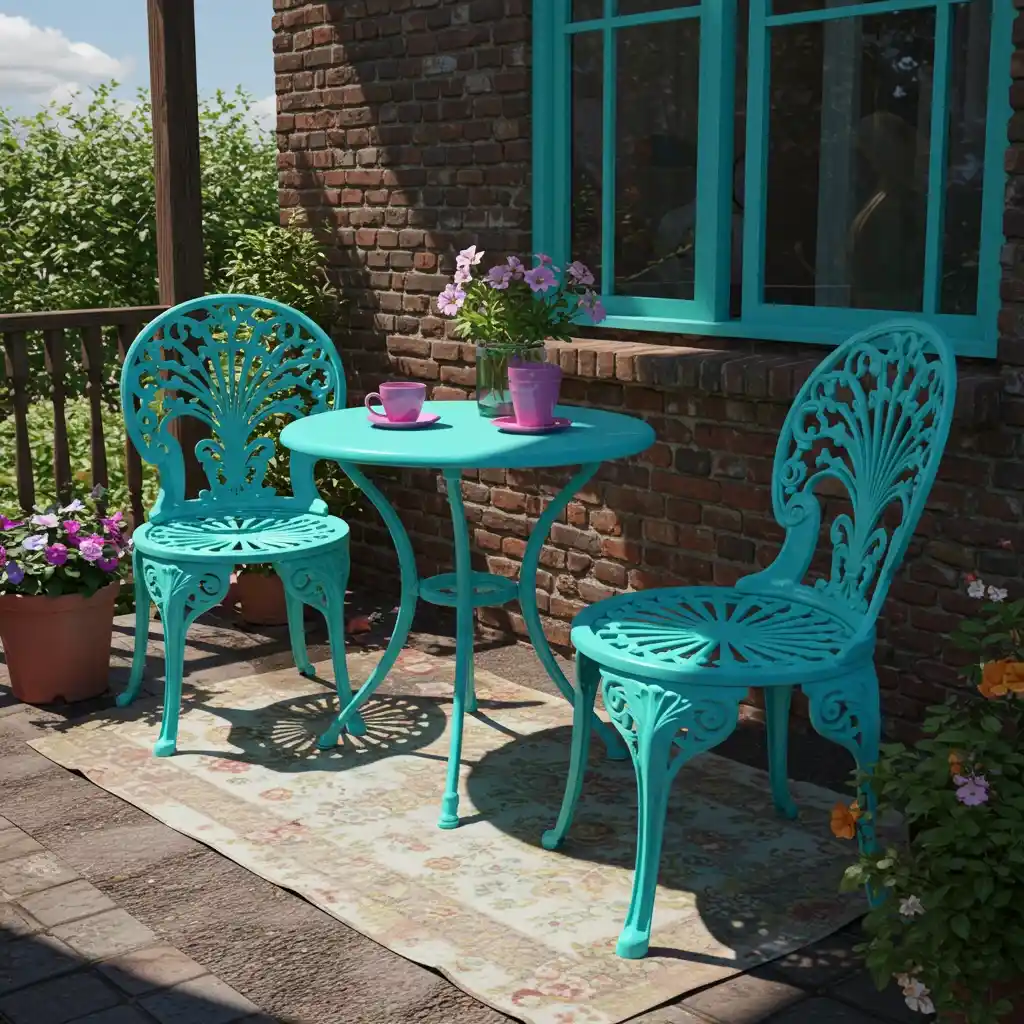
14. Make a Statement with Spray-Painted Furniture
One of the quickest and cheapest ways to completely transform the look of your backyard is with a can of spray paint. You can find old, mismatched, or faded outdoor furniture for next to nothing at thrift stores, flea markets, or on online marketplaces.
A quick coat of a fresh, modern spray paint can unify a collection of different pieces and make them look brand new and incredibly stylish.
Don’t be afraid to go bold with your color choices! A set of old, metal bistro chairs painted a vibrant, sunny yellow or a classic Adirondack chair painted a deep, glossy navy blue can become a stunning focal point in your yard. I always tell my clients that paint is the most powerful and affordable tool in their design arsenal.
- Find Your Pieces: Look for furniture with a good, solid shape, even if the finish is bad.
- Prep is Key: Clean the furniture thoroughly and sand it lightly to help the paint adhere. Use a primer if you’re making a drastic color change.
- Choose the Right Paint: Make sure you use a spray paint that is specifically designed for outdoor use and is suitable for the material you are painting (metal, wood, or plastic).
- Apply in Light Coats: Several thin, even coats are much better than one thick, drippy coat.
For a professional-looking enhancement, after your paint is completely dry, apply a coat of a clear, protective sealant. This will protect your new paint job from chipping and fading and will give it a more durable, long-lasting finish.
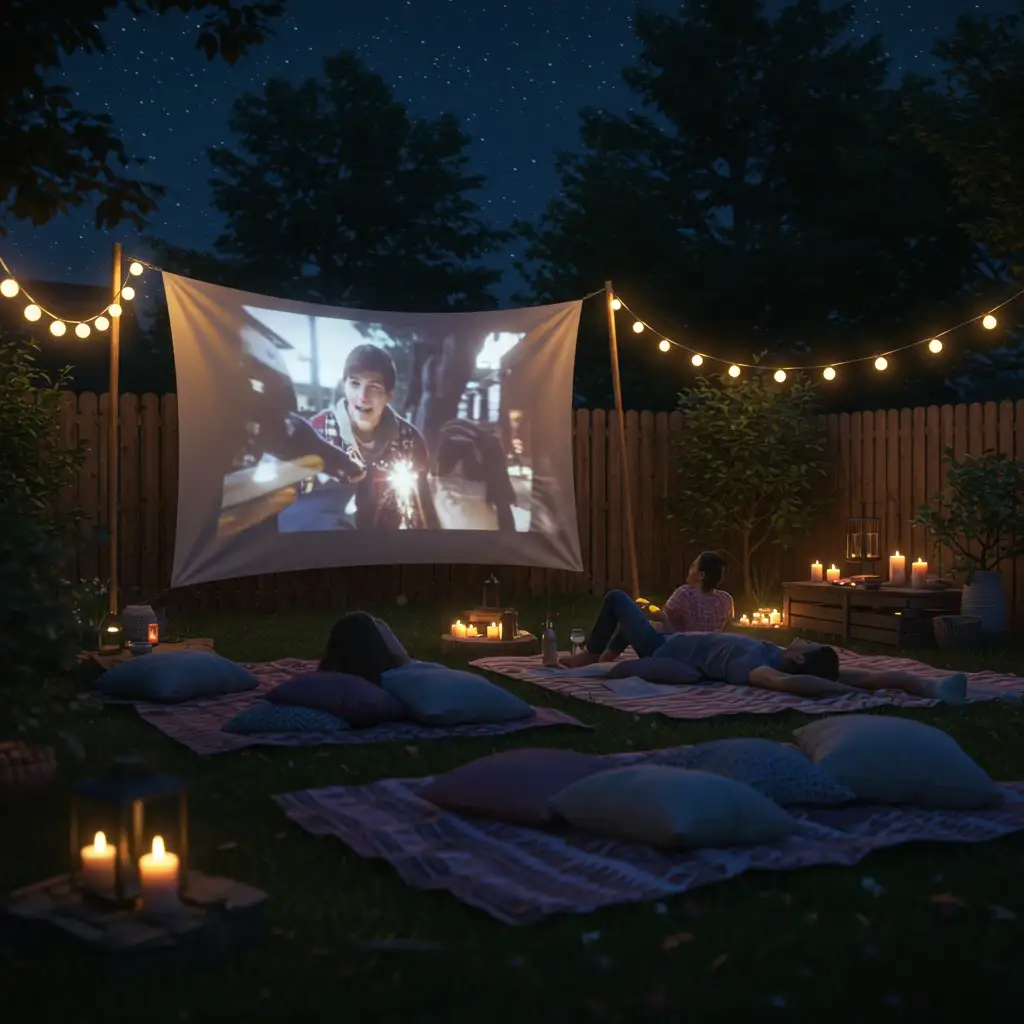
15. Build a Simple Outdoor Movie Screen
Host unforgettable movie nights in your own backyard with a simple, DIY outdoor movie screen. This is a wonderfully creative and cheap way to create a unique entertainment experience for your family and friends. You don’t need to buy an expensive, inflatable screen. A simple, large, smooth surface is all you need.
The easiest method is to simply hang a large, white, king-sized flat sheet, pulled taut to avoid wrinkles. You can hang it from a clothesline, a fence, or between two trees.
For a more permanent solution, you can build a simple wooden frame and stretch a piece of blackout cloth (available at fabric stores) across it. All you need is a simple, affordable projector, and you have your own private, outdoor cinema.
- The Screen: A taut, white flat sheet or a piece of white blackout cloth.
- The Projector: Many small, portable, and affordable projectors are available online.
- The Seating: A collection of blankets, outdoor pillows, and low-slung beach chairs.
For the ultimate enhancement, create a “concession stand” on a small table nearby. Fill bowls with popcorn, candy, and drinks to complete the authentic movie-going experience.
Conclusion
Creating a beautiful and inviting backyard doesn’t have to be a costly endeavor. As we’ve explored through these 15+ creative cheap backyard ideas, the most charming and personal spaces are often born from resourcefulness, a willingness to get your hands dirty, and a little bit of imagination. By upcycling materials, embracing DIY projects, and making smart, budget-friendly choices, you can create a stunning outdoor oasis that is rich in style and personality. The greatest reward is the satisfaction of knowing you’ve built a beautiful retreat with your own two hands.