Are you looking for the best pantry organization ideas to transform your most chaotic cupboard into a model of efficiency and style? The pantry is the hardworking heart of the kitchen, but it can quickly descend into a jumbled mess of half-empty boxes, hidden cans, and forgotten ingredients. A well-organized pantry, however, is a game-changer. It not only saves you time and money by letting you see exactly what you have, but it also brings a sense of calm and order to your entire home.
This guide provides an ultimate list of 50 ideas from foundational editing and zoning to the magic of containers and labeling to help you create the perfectly organized pantry of your dreams.
Phase 1: The Edit & Preparation
1. Start with a Full “Edit”
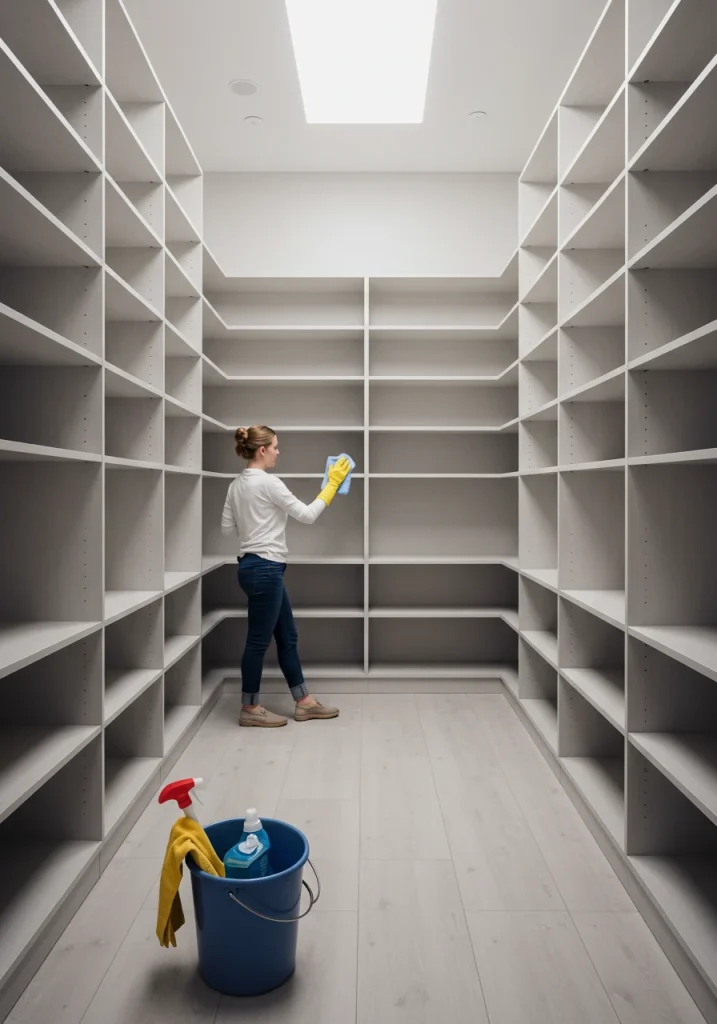
Before any organizing can begin, you must start with a complete “edit.” This means taking every single item out of your pantry. Every can, every box, every bag. This allows you to see the true volume of what you have and assess the space as a blank canvas. It’s the most crucial first step.
2. Clean and Prepare Your Empty Space
With everything out, give your pantry a deep clean. Wipe down all the shelves, clean the walls, and sweep or vacuum the floor. This is also the perfect time to add a fresh coat of paint for a brighter look or install new shelf liners. Starting with a pristine space is motivating and ensures your newly organized pantry is as clean as it is tidy.
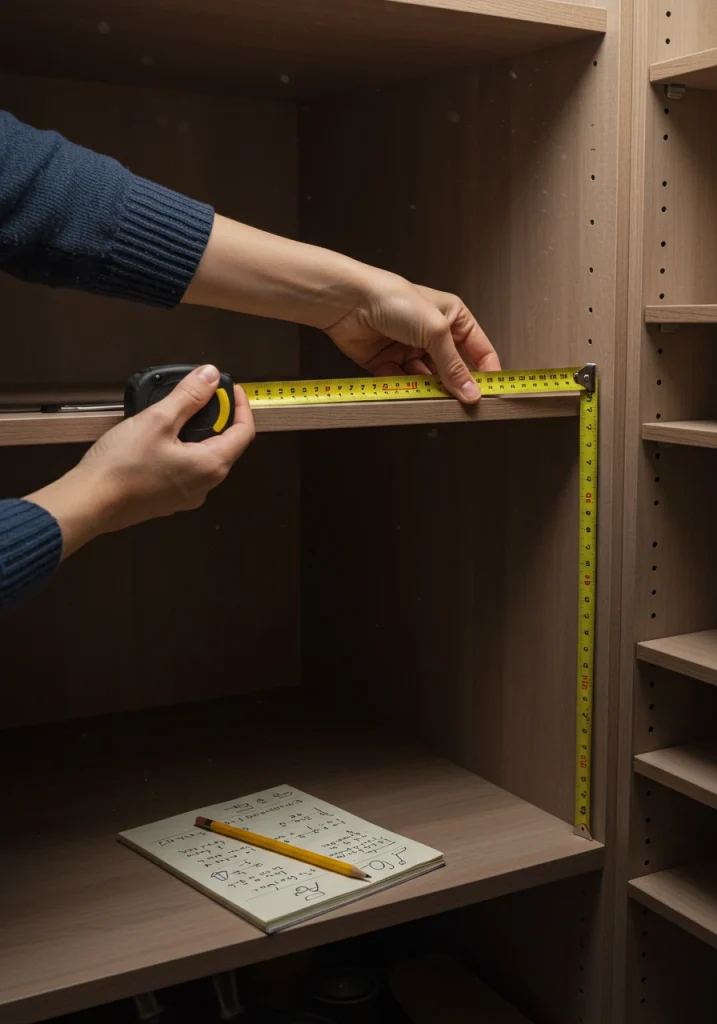
3. Measure Everything Before You Buy
This is a pro tip that saves time and money: before you buy a single bin or container, measure your pantry. Measure the depth, width, and height of each shelf. Take a tape measure with you to the store or have your measurements handy when shopping online. This ensures that every container you buy will fit perfectly and maximize your space.
4. Upgrade Your Shelving
If your pantry has inefficient wire shelving where items wobble or fall through, consider an upgrade. Solid shelving made of wood or melamine provides a stable, continuous surface. Adjustable shelving is even better, as it allows you to customize the height of each shelf to perfectly fit your items and eliminate wasted vertical space.
5. Add Shelf Liners
For a polished look and to protect your shelves from spills and scratches, add shelf liners. They are easy to cut to size and install. Choose a simple, neutral liner for a clean look, or opt for one with a subtle pattern to add a touch of hidden style every time you reach for an item. This small detail makes a pantry feel more finished.
Phase 2: Zoning & Categorizing
6. Create Broad Categories
As you sort through your items, group them into broad, intuitive categories. This is the foundation of your organizational system. Typical categories include: Breakfast (cereal, oats, coffee), Dinner (pasta, rice, sauces), Baking (flour, sugar, sprinkles), Snacks, Canned Goods, Beverages, and Spices.
7. Establish Specific Zones on Shelves
Once you have your categories, assign a specific “zone” for each one on your pantry shelves. Dedicate a shelf for baking, a section for canned goods, a corner for breakfast items. This creates a mental map of your pantry, so you and your family always know exactly where to find things and where to put them away.
8. Designate a “Back Stock” Area
To avoid clutter and duplicate purchases, designate a specific area—usually a higher or lower shelf—for “back stock.” This is where you keep unopened, extra items. When you use up the last of your pasta from your “Dinner Zone,” you “shop” from your back stock area to replenish it, and then add the item to your grocery list.
9. Create a Kid-Friendly Snack Zone
If you have children, create a dedicated “snack zone” on a low, easily accessible shelf. Use open, clear bins to store pre-portioned, parent-approved snacks like granola bars, fruit snacks, and small bags of crackers. This empowers kids to get their own snacks and helps you keep track of what’s available.
10. Implement a “First In, First Out” (FIFO) System
To reduce food waste, implement a simple FIFO system, especially for canned goods and boxed items. When you buy new items, place them at the back of the shelf and pull the older items to the front. This ensures you are always using up the oldest products before they expire.
11. Group “Like with Like”
This is a fundamental rule of organizing, made famous by Marie Kondo. Within your broad categories, get more specific and group identical or very similar items together. All your different types of pasta should be together, all your oils and vinegars should be together, all your breakfast cereals should be together. This makes it incredibly easy to see exactly what you have.
12. Create a Dedicated Baking Zone
If you’re an avid baker, create a dedicated baking zone. On one or two shelves, group everything you need for baking: flour, sugar, baking soda, vanilla extract, sprinkles, chocolate chips, and mixing bowls. Using a collection of clear, airtight containers for your dry goods is key to this zone.

Phase 3: The Power of Containers
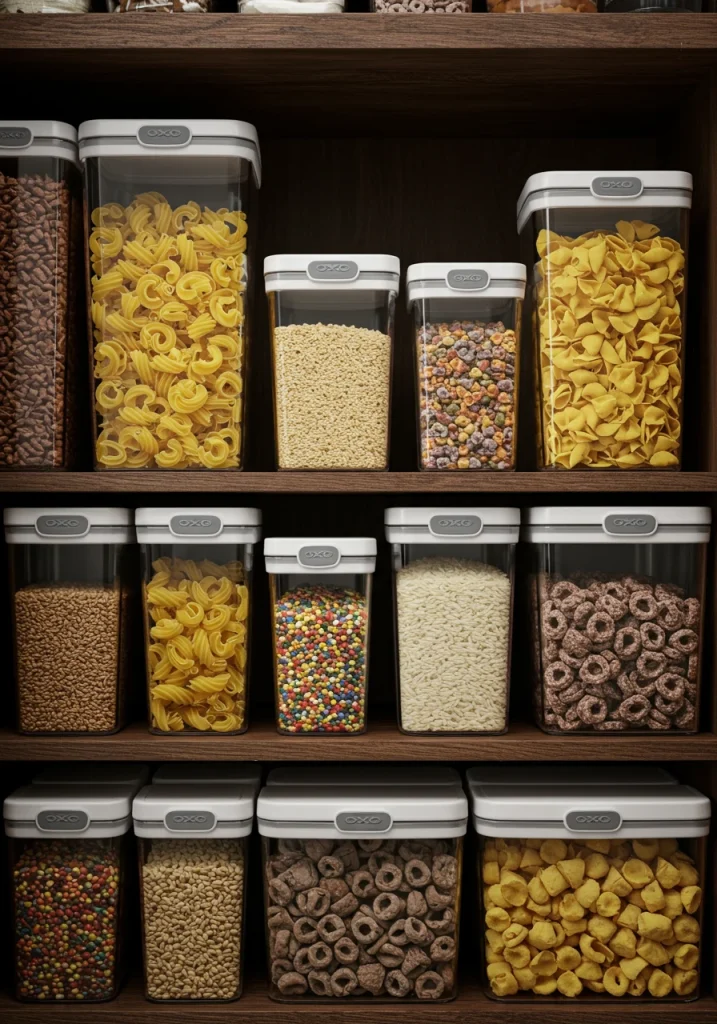
13. Decant Dry Goods into Clear, Airtight Containers
This is the number one secret to a beautiful, organized, and functional pantry, as championed by The Home Edit. Decanting dry goods (like flour, sugar, pasta, cereal, and rice) from their messy, bulky packaging into clear, airtight containers is a game-changer. It keeps your food fresher for longer, allows you to see exactly how much you have left at a glance, and creates a stunningly uniform and cohesive look.
14. Use Baskets and Bins for Grouped Items
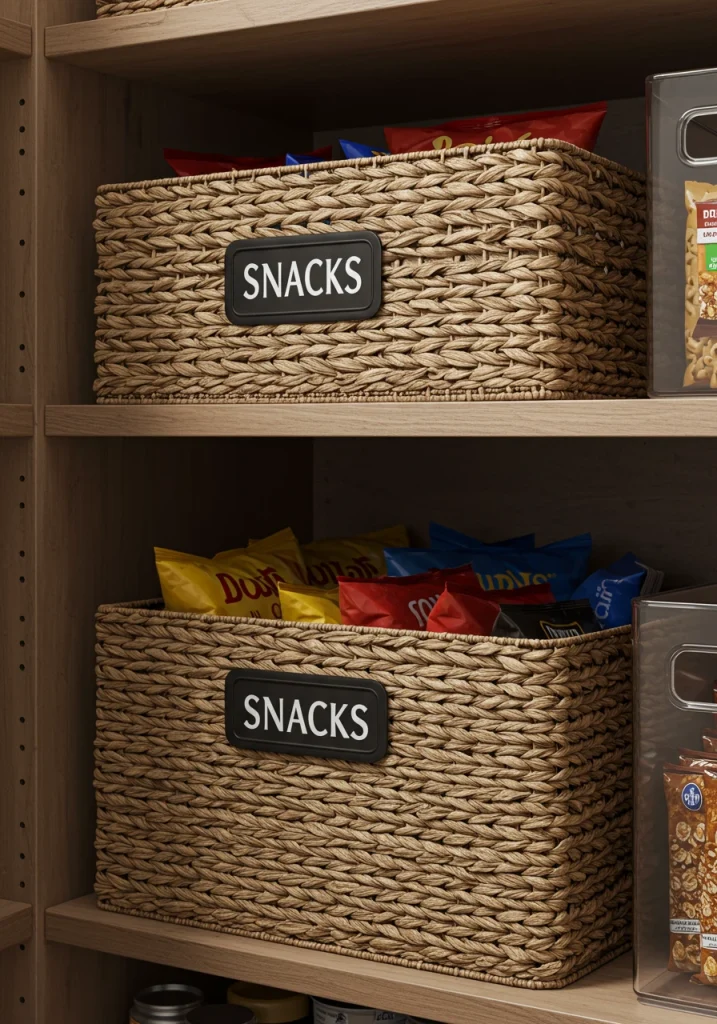
For items that don’t decant well or for loose packets and bags (like bags of chips, seasoning packets, or small bags of nuts), use baskets and bins to keep them contained. A beautiful basket can hide a multitude of visually cluttered items. Choose opaque baskets to hide messy-looking bags, and clear bins for items you want to be able to see easily.
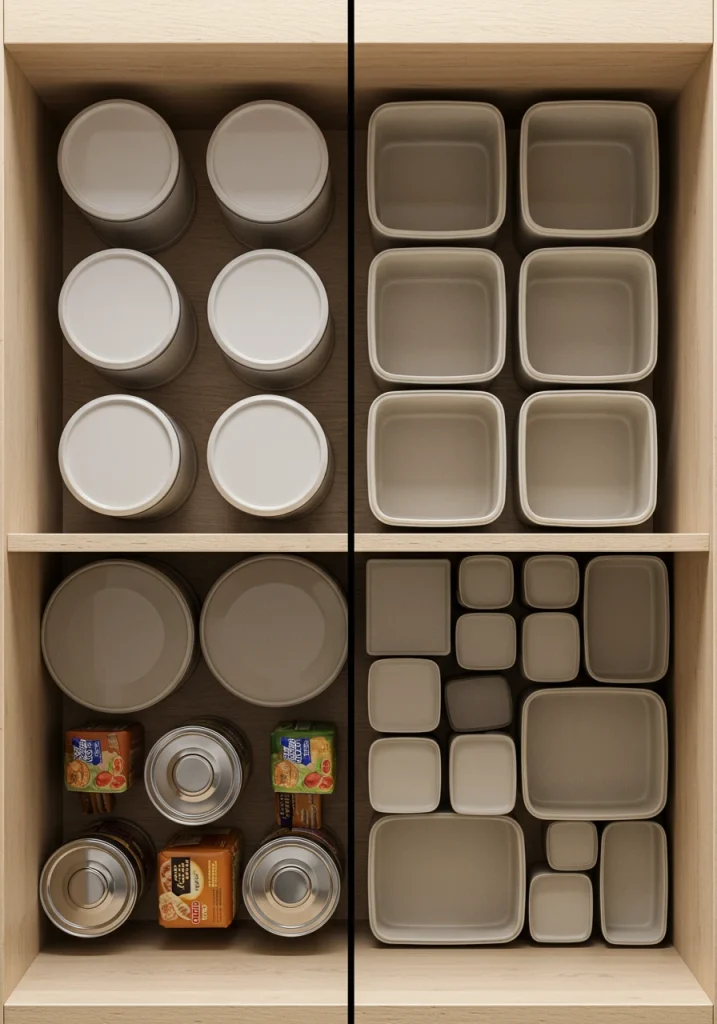
15. Opt for Square or Rectangular Containers
When choosing your containers, always opt for square or rectangular shapes over round ones. This might seem like a small detail, but it makes a huge difference. Round containers waste a significant amount of space on a shelf because of the gaps they leave between them. Square and rectangular containers fit together perfectly, with no wasted space, allowing you to maximize every single inch of your precious shelf space.
16. Use Turntables (Lazy Susans) for Corners
Pantry corners are notorious “dead zones” where items get lost and forgotten in the back. The perfect solution for a corner shelf is a turntable, or a Lazy Susan. This simple, rotating tray allows you to easily access everything on the shelf with a simple spin. It’s the ultimate tool for making a deep or awkward corner completely functional. I always use them for oils, vinegars, jars of condiments, and spices.

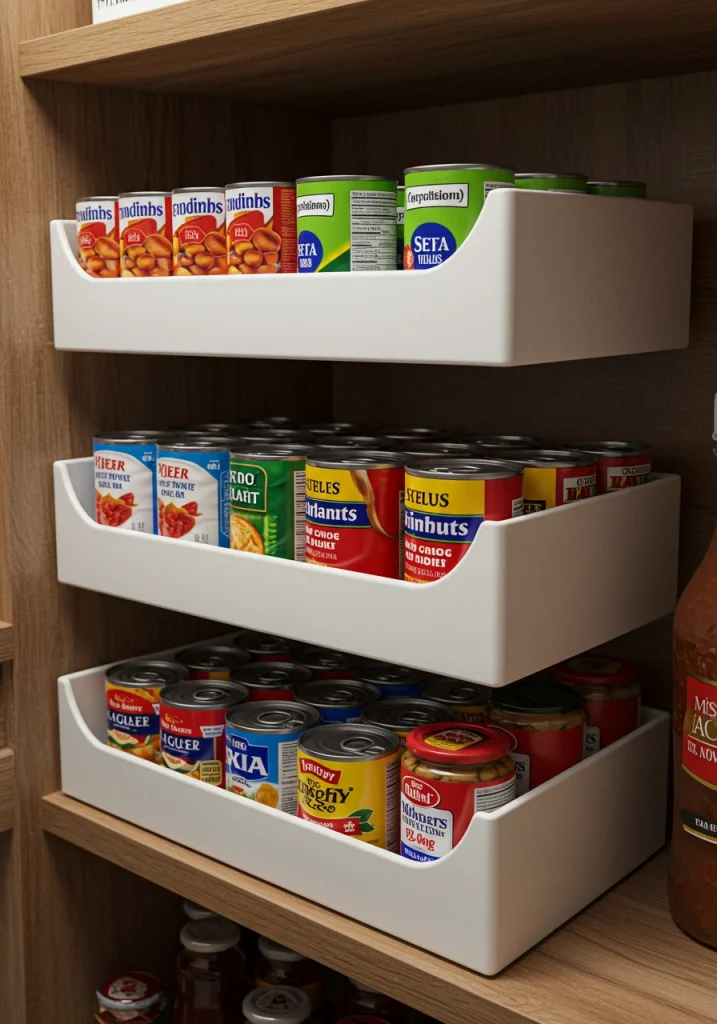
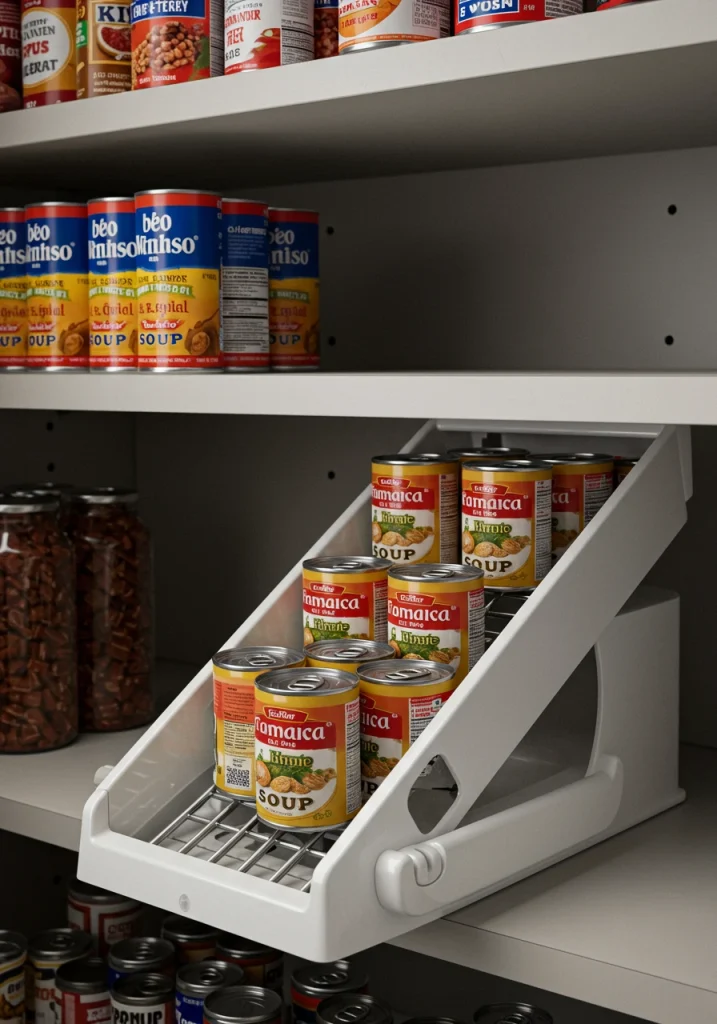
17. Incorporate Tiered Shelves for Cans
Canned goods can quickly become a disorganized jumble where you can’t see what you have in the back rows. A tiered, or stadium-style, shelf is a simple and inexpensive organizer that solves this problem instantly. It elevates the cans in the back rows so that you can see every single label at a glance. You’ll never have to knock over a whole row of cans to find the one you’re looking for again.
18. Use Clear Bins for Fridge-like Visibility
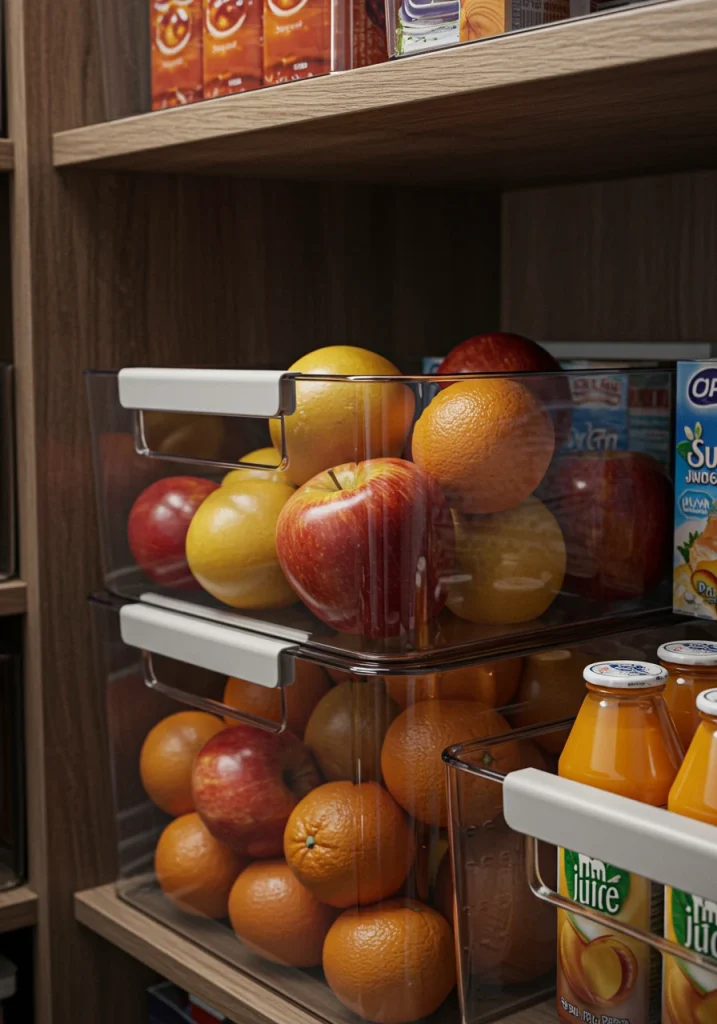
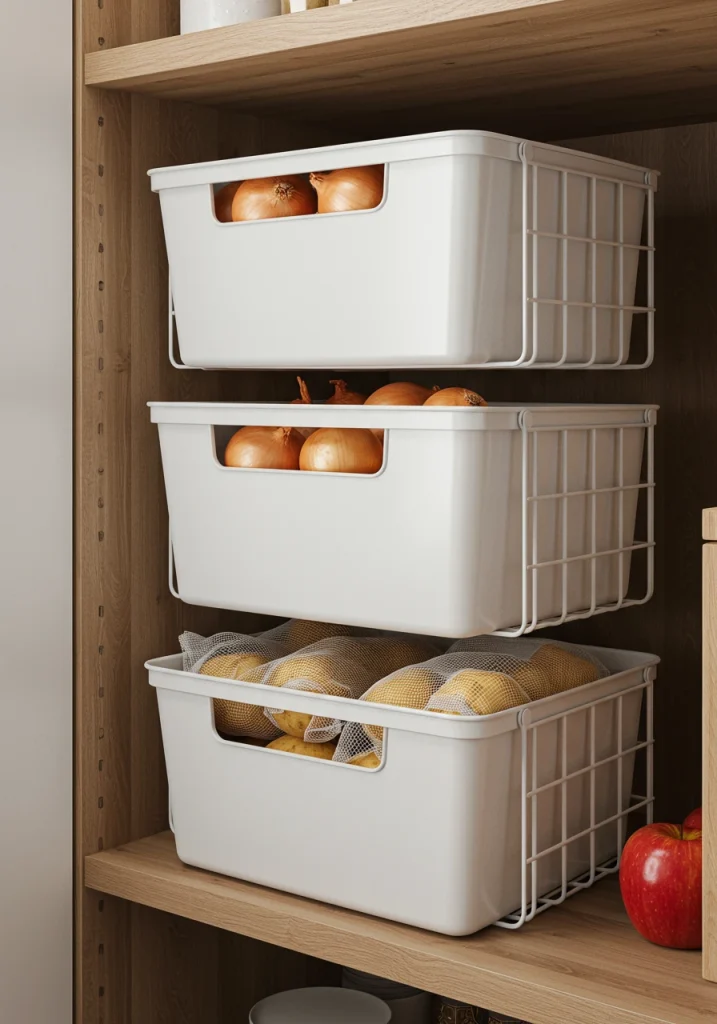
For items like produce (potatoes, onions), drink boxes, or collections of small jars, use clear, open-topped bins. This is a strategy borrowed from refrigerator organization that works wonders in a pantry. The clear plastic allows you to see exactly what’s inside from a distance, and the bin acts like a drawer, allowing you to easily pull the whole category out to find what you need.
19. Add Can Risers
Can risers, similar to tiered shelves, are another great tool for canned good organization. These are typically spring-loaded dispensers that you load from the back, and they automatically roll the next can to the front as you take one. This is a fantastic way to automate your “First In, First Out” (FIFO) system, ensuring you are always using your oldest cans first.
20. Use Undershelf Baskets
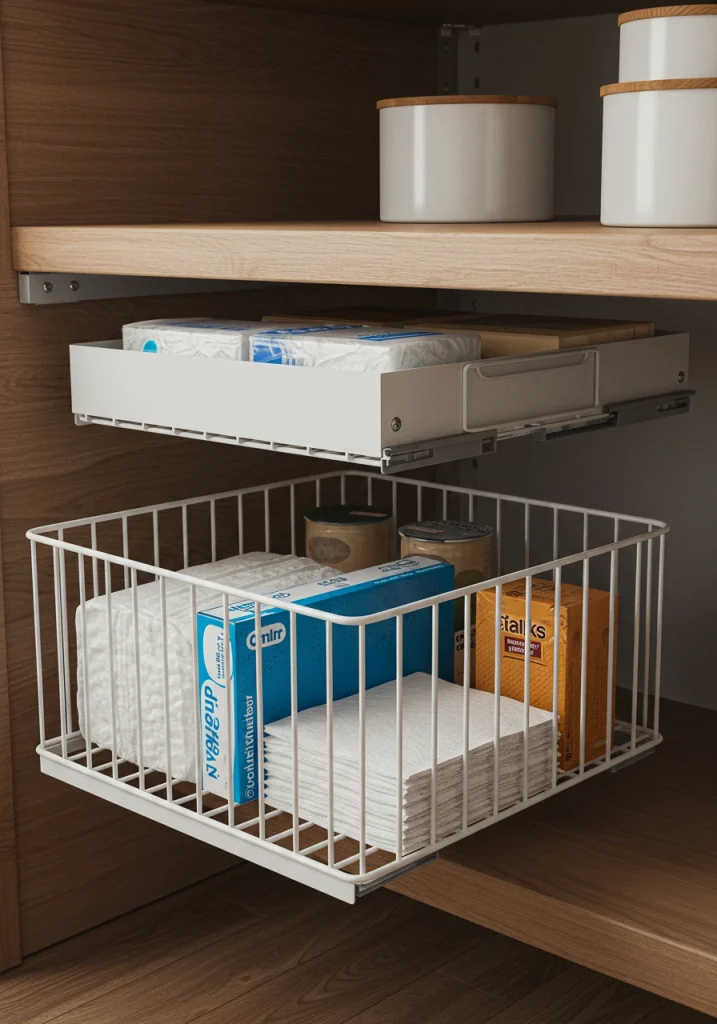
To take advantage of the often-wasted, empty air space under a shelf, use a simple, slide-on, undershelf basket. These wire baskets are a brilliant way to add a whole new layer of storage without any installation. They are perfect for storing small, flat items like boxes of aluminum foil and plastic wrap, napkins, or small bags of snacks.
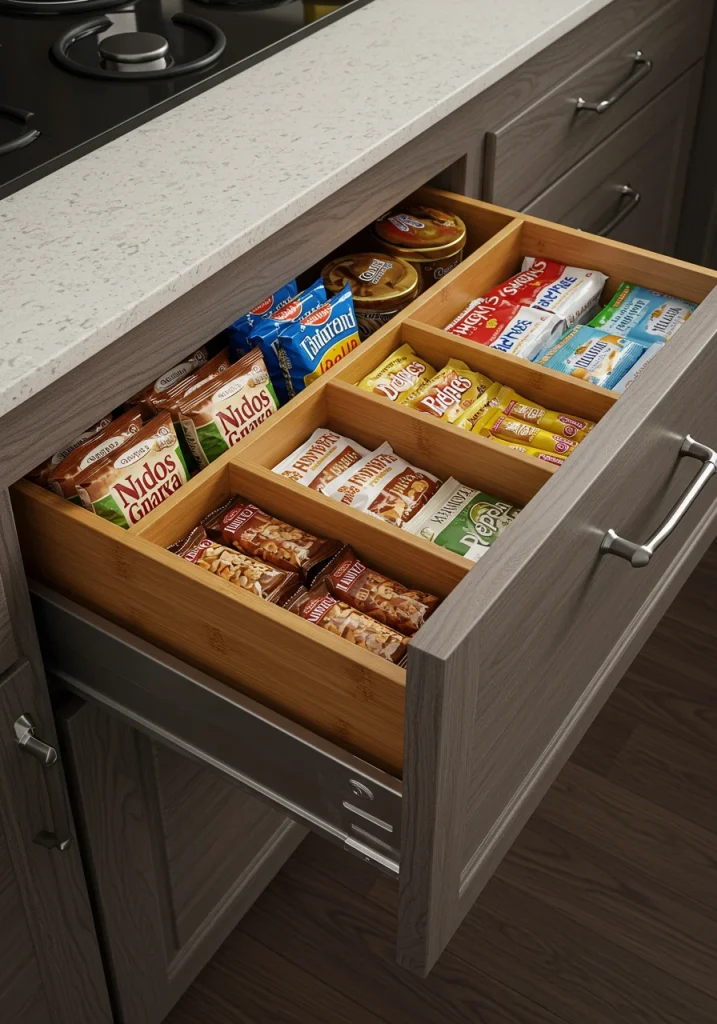
21. Incorporate Drawer Dividers
If your pantry has drawers, don’t let them become a jumbled “junk drawer.” Use simple, adjustable drawer dividers to create neat, designated compartments for your items. This is a perfect way to organize small, loose items like snack bars, seasoning packets, tea bags, or small kitchen gadgets.
22. Use Stacking Bins
For produce that needs good air circulation, like potatoes, onions, and garlic, or for storing a large collection of kids’ snacks, stacking, open-fronted bins are a fantastic, space-saving solution. These bins are designed to stack securely on top of each other while still allowing you to easily access the contents of each bin through the open front.
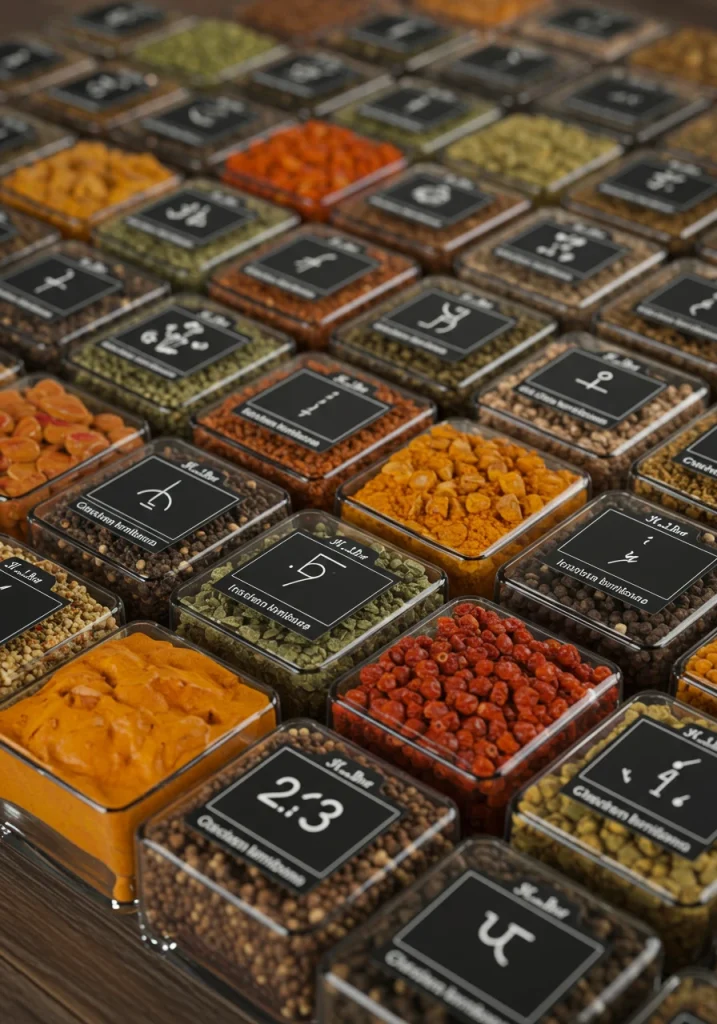
23. Decant Spices into Uniform Jars
A jumble of different-sized, mismatched spice jars is a major source of visual clutter in a pantry. For a truly beautiful and organized look, decant all of your spices into a set of small, uniform, glass jars. This will create a stunningly cohesive and satisfying look, and it will also make it much easier to see all of your spices at a glance.
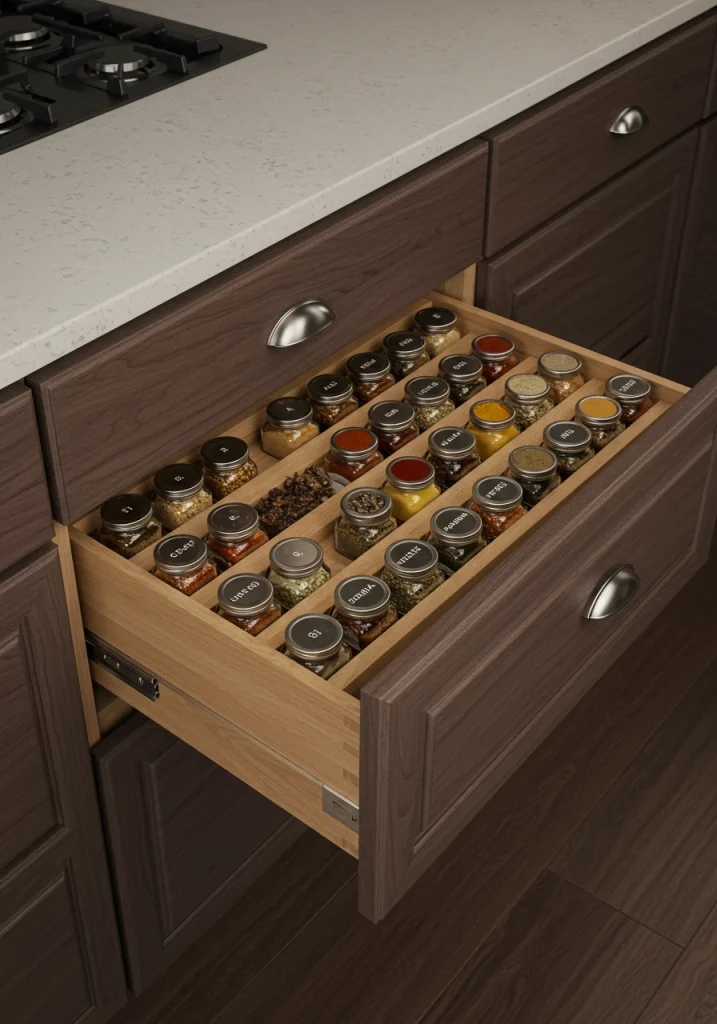
24. Use a Spice Rack or Drawer Insert
Once your spices are in their beautiful, uniform jars, you need an organized way to store them. Depending on your pantry’s layout, there are several great options. A tiered, stadium-style spice rack is great for a shelf. A pull-out, vertical spice rack is perfect for a narrow cabinet. Or, if you have a drawer, a slanted, drawer insert is a fantastic way to lay your spices down so you can see every single label.
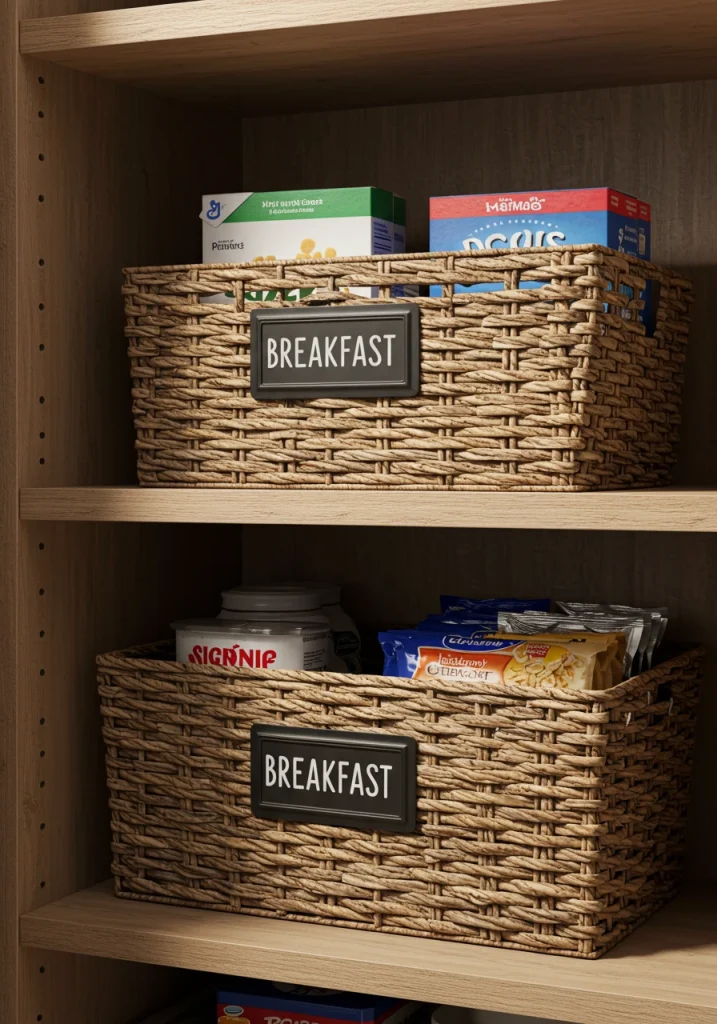
25. Create a “Grab-and-Go” Breakfast Bin
To make busy mornings run more smoothly, create a single “grab-and-go” breakfast bin. In one, open-topped basket or bin, place all of your non-refrigerated breakfast essentials. This could include single-serving boxes of cereal, packets of instant oatmeal, breakfast bars, and jars of peanut butter or jam. The whole family can then just grab the single bin in the morning to easily access everything they need.